Aerial photograph interpretation (geology)
Aerial photograph interpretation is a method of extrapolating geological details of the ground surface from aerial images.[1] It allows geologists to analyze the distinguishing geological features and structures, plant cover, past history of the site, soil properties, and topography of the study area.[1][2] It is crucial in the early stage of a geological mapping as it is less time-consuming and offers important data at a minimal price.[1] It is also commonly used in other industries such as forest management, environmental science, disciplines of engineering, and investigating aviation accidents.[1][3][4]

Aerial photograph interpretation is also useful to assess the risk of landslides and other dangers in the natural environment in the geotechnical industry.[5] As proper interpretation of aerial photos can reveal historical changes of the topography and the details of previous landslides, it can be help determine whether an area is stable or not.[5][4] Geologists can further utilize the interpretations to design the most favorable locations for field studies and the acquisition of data.[5]
Types of aerial photographs
Vertical aerial photographs
Vertical aerial photographs represent more than 95% of all captured aerial images.[1] Geologists use these photographs to study the geological details of the rock outcrop.[1] The principles of capturing vertical photographs are shown in Figure 2.[2][6] Two major axes which originate from the camera lens are included.[2] One is the vertical axis which is always at 90° to the study area.[2] Another one is the camera axis which changes with the angle of the camera.[2] To capture a vertical aerial photograph, both of these axes must be in the same position.[2] The vertical pictures are captured by the camera which is above the object being photographed without any tilting or deviation of the camera axis.[7] Areas in a vertical aerial photograph often have a consistent size.[6]

Oblique aerial photographs
Oblique aerial photographs are captured when the cameras are set at specific angles to the land.[7] It is a very helpful enhancement or addition to the traditional vertical image.[1] It allows the vision to pass through a relatively high proportion of the plant cover and leaves of trees.[1] Oblique aerial photographs can be classified into two types.
Low oblique
Low oblique aerial photographs are generated when the camera axis has a 15–30° angle difference from the vertical axis, shown in figure 3.[2] The horizon, the dividing border between planet and atmosphere from a viewing angle,[8] is unobservable in a low oblique aerial photograph.[7] The length between two points is unable to be calculated and is not accurate because a low oblique image does not have a scale. The orientation of objects is also inaccurate.[7] Low oblique photographs can be used as a reference before site investigation because they give updated details of local places.[2][6]

High oblique
High oblique aerial photographs are generated when the camera axis has a 60° angle difference from the vertical axis, shown in figure 4.[2] In this case, the horizon is observable.[7] This type of photograph captures a fairly sizable region.[7] As in a low oblique photograph, the length between two points and the orientation of objects are inaccurate.[7] High oblique aerial photographs are widely used in assisting field investigation because the line of sight shown is more similar to humans.[2] Features and structures can be easily recognized.[6] However, landscapes, buildings and hillslopes that are blocked by the mountainous areas are not visible.[6]

Color of aerial photographs
Black and white
Black and white aerial photographs are frequently used for drawing maps, such as topographic maps.[7] Topographic maps are precise, in-depth descriptions of the terrain characteristics found in the areas or regions.[9] Black and white aerial photography is capable of producing good-quality images under poor weather conditions, such as foggy and misty air.[1]
Color
Color aerial photographs preserve and capture the colors of the original objects through the numerous layers inside the film.[10] Color photographs can be used to distinguish different kinds of soils, rocks, and deposits that are located above the rock layers, and some contaminated water sources.[7] The degradation of trees driven by the insects can also be identified using color aerial photos.[7] It can assist in locating storage of materials in the natural environment, such as trees, wild animals and oil.[6]
Color infrared
Color infrared aerial photographs are captured using false color film which changes the original color of different features into "false color".[1][7] For example, grasslands and forests which are green in nature have a red color.[1] But some artificial objects which are covered in green may have a blue color.[1] This phenomenon is due to the fact that plants reflect more infrared radiation (IR) than man-made objects.[1] Dense vegetation cover may give a more intense red color than that of sparse vegetation cover. This helps in determining whether the trees are healthy or not.[7] It also gives evidence for the growth rate of plants.[7] It is helpful when identifying the boundary between land and ocean or lakes because the ocean does not reflect the IR.[1]
Altitudes of aerial photographs
High-altitude
High-altitude aerial photographs are taken when the plane is flying in the altitude range of 10,000 to 25,000 feet.[1] The advantage of high-altitude aerial photography is that it can record the information of a larger area by taking one photograph only.[7] However, high-altitude photographs cannot show as many details as low-altitude photographs since some objects, such as buildings, roads, and infrastructures, are of a very tiny in size in the image.[7]
Low-altitude
Low-altitude aerial photographs are taken when the plane is flying at an altitude of less than 10,000 feet.[1] The objects in the photograph are of a larger in size and contain more details compared with those in high-altitude photographs.[7] Due to this advantage, a routine collection of low-altitude photographs has been conducted every six months since 1985.[1]
Scale of aerial photographs
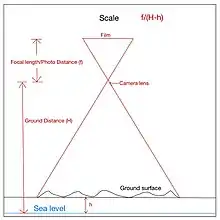
The scale of aerial photography is the value calculated when the elevation difference between the photo film and the camera lens is divided by the difference between the camera lens and the terrain surface.[6] It can also be measured by dividing the measured length of two locations in the photo by the length of those locations in reality.[6][2] In figure 5, several related terms and symbols are shown. Focal length (f) refers to the elevation difference between the film and the lens.[1][6] H is the elevation difference between the lens and the sea level, which is the average level of the water surface.[1][6] h is the elevation difference between the terrain surface and the sea level.[1][6] S is the scale of aerial photographs.[1][6] is the formula for scale measurement.[1][6] This measurement controls the amount and types of buildings observed in the photographs, the occurrence of some specific characteristics, and the certainty of the measurements.[2] For example, a large-scale photograph usually gives a more accurate measurement of distance compared with a small-scale photograph. 1:6000 to 1:10000 is the best range of scale for landslip research and geological mapping for ground assessment.[1]

Large-scale aerial photographs
Large-scale aerial photographs are those taken at a scale of 1:500 to 1:1000.[4] This type of photograph is best suited for local site investigations.[4] It looks like a zoomed-in map.
Small-scale aerial photographs
Small-scale aerial photographs are those taken at a scale of 1:5000 to 1:20000.[4] It is more suitable for provincial or large area research.[4]
Elements of aerial photographs
Aerial photograph interpretation is undertaken by looking at six elements. These are pattern, size, shape, shadow, tone and texture.
Pattern
The pattern of an aerial photograph refers to how the observed, recurring features are distributed spatially in a confined area.[1][6][7] The features can be made by humans or created by the environment.[6] It allows the interpreter to define the nature and function of the features or buildings.[7] Patterns that appear on the surface of rock give evidence of the characteristics and structures of the rock.[6] Farmlands or cultivated lands may have patterns of repeated, separated rectangles on aerial photographs.[1]
Size
Size refers to the dimensions of a feature compared to the surrounding environment.[1][7] It is a useful tool when estimating an unidentified feature in an image.[6] This is because comparing the size of that feature to the other known objects, e.g., stadiums, highways, and public estates, helps geologists exclude other possibilities.[6][1]
Shape
Shape is the geometry of a feature.[1][7] It provides essential evidence to determine the nature of a feature.[1] Anthropogenic activities usually show repeated, identical shapes of objects.[7]
Shadow
Shadow refers to the dim areas adjacent to buildings or features which are generated by the solar rays and the position of the Sun.[1] Estimations of other elements, such as the outline and dimension of features, can be supported by the shadow element.[1][6] It can be used for the analysis of some small village houses.[6] By analyzing shadow, geologists can gain preliminary estimates of the position, elevation and form of a building.[7] Figure 6 shows how the shadow of a short building differs from that of a tall building.[7] Some features of interest may be blocked by the shadow(s) in an image.[1]

Tone
Tone refers to the light intensity and color.[1][6][7] It provides the basis for interpreting B&W aerial photographs.[6] The light intensity is related to the solar reflectance of the buildings or materials inside the covered area.[6] Solar reflectance is the capability of an object to return the incoming sunlight back to the air.[11] Different materials give different tones. Tone provides assistance on geological mapping of the characteristics of rocks and minerals on outcrop.[6] It is closely related to the sun's position and amount of the solar energy.[1]
Texture
Texture refers to a specific spatial distribution of different degrees of tones on a surface.[1] It also describes how the features are arranged.[7] It indicates whether the surface looks smooth or rugged in the aerial image.[1] Texture is closely related to tone. A surface that is free of irregularities will have a very light tone.[6] A surface that is full of irregularities will have a darker tone.[6] For example, the smooth texture of land with poor grass growth results in a lighter tone, while land with a high growth rate of grasses has a rough surface which results in a darker tone.[6] Aerial photographs with different scales will have different sizes of the components composing the surface texture.[1] A tree can be an element affecting a forest's texture in a small-scale image. When the scale of the image increases, the texture-affecting components may shift from trees to tiny leaves, with the target will changing from the forest to a single tree.[1]

Interpretating an aerial photograph
Details of an aerial photograph
An aerial photograph marks different data and information about the covered area and the airplane's position and condition.[1] These details are measured and noted by the data panel which includes different devices and instruments for the specific measurements.[1] Figure 8 shows the general format of a vertical aerial photograph.

Aerial photographs overlap
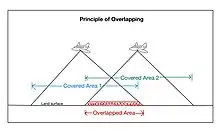
Overlapping of aerial photos means that around 60% of the covered area of every aerial image overlays that of the one before it.[1] Every object along the flying path can be observed twice at a minimum.[1] The purpose of overlapping the aerial photography is to generate the 3D topography or relief when using a stereoscope for interpretation.[1] The stereoscope is an instrument used to see the 3D overlapping aerial images.[1]
Reaching the requirements of the two chosen, overlapping images is simple. The principal points (central point of the image in geometry) of the two photos must be in different locations on the terrain.[1] Another restriction is that the scale of the images must be the same.[1] The flying routes of the planes and the time of day are not restricted.[1]
Aerial photo-geometry orientation
The preferred orientation of an aerial photograph is closely related to the position of the Sun and the shadow element.[1] In the Northern Hemisphere, the south direction is always the position of the sun.[1] Therefore, shadows are usually formed on the north side.[1] This then affects the shadow element in aerial photographs. For example, if the plane is flying from North to South, the sunlight is also coming North and the shadows that show the shapes of objects can be clearly observed in aerial photographs.[1] If the plane is flying from South to North, shadows will not be clearly observed.[1] For photo interpretation, it is preferred that the image is taken so that the shadows can be clearly observed[1] as shadows can highlight the relief of the topography.[1] This orientation of the image also helps geologists link the 3D pictures to what they observe.[1]

Displacement and distortion
Distortion and displacement are two common phenomena observed on an aerial photograph.
Displacement
Displacement is a result of varying topographic relief within a covered area.[6] A datum plane, which refers to the average sea level, is essential in the displacement phenomenon.[6] For a location which has an elevation higher than that of the datum plane, the original position will move away from the central point of the image.[6] For a location which has an elevation lower than that of the datum plane, the original position will move closer to the central point of the image.[6]

Distortion
Distortion refers to any change in an object's or region's location on an aerial photo that modifies its original features and shapes.[1] It usually appears near the picture's border.[1] There are two causes of distortion. The first one is the tilt and tip of a plane.[6] When the aircraft is rising or descending it produces a tip.[6] When the aircraft leans in a particular direction during the aerial survey, it produces a tilt.[6] The tilt axis is perpendicular to the tip axis.[6] The second reason is the processing of photographs.[6] This is a process used to modify the exposed photo film to generate an aerial photograph.[12] When the moistened film dries, it expands through one orientation and contracts through the other orientation.[6] Only a small amount of distortion is caused by this.[6]
Using a mirror stereoscope
- Choose two (2) aerial photos which are taken one after the other and make sure there is at least 60% superimposition.[1]
- Make sure they are placed in the same orientation and the northern part of the aerial photograph as well as the generated shadows should be placed towards the interpreter.[1]
- Make sure the distance between the pair of eyepieces, a lens used in the stereoscope for observation, fits the distance between the eyes.[1]
- Put both forefingers on the same, easily identified object in each of the photos.[1]
- Slowly drag the photos until the two objects are overlapped under the stereoscope.[1]
- The overlapped areas then appear 3D under the stereoscope.[1]
 Figure 12: An example of a mirror stereoscope.
Applications for aerial photographs
Landslide hazard assessment
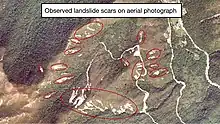
Aerial photographs play an important role in assessing the risk of different natural hazards, particularly landslides.[1] They can be used to determine whether hillslopes are stable or not.[1] They can also record the history of landslides experienced in that area.[1] For example, in an area with more than half of the ground surface constitutes natural terrain, which is the unmodified natural environment, there are more slopes.[1] The majority of naturally occurring landslides happen in isolated locations, posing a threat to ongoing development.[1] Aerial photographs can be used to find all current and historical landslides in and around the research region to gauge vulnerability to future landslides.[1]
A landslide scar refers to the local area disrupted by the landslide.[5] It comprises the starting point, also called the "source", the detached substances and a trail that describes the movement of a landslide.[5] Every landslide scar is noted, along with its position, size, and the estimated date of the event. For the current landslides, on the photograph, they can be recognized easily by the unique light-colored landslide scar.[1] Very few plants can be observed on the scar.[1] For historical or old landslides, they may be hidden by vegetation such as bushes and woody plants, but scars in the land are still present.[1] This type of landslide is recognized by a concave depression that appears on a major steep slope.[1] Depression is when a feature is lowered compared to its surroundings. It is important to take into account the age of historical landslides and assess their applicability to the present climate and environment.[5]

Determining geological structures and types of rock
Aerial photographs can be used to identify different rock types on the rock exposure and the arrangement of the geological structures.[1][5] These structures are produced by deformation processes during tectonic movement, such as faults and folds. Geologists identify different geological features and structures based on photo-lineament.[4][1] Photo-lineaments are lines that appear on the photos and are thought to be driven by geological factors.[1] Those identified photo-lineaments are aligned with the linear topographic landforms.[1] They can be referred to as joints, faults, dikes, or rock contacts.[1] Some faults may even occur along rivers and mountain valleys.[1]
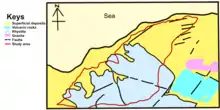
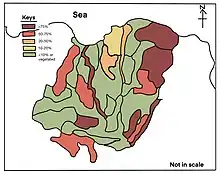
For example, in Hong Kong the two major rocks are granite (35%) and volcanic rock (50%).[1] Since granite is more easily weathered and eroded than volcanic rocks, it usually forms gullies, which are the valleys on a smaller scale, whereas volcanic rocks form the summit, which is the location with a higher elevation in the mountains.[5][1] Figure 14 shows a simplified sketch of the area on northern Lantau Island in Hong Kong.[1]
Another example of determining geological structures is a fold found in Wyoming in the United States.[13] A fold is developed when the rock layers are squeezed and curved by forces and do not break during the deformation.[14] It is an anticline which has the earliest-formed rock layers in the inner part and the youngest rock layer on the outer part of the fold.[15][16] The hinge line of this fold, which refers to a line tracing the maximum bend of the fold structure, is not a straight line.[16][13] The head and the tail of the hinge line dip downward from the original horizontal plane. It is an asymmetrical fold which means the axial plane is not in the upright orientation but inclined.[14] The axial plane is a hypothetical plane dividing two sides of the fold.[14] The limbs dip in opposite directions and are formed by tilted sedimentary rock layers.[13] Limbs belong to the straight sections on the two sides of a fold. Aerial photographs are helpful for geologists to observe large-scale geological structures without spending large amount of time in fields.


Boulder survey
Boulder surveys determine and categorize the areas of boulders using aerial photograph interpretation.[1] After the survey the properties (dimension, amount, form) of boulders are combined with the geological map. This helps detect dangers from the falling of these large rock pieces, especially when conducting new projects close to the hillsides.[1]
Dense forests may obstruct the view of boulders from aerial photographs, which is one of the limitations of using aerial photographs to conduct a boulder survey.[1] Therefore, old aerial photographs with less vegetation are usually more beneficial for boulder mapping. Hillslopes are often occupied by some small village houses which produce a shadow.[1] These factors may decrease the efficiency of the boulder survey whereas bare ground allows for typically good sight of the terrain.[1]
Geologists mark down the locations of the boulders on maps after making observations from aerial photographs to develop a sense of the possible boulder locations before going to the site. For example, from figure 17, it is observed that several boulders were settled on the hillslopes along the nearby footpaths. From the vertical view of the aerial photograph, the positions and relative dimensions of the boulders can be determined and measured easily. For an initial assessment of boulders on a wide and isolated landscape, conducting a boulder survey is necessary.[1]

Studying landforms
Aerial photographs can be used to help study, recognize, and classify landforms, which refers to the topographical characteristics created by the environmental systems.[1] They usually contain some distinct components and sets of features.[1] Certain fundamental spatial distributions of features are used to distinguish different landforms.[1] Differences in terrain surface elevation, river flow, colors of the aerial photographs, spatial distribution of tones, and the occurrence of plant covers are considered during landform studies.[1] Watersheds, which refer to the regions that separate drainage basins, are able to be defined using small-scale aerial photographs.[5] Landform studies also help identify decreases in surface elevation in natural terrain. and river courses[5]

Regolith mapping
Regolith Mapping helps distinguish different kinds of superficial deposits which refer to loosely arranged aggregates of weathered materials on the land surface.[1][17] Aerial photographs can be used to establish the borders between the fluvial and gravity-driven hillslope sediments.[1] These superficial deposits usually have indistinct borders.[1] Some examples of the deposits identified using regolith mapping are described below.
Valley colluvium
Valley colluvium refers to the loose, unconsolidated sediments that have been settled inside the water courses and are driven by river mechanisms.[1] They are thin in shape and extended into straight lines that follow the river channels.[1] The plants grown on the valley colluvium are thicker than the nearby areas.[1] Woody plants and large bushes dominate the vegetation.[1]
Debris fan colluvium
Debris fan colluvium refers to the aggregates of gravity-driven and fluvial deposits located near the hillslope's base or the eroded catchment area.[1] It looks like a shell from the vertical view and is cut by the flowing rivers.[1] In certain parts of the debris fan, there may be some woody plants covering the land surface.[1]

Agricultural terraces
Regolith mapping can also be used to determine disrupted natural landscapes on aerial photographs.[1] For example, agricultural terraces, which refer to the level land surfaces divided by short back slopes and concrete barriers, is one of the disrupted landscapes.[1] Back slopes refer to the slopes constructed by removing soil or rocks from hillslopes for nearby infrastructure. They were developed for the purpose of growing rice.[1] The terraces are usually found on gentle slopes and bottom areas of the mountains.[1] They are usually covered with thick vegetation when the terraces are abandoned, or the farming activities are no longer active.[1]

References
- Ho, H (2004). "Application of aerial photograph interpretation in geotechnical practice in Hong Kong (MSc thesis)". University of Hong Kong, Pokfulam, Hong Kong SAR. doi:10.5353/th_b4257758.
- National Counil of Educational Research and Training. (2006). Introduction To Aerial Photographs. In Practical Work In Geography (pp. 69–83). Publication Division by the Secretary. https://www.philoid.com/epub/ncert/11/214/
- Legislative Council of Hong Kong. (2011). Legislative Council Panel on Development, Procurement of One Set of Large Format Digital Aerial Camera System (CB(1)1648/10-11(01)). https://www.legco.gov.hk/yr10-11/english/panels/dev/papers/devcb1-1648-1-e.pdf
- Geotechnical Engineering Office, Civil Engineering and Development Department. (1987). Guide to Site Investigation (Geoguide 2) (pp. 1–352) https://www.cedd.gov.hk/filemanager/eng/content_108/eg2_20171218.pdf
- Ho, H., & Roberts, K. (2016). Guidelines for Natural Terrain Hazard Studies, Second Edition. Geotechnical Engineering Office, Civil Engineering and Development Department. https://www.cedd.gov.hk/filemanager/eng/content_293/er138links.pdf
- Crisco, W. (1988). Interpretation of Aerial Photographs. U.S. Department of the Interior, Bureau of Land Management.
- Imam, E. (2018). Aerial Photography and Photogrammetary.
- Salamone, M. A. (2017). Equality and Justice in Early Greek Cosmologies: The Paradigm of the "Line of the Horizon".
- Australia Government. (2014). What is a topographic map? Geoscience Australia.
- National Film and Sound Archive of Australia. (2018). COLOUR FILM. https://www.nfsa.gov.au/preservation/preservation-glossary/colour-film
- Casini, M. (2016). Smart buildings: Advanced materials and nanotechnology to improve energy-efficiency and environmental performance. Woodhead Publishing.
- Karlheinz Keller et al. "Photography" in Ullmann's Encyclopedia of Industrial Chemistry, 2005, Wiley-VCH, Weinheim. doi:10.1002/14356007.a20_001
- Lisle, R. J. (2003). Dupin's indicatrix: a tool for quantifying periclinal folds on maps. Geological magazine, 140(6), 721–726.
- Geological Folds. (26 December 2015). Geology Page. https://www.geologypage.com/2015/12/geological-folds.html
- De Paor, D. G., Dordevic, M. M., Karabinos, P., Tewksbury, B. J., & Whitmeyer, S. J. (2016). The fold analysis challenge: A virtual globe-based educational resource. Journal of Structural Geology, 85, 85–94.
- The National Park Service. (7 December 2021). Glossary of Geologic Terms. NPS.gov (U.S. National Park Service). Retrieved 5 November 2022, from https://www.nps.gov/subjects/geology/gri-glossary-of-geologic-terms.htm
- Hong Kong Geological Survey, Civil Engineering and Development Department. (2009). Weathering & Erosion – Introduction to Geomorphological Processes.https://hkss.cedd.gov.hk/hkss/eng/education/gs/eng/hkg/chapter4.htm?tab=2.