Lesson 10: Inserting and Deleting Cells
/en/excel2000/adjusting-column-width-and-row-height/content/
Introduction
By the end of this lesson, you should be able to:
Inserting cells
When working in an Excel worksheet, you may need to insert or delete cells without inserting or deleting entire rows or columns.
To insert cells:
- Select the range where new cells should be inserted.
- Right-click and select Insert.
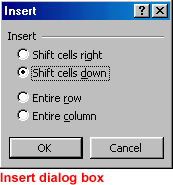
- The Insert dialog box opens and presents the following four choices:
- Shift cells right: The cells in the same row are shifted right.
- Shift cells down: Selected cells and all cells below them in the same column are shifted.
- Entire row: This inserts an entire row of cells.
- Entire column: This inserts an entire column.
- Choose an option, then click OK.
- Your result displays in the spreadsheet.
 You can also use the Insert and Delete dialog boxes to insert and delete columns and rows.

Deleting cells
To delete cells:
- Select one or more cells.
- To delete cell contents but leave the cell in place, press Delete.
OR
- Right-click and choose Delete.
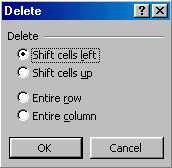
- The Delete dialog box opens and presents the following choices:
- Shift cells left: Cells in the same row are shifted right.
- Shift cells up: Selected cells and all cells below them in the same column are shifted.
- Entire row: This deletes an entire row of cells.
- Entire column: This deletes an entire column.
- Choose an option, then click OK.
- Your result displays in your spreadsheet.

Challenge!
Practice inserting and deleting cells using the Insert and Delete dialog boxes.
/en/excel2000/moving-and-copying-cell-contents/content/


![]() You can also use the Insert and Delete dialog boxes to insert and delete columns and rows.
You can also use the Insert and Delete dialog boxes to insert and delete columns and rows.
