Lesson 11: Adding AutoShapes, WordArt, and Hyperlinks
/en/powerpointxp/adding-charts-diagrams-and-tables/content/
Introduction
By the end of this lesson, you should be able to:
- Insert an AutoShape
- Insert WordArt
- Insert a hyperlink
Inserting an AutoShape
PowerPoint provides different that you can use to enhance your slides. For example, an AutoShape can be a useful graphical element. AutoShapes include lines, arrows, banners, stars, and other shapes you can add to your presentation.
To insert an AutoShape:
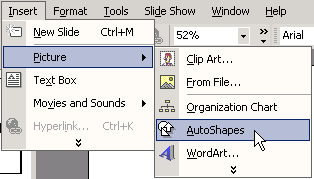
- Click Insert
 Pictures
 AutoShapes.
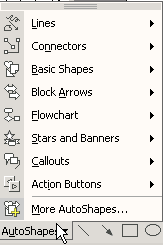
- A small AutoShapes toolbar appears.
- Click the various options, and a list of AutoShapes appears.
- Choose the one for your presentation.
- To format an AutoShape, right-click it and choose Format AutoShape.
- A dialog box appears with various formatting options.
OR
- Insert AutoShapes by clicking the Drawing toolbar at the bottom of the PowerPoint screen. A list of options appears.
 You can click and drag an AutoShape to increase its size, and you can add text by choosing Insert
 Text Box.
Inserting WordArt
WordArt is colorful and artful text that is available in a variety of styles. It allows you to create interesting titles, logos, and text in your PowerPoint presentation.
To insert Word Art:
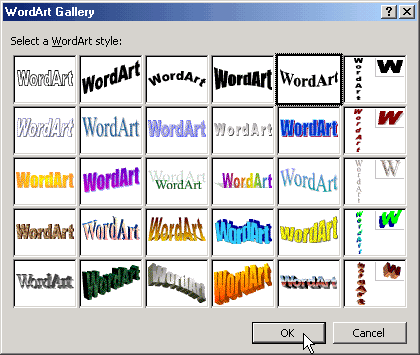
- Click the WordArt button on the Drawing toolbar.
- The WordArt Gallery appears.
- Choose the WordArt that best fits your slide presentation.
- Click OK.
- When the Edit WordArt Text dialog box appears, click Your Text Here to add text. Type the text for your slide. You can also make any formatting changes to your font.
- Click OK.
- The WordArt appears in your slide. You can drag it to where you want it to appear on your slide.
OR
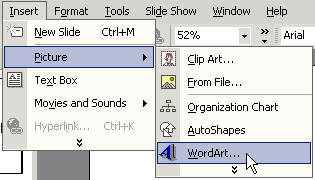
- Click Insert
 Pictures
 Word Art.
OR
- Click View
 Toolbars
 WordArt.
Inserting a hyperlink
PowerPoint also allows you to add hyperlinks to your slides to make them more interactive. A hyperlink can link to a website, which provides more information for your presentation.
To insert a hyperlink:
- Select the text in your document you want to be a hyperlink, such as www.gcflearnfree.org or Free Computer and Career Classes.
- Click the Hyperlink button on the Standard toolbar.
If this button does not show, you may want to add it to your toolbar by clicking the down-pointing arrow at the end of the bar to display Toolbar Options. Click Insert Hyperlink to add the button to your toolbar.
- Click the Existing File or Web Page button.
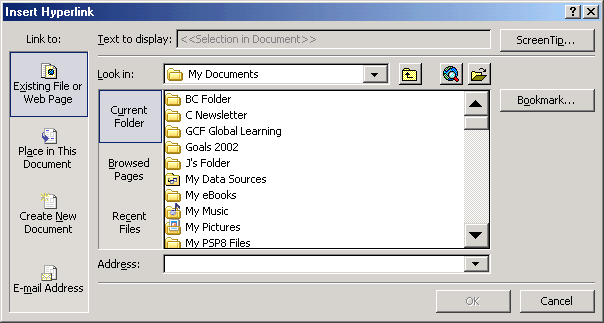
- Type any text you want to display, such as Free Computer and Career Classes. This type will display instead of the web address.
- Click OK.
 To make sure the hyperlink works, click the Slide Show button and click the link on the slide.
Challenge!
- Open the presentation titled Tips for Getting Organized.
- Insert a new slide that is blank.
- Insert clip art into the slide. Search for clip art by typing in the word thinking.
- Insert a callout AutoShape.
- Insert a text box into the AutoShape and make any changes to the format.
- Type the words I really need to get organized!
- Choose WordArt and type the words Organization saves time and money.
- Drag the WordArt so it appears at the bottom of the slide.
- Insert a hyperlink somewhere on the slide to www.gcflearnfree.org.
- Close and save your presentation.
/en/powerpointxp/animating-slides/content/


 Pictures
 AutoShapes.

 You can click and drag an AutoShape to increase its size, and you can add text by choosing Insert
 Text Box.
 Pictures
 Word Art.
 Toolbars
 WordArt.

 To make sure the hyperlink works, click the Slide Show button and click the link on the slide.