This article was co-authored by Daniel Vann. Daniel Vann is the Creative Director for Daredevil Cosmetics, a makeup studio in the Seattle Area. He has been working in the cosmetics industry for over 15 years and is currently a licensed aesthetician and makeup educator.
There are 11 references cited in this article, which can be found at the bottom of the page.
This article has been viewed 45,382 times.
Blush is a type of cosmetic that’s worn on the cheeks to redden and highlight the cheeks and give the face a youthful and healthy glow. Because faces come in different shapes and sizes, the best blush application techniques differ based on the shape of your face. For people with oval faces, there are many ways that you can apply blush, but the most flattering one will highlight the natural cheekbones.
Steps
Applying Blush the Right Way
-
1Pick the right brush. There are a number of different brushes you can use to apply blush, and the one you choose depends on the result you want to achieve. For instance, you won’t use the same brush to achieve a heavier and more noticeable blush job than if you want to go for a soft and natural look.
-
2Dip the brush into the blush. Swirl the tip of the brush around in the blush, then blow off the excess. When you have an oval face, the key to blush is a light and natural look that highlights the cheekbones.
- You can always apply more blush later if you want a bolder look, so start with a small amount.
Advertisement -
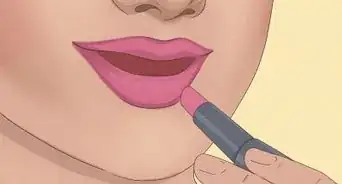
3Apply blush to the apple of your cheek. Hold the brush at the end to ensure that you only apply light pressure. Apply the blush to the apple of your cheek by making two circles with the brush.[3]
- The apple of your cheek is the round part of your cheeks that form when you smile. Smile at yourself in the mirror to locate your apples.
- Don’t smile when your applying the blush, otherwise you may accentuate wrinkles or apply blush to the wrong spot.
-
4Follow your upper cheekbone toward the temple. After you make the circles at your apples, continue with the brush to extend the line of blush along your cheekbones. Brush the blush onto your cheekbones at an angle, connecting the apples of your cheek with your temple.[4]
- Make sure you apply the blush to the upper part of your cheekbone, rather than the bottom.[5]
- Once you’ve swept the brush up to your temples, repeat the same path with the brush going back down to the apple of your cheek, so that you make two passes with the brush on your cheekbone.
-
5Make a few sweeping strokes to blend. Without adding more blush to your brush, continue to make circles at your apples and then sweep up to your temples and back down again. This will blend the blush into your skin and your hairline.[6]
- The trick with blush is not being able to tell where the color begins and ends, so proper blending is key. This will ensure a natural look that highlights your natural features and the shape of your face.


Choosing the Right Blush
-
1Determine your undertone. Blush should always match your undertone, which is the natural color of your skin below the surface layer. Undertones can be warm, cool, or neutral, and you can pick the most flattering blush colors by finding ones that complement yours.[7]
- Cool people burn easily in the sun, have blue veins on the inside of the wrist, and have green, grey, or blue eyes with black, brown, or blond hair.
- Warm people tan in the sun, have green veins on the inside of the wrist, and have hazel, brown, or amber eyes with black, auburn, or strawberry blond hair.
- Neutral people look good in both gold and silver, and have bluish-green veins on the inside of the wrist.[8]
-
2Pick shades based on your undertone. Cool, warm, and neutral undertones refer to the colors below your surface skin, so different blush colors will either complement or clash with your undertone.
- Cool undertones indicate pink, red, or bluish skin, so blush colors that will complement you include light pinks and reds.[9]
- Warm undertones indicate peach, yellow, or golden skin, so opt for golden and peachy shades of blush.
- Neutral undertones can have any skin shade below the surface, so choose blush based on yours.
-
3Use the right blush for your skin type. There are three different types of blush, and they are suitable for different skin types and textures. The three blush types are powders, creams, and gels or stains.
- Choose powder blush if you have oily skin, because the powder will help to absorb oil and won’t add extra liquid to your face.
- Opt for cream blush if you have dry skin, because the cream will add some extra moisture to your face and won’t dry your skin out further.
- Gel blushes can be used by people with any skin type.
- For people who don’t have smooth skin and have lots of texture from things like scarring or acne, opt for matte blush types rather than shimmery ones.[10]


Determining Your Face Shape
-
1Gather your supplies. There are multiple face shapes out there, and knowing what yours is can help you determine the hair cuts, eyebrow shapes, and makeup styles that will be most flattering.
- To figure out the shape of your face, you will need a ruler and calculator.
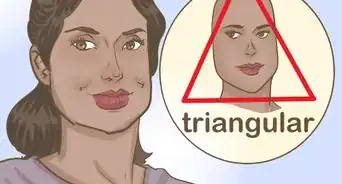
- The most common face shapes include oval, heart, long, round, square, diamond, and pear.[11]
-
2Take some measurements. In a mirror, hold a ruler in front of your face to measure the basic length and width of your face, without taking into account the additional measurements added by protruding features like your nose. Take the basic measurements of your:[12]
- Forehead, from one eyebrow arch to the other
- Jawline, from the tip of your chin to the edge of your jaw (times two)
- Face length, from the tip of your chin to the start of your hairline
- Cheekbones, from the outside corner of one eye to the other (across the bridge of the nose)
-
3Compare your facial features. One of the easiest ways to determine the shape of your face is to look at the parts that are widest and longest.[13]
- If your measurements are roughly equal, your face is likely square, round, or oval.
- If your forehead is widest, you likely have a heart-shaped, or inverted triangle face.
- When cheekbones are the widest, this generally indicates a diamond-shaped face.
- A wider jaw often means a pear- or triangle-shaped face.
- If the length measurement of our face was the largest, this is oblong.
-
4Examine the shape of your jaw. The shape of your jaw plays into the overall shape of your face, so you must consider this when determining the shape of your face.[14]
- Rounded jaws mean a round or oval face
- Strong and well-defined jaws often mean square, diamond, or triangle faces
- Pointed chins indicate a diamond-shaped face


Community Q&A
-
QuestionWhat brush should I use for blush?
 Daniel VannDaniel Vann is the Creative Director for Daredevil Cosmetics, a makeup studio in the Seattle Area. He has been working in the cosmetics industry for over 15 years and is currently a licensed aesthetician and makeup educator.
Licensed AestheticianLook for a high-quality angled blush brush. When you're applying blush, you're doing some contouring, so you need a brush that's going to give a soft glow application, but also unload the product in a controlled way. For that, I prefer either an angled white goat hair brush or a really good synthetic that's coated with nylon.


References
- ↑ https://www.youtube.com/watch?v=niQ0tMZgjvY
- ↑ https://www.youtube.com/watch?v=mDdn2gq3Nuk
- ↑ http://www.cosmopolitan.com/style-beauty/beauty/how-to/g2642/how-to-apply-blush-for-your-face-shape/?slide=2
- ↑ http://www.brit.co/how-to-apply-blush/
- ↑ http://www.byrdie.com/where-to-apply-blush-for-your-face-shape-round-square-long-2014/slide6
- ↑ https://www.youtube.com/watch?v=mDdn2gq3Nuk
- ↑ http://www.bustle.com/articles/36375-warm-or-cool-skin-tone-5-questions-to-help-you-determine-your-undertones-so-you-can
- ↑ http://www.cosmopolitan.com/style-beauty/beauty/advice/g2414/best-foundation-for-your-skin-tone/?slide=2
- ↑ https://www.youtube.com/watch?v=niQ0tMZgjvY
- ↑ https://www.youtube.com/watch?v=niQ0tMZgjvY
- ↑ http://www.stylebistro.com/Finding+the+Best+Hairstyle+for+Your+Face+Shape/articles/9jId6AKPfBl/Seven+Most+Common+Face+Shapes
- ↑ http://www.rachaelrayshow.com/lifestyle/beauty/19674_learn_how_to_measure_your_face_shape/
- ↑ https://www.birchbox.com/magazine/article/how-to-determine-face-shape-men
- ↑ http://www.allure.com/beauty-trends/blogs/daily-beauty-reporter/2012/05/3-steps-to-finding-your-face-s.html
About This Article