This article was co-authored by Tymia Yvette and by wikiHow staff writer, Amy Bobinger. Tymia Yvette is a Makeup and Lash Artist and the founder of Tymia Yvette Beauty LLC, a makeup artistry and lash extension company focused on customized beauty services based in Baltimore, Maryland. Trained by MAC Cosmetics, Tymia's work has been featured in the Bravo A-List Awards 2008, the BET Honors Award Show in 2011, 2012, and 2013, the Mercedes-Benz New York Fashion Week 2011, 2012, and 2013, and the White House Correspondent's Dinner in 2014. She has also provided makeup and lash services for the Betsy Royal Casting Agency and the Baltimore Raven's cheerleading squad from 2010 to 2012. Her clients include Terrence Howard, Torrey Smith, Lester Holt, Adrienne Lofton, and Natasha Hastings. She has been awarded WeddingWire's Couple's Choice Award in 2017, 2018, and 2019.
There are 11 references cited in this article, which can be found at the bottom of the page.
This article has been viewed 53,324 times.
Putting on eyeshadow is part of almost any basic makeup look, but knowing exactly how to apply the shadow to your crease can be a little tricky. Luckily, though, putting eyeshadow in your crease is easy. Open your eye to find your natural crease, then use a soft, round brush to apply the shadow to your eyelid in light layers, blending as you go. With a little practice and a few helpful tips, you’ll be able to master the perfect application for your eye shape in no time!
Steps
Creating a Basic Eyeshadow Look
-
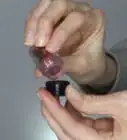
1Apply an eyelid primer over your eyelid all the way up to the crease. Dab a small amount of eye primer onto your ring finger and pat it onto your eyelid, starting at your lash line and blending upward all the way up to your brow bone.[1] Primer helps to create a smooth surface, so your eyeshadow will go on more smoothly and evenly.[2]
- Through the course of the day, your skin’s natural oils can cause your makeup to smudge, crease, or wear away. Eyelid primer helps prevent this.[3]
- If you don’t have eyelid primer, try using a little bit of regular face primer instead. If you don’t have either, it’s okay to skip this step.
- For extra staying power, prep your eyelids with a lightweight eye gel or cream. Once the product has completely absorbed into your skin, follow with a translucent or neutral-colored eyeshadow primer.[4]
-
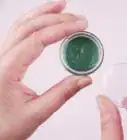
2Tap a light, neutral-colored eyeshadow or base from your lash line up to your crease. If you have a cream or gel eyeshadow in a neutral color, dip your ring finger into the pot and apply a thin layer of the base from your lashes all the way up to your crease. If you need to, you can add a little more to ensure you have a smooth, even tone all the way across your eyelid. You can also use a flat brush to pat on a light, neutral-toned powder eyeshadow if you don’t have a cream or gel formula.[5]
- Everyone has slight variations in color across their eyelid, and you may even have visible veins beneath the skin. The base helps create a uniform appearance, so your final look will be more put-together.
- If you’re using cream or gel, let the base dry for about 30 seconds before you apply any eyeshadow on top of it.
Advertisement -
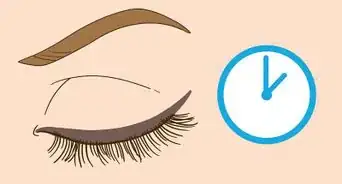
3Open your eyes naturally to find your crease. Sit or stand so you’re looking straight at your mirror while facing forward. Close your eyes, then open them naturally and look at your eyelids in the mirror. Most people will be able to see a crease or fold in their eyelid about halfway up.
- If you can’t see a crease at all, you may have a monolid, which is a feature that is typically characteristic of people from Eastern Asian. In that case, apply the darker color near your lash line, then smudge it upward to create the illusion of a crease.
-
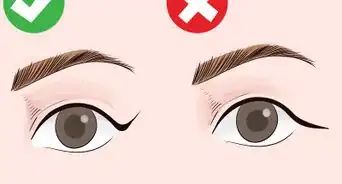
4Choose a dark, matte color for your crease. The purpose of putting eyeshadow into your crease is to help define the shape of your eyes. A medium to dark eyeshadow color with a matte or satin texture will create more of a recessed look.[6] Also, it's best to use matte colors in your crease, rather than shimmery shades. Shimmers bring an area forward, so if you use a dark shimmery shade in your crease, it can offset the effect.[7]
- Rich, warm brown shadows are a great option if you prefer a natural eye, but you can use any dark shade in your crease, including grey, black, plum, and hunter green. The darker the color you use in the crease, the more dramatic your look will be.
- You can use gel, cream, or powder eyeshadow in your crease. However, if you used powder eyeshadow for your base, it's best to use powder eyeshadow in your crease, as creams and gels won't blend well on top of powder. If you used gel or cream for your base, you can use any type of eyeshadow in your crease.
- If you have deeply recessed eyes, stick to a crease color that's just a little darker than your base color for a more subtle effect.
-
5Dip a small, round brush into your dark eyeshadow and tap off any excess. Since you’ll be applying your makeup in layers, you don’t need to pick up very much eyeshadow on your brush. If you have an eyeshadow that’s highly pigmented, you’ll only need to sweep the tips of your brush bristles across the pan to pick up color. If the eyeshadow doesn’t show up at first, try swirling the brush lightly across the eyeshadow instead. For powder eyeshadows, tap the handle of the brush on the eyeshadow pan or against the corner of your counter to remove excess powder.[8]
- You can use either a synthetic or a natural brush for any type of eyeshadow that you're using, as long as the brush is soft, fluffy, and fits into your crease. Synthetic brushes are typically less expensive, but high-quality synthetic brushes can perform just as well as their natural counterparts.
- The skin on your eyelids is delicate, so don’t use a brush with stiff bristles, as you could irritate your eyes.
-
6Sweep your brush from side to side along your crease. Close your eye, then gently push the bristles of your brush into the outer corner of your crease. Move the brush along the natural curve of your crease, stopping about 2/3 of the way in toward the inner corner of your eye.[9]
- To create a more dramatic look, apply some of the dark shadow in a sideways “V” shape (like “<” on the left or “>” on the right) at the outer corner of your eye from the edge of your crease to your lash line. Blend the shadow about 1/3 of the way in along your lash line.
Tip: If you love the look of sharp, winged eyeshadow but you aren't sure how to do it, put a piece of tape running from the outer corner of your eyelid up to your eyebrow. Apply your eyeshadow, then remove the tape to reveal a perfect line!
-
7Blend along your crease in a windshield wiper motion. Take a slightly longer, softer makeup brush and run the bristles back and forth across your crease. It can take a little time to blend your eyeshadow perfectly, so keep going until there are no harsh lines or edges on or above your crease.[10]
- Blending is essential to any eyeshadow look, from a barely-there natural style to a dramatic smokey eye.
- You can also swirl the blending brush in a circular motion to smooth out any harsh edges or uneven color near the outside corners of your eyes.
- You don't have to spend a lot to get good eyeshadow brushes. You can find quality, affordable brushes from drugstore brands and mid-range beauty brands. However, if you don’t have a good brush, you can use your fingers, instead. Just make sure your hands are clean first.
-
8Continue adding color and blending until you get the look you want. Using light layers, keep building up your eyeshadow until you’re happy with how it looks. Every time you add more eyeshadow, switch to your bigger brush and blend well.[11]
- Once you master basic eyeshadow application, you can start trying more advanced techniques, like a smokey eye or a cut crease!


Finishing the Look
-
1Use cotton swabs to clean up mistakes, not your fingers. Cotton swabs (sometimes called cotton buds) are the perfect way to fix any mistakes you make with your makeup. Just dip one end in a little water or makeup remover and carefully run it over the area you need to clean up.[12]
- You can also run a damp beauty blending sponge over the area, if you have one.
- Not only is using your fingers less precise, but rubbing your skin vigorously to remove makeup can transfer oils to your face. This could lead to your makeup smudging or creasing throughout the day, and it can even cause breakouts.
-
2Dab a light, shimmery shade in the inner corner of your eye and below your brow. Once you’ve perfected your crease, use a small, flat brush to pat highlighting eyeshadow right in the inner corner of your eyelid, near your tear duct. If you like, you can also use a little in the center of your eyelid or along your brow bone just under your eyebrows.[13]
- This will help add dimension and brightness to your finished look.
- A light color with a little shimmer is ideal for a highlight because it draws attention wherever you put it.
-
3Apply a little eyeliner if you want your eyes to be more defined. If you want to wear eyeliner, draw the tip of an eyeliner pencil or liquid eyeliner brush or pen just above your eyelashes on your upper eyelid. If you’re using a pencil, you can also line just under your lower lashes as well.[14]
- Liquid eyeliner is typically a little too bold for your lower lids.
- You can also use a short, angled brush to apply dark shadow along your upper and lower lash line for a smokier lined look.
-
4Brush on mascara to accentuate your lashes. Place your mascara wand against the base of your lashes and wiggle it slightly, then sweep the wand up the entire length of your lashes. If there are any clumps, use a toothpick or a lash comb to remove them.[15]
- For more dramatic lashes, wait for the first coat to dry, then apply a second coat of mascara.
-
5Fill in your brows with pencil or powder. For a polished look, finish your eye makeup by filling in your brows. You can either use an eyebrow pencil or a powder and an angled brush. Either way, use small, light strokes to mimic your natural brow hairs. [16]
- Powder tends to look softer and more natural, while pencils are good for a more dramatic brow.[17]
- When choosing a color for your brows, look for a product that’s about 1 shade lighter than your natural hair color.

Accentuating Different Eye Types
-
1Follow the natural crease if you have upturned eyes. Look at your eyes in the mirror and imagine a straight, horizontal line going across the top of your iris. If the outer corners of your eyes go above that line, you have upturned eyes. Your eyes are naturally the shape that most people are trying to recreate, so all you have to do is apply your eyeshadow to your natural crease.[18]
- If you're self-conscious that your eyes are too upturned, try to keep your darker color toward the bottom of your crease.
-
2Blend your eyeshadow up and out to balance downturned eyes. If the corners of your eyes fall below the imaginary line from the top of your iris, you have downturned eyes. To keep your eyes from looking droopy, blend your crease shadow up toward the outside corner of your eyebrow, starting about halfway across your eye.[19]
- Remember to blend well so you don’t have any harsh lines!
-
3Apply your dark shadow a little above your crease if you have hooded eyes. If your eyes have a heavy hood, your darker shadow might not show up at all if you apply it directly into your crease. To avoid that, apply your darker shadow just above your actual crease, which will help lift your eye. Also, apply the eyeshadow to the outer corners of your eye in a sideways “V” shape to help balance your eye shape.[20]
- If you’re looking at your eyes in the mirror and your top lid comes down over your mobile lid (the part that moves when you blink), then you have hooded eyes.
-
4Smudge your eyeshadow upward if you have a monolid. If you have a monolid, meaning there’s only a small crease or no crease at all on your eyelid, you can still create your own version of a basic eyeshadow look. Apply a dark eyeshadow near your lash line, then blend it upward and outward about halfway up your lid.[21]
- Although it can seem difficult to have an unusual eye shape, actually having a smooth surface to work on is the perfect canvas for trying out experimental eye makeup! Have fun and see what you can come up with!


Community Q&A
-
QuestionHow do I keep my eyeshadow looking nice and even around my crease?
 Tymia YvetteTymia Yvette is a Makeup and Lash Artist and the founder of Tymia Yvette Beauty LLC, a makeup artistry and lash extension company focused on customized beauty services based in Baltimore, Maryland. Trained by MAC Cosmetics, Tymia's work has been featured in the Bravo A-List Awards 2008, the BET Honors Award Show in 2011, 2012, and 2013, the Mercedes-Benz New York Fashion Week 2011, 2012, and 2013, and the White House Correspondent's Dinner in 2014. She has also provided makeup and lash services for the Betsy Royal Casting Agency and the Baltimore Raven's cheerleading squad from 2010 to 2012. Her clients include Terrence Howard, Torrey Smith, Lester Holt, Adrienne Lofton, and Natasha Hastings. She has been awarded WeddingWire's Couple's Choice Award in 2017, 2018, and 2019.
Makeup & Lash ArtistPrep your eyelids with a lightweight eye gel or cream. Once the product has completely absorbed into your skin, apply a translucent or neutral-colored eyeshadow primer over your entire eye area, from lash line to brow bone. -
QuestionWhat is another alternative to scotch tape?
 Community AnswerYou can buy pre-molded guides to help apply eye shadow in your crease. Another common alternative is using a spoon.
 -
QuestionCan powdered eyeshadow be applied on creases?
 Community AnswerYes, it certainly can be. Powder and cream shadow can be applied to the crease, as well as any other form.
Things You’ll Need
Creating a Basic Eyeshadow Look
- Eyelid primer
- Neutral-colored gel, cream, or powder eyeshadow
- Dark-colored eyeshadow
- Small, round eyeshadow brush
- Fluffy eyeshadow blending brush
- Flat eyeshadow brush
Finishing the Look
- Cotton swabs
- Water or makeup remover
- Shimmery, light eyeshadow
- Flat eyeshadow brush
- Eyeliner (optional)
- Mascara
- Brow pencil or powder

References
- ↑ Tymia Yvette. Makeup & Lash Artist. Expert Interview. 22 April 2020.
- ↑ https://www.goodhousekeeping.com/beauty/makeup/a35631/how-to-apply-eye-makeup-guide/
- ↑ https://www.glamourmagazine.co.uk/article/tips-to-stop-eyeshadow-creasing
- ↑ Tymia Yvette. Makeup & Lash Artist. Expert Interview. 22 April 2020.
- ↑ https://www.goodhousekeeping.com/beauty/makeup/a35631/how-to-apply-eye-makeup-guide/
- ↑ Tymia Yvette. Makeup & Lash Artist. Expert Interview. 22 April 2020.
- ↑ https://www.cosmopolitan.com/uk/beauty-hair/makeup/advice/a48863/how-to-apply-eyeshadow/
- ↑ https://www.goodhousekeeping.com/beauty/makeup/a35631/how-to-apply-eye-makeup-guide/
- ↑ https://www.goodhousekeeping.com/beauty/makeup/a35631/how-to-apply-eye-makeup-guide/
- ↑ https://www.allure.com/story/how-to-blend-eyeshadow-tips
- ↑ https://www.allure.com/story/how-to-blend-eyeshadow-tips
- ↑ https://www.elle.com/beauty/makeup-skin-care/tips/g8507/how-to-apply-eye-shadow-by-eye-shape/
- ↑ https://www.allure.com/story/how-to-blend-eyeshadow-tips
- ↑ https://www.goodhousekeeping.com/beauty/makeup/a35631/how-to-apply-eye-makeup-guide/
- ↑ https://www.goodhousekeeping.com/beauty/makeup/a35631/how-to-apply-eye-makeup-guide/
- ↑ https://www.elle.com/uk/beauty/make-up/a30912/how-to-do-eyebrows-and-avoid-mistakes/
- ↑ https://www.self.com/story/common-brow-mistakes
- ↑ https://www.vogue.com.au/beauty/makeup/how-to-determine-your-eye-shape-and-master-your-eyeshadow-application/image-gallery/d7b6b543bf9dafebce8b78d3f402251e?pos=7
- ↑ https://www.vogue.com.au/beauty/makeup/how-to-determine-your-eye-shape-and-master-your-eyeshadow-application/image-gallery/d7b6b543bf9dafebce8b78d3f402251e
- ↑ https://www.goodhousekeeping.com/beauty/makeup/a35631/how-to-apply-eye-makeup-guide/
- ↑ https://www.teenvogue.com/story/best-makeup-tips-for-monolid-eyes
About This Article


-Step-20.webp)