This article was co-authored by Mia Rubie. Mia Rubie is a Nail Artist and the Owner of Sparkle San Francisco, a nail studio based in San Francisco, California. She has over eight years of nail artist and management experience and is known for her push-the-envelope designs and artistic eye for colors. Her clients include Sephora, Target, and Vogue. Her work has been featured in the San Francisco Chronicle and StyleCaster. She holds a BBA focusing on Entrepreneurial and Small Business Operations from San Francisco State University. You can find her work on her Instagram account @superflynails.
There are 8 references cited in this article, which can be found at the bottom of the page.
wikiHow marks an article as reader-approved once it receives enough positive feedback. This article received 22 testimonials and 95% of readers who voted found it helpful, earning it our reader-approved status.
This article has been viewed 1,431,342 times.
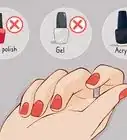
Applying gel nails gives you the strength of acrylic nails with the appearance of natural nails. When applying gel nails, you don’t get the strong fumes that you get when acrylics are applied. The gel hardens under UV light. Each layer has to harden under this light for two to three minutes. This creates a chemical bond that connects the gel to your nail.[1]
Steps
Prepping Your Nails
-
1File and shape your nails. To get the ultimate look from your at-home gel nails, start with the ultimate blank nail. Take the time to cut, file, and shape your nails. Before you cut them, decide what shape you want. Cut the basic shape and then file the tips. Finally, finish shaping by rounding the surface of your nails with a buffer.[2]
- You can create round, square, pointy, almond, or oval nails, depending on your preference.[3]
- Because gel nails are based off of your nails, this is when you shape your nails. It is not like applying acrylic nails that can be shaped during/after application.
-
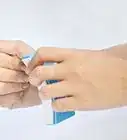
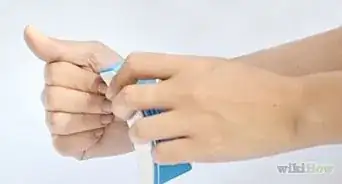
2Use cuticle remover. Once you have the basic shape to your nail, apply a cuticle remover around the base of your nails.[4] Use a cuticle stick to push back any skin off of your nail plate. Remove any remaining oil or debris from your nail with a cotton ball that’s been dipped in acetone.Advertisement
-
3Apply your base layer. Apply a very thin layer of your basecoat to your nails. For gel, you use a much thinner layer than you would with standard nail polish. Be careful when applying your base layer: you don’t want to get the gel on your fingers. Let your base layer dry for twice as long as recommended.[5]

Applying the Color
-
1Apply 2 thin layers. Once your base layer has dried completely, apply another extremely thin layer. This will be your color gel. It will probably look streaky, but that is normal for the first layer. Make sure to use these colored layers to paint over the tip of your nail as well as over the surface. This will keep the gel from curling back off your nail.
- Cure each layer under a UV lamp for 2-3 minutes.[6]
-
2Apply your top gel. Coat your nails completely in your top gel. Paint over the tip, like you did with your color gel. Once again, cure the gel polish under a UV light for 2-3 minutes.
-
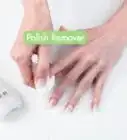
3Remove the tacky. Some gel methods leave a tacky, sticky layer on and around your nails after curing the top gel. If this is the case, simply take a cotton ball dipped in isopropyl alcohol and wipe over the tacky.[7] Finish off your gel manicure by rubbing a cuticle oil into the skin around the base of your nail.
- If your gel nails start to look dull after a few days, take a buffer and smooth out the top layer of clear coat, then cleanse your nails and reapply another clear top coat to bring back the shine.[8]
Removing Gel Nails
-
1File off the top layer. To remove your gel nails, you first need to file off the top layer of the gel. This will take away the shine. Only once the shine is removed can you move forward in removing the gel.
- Avoid picking the polish off your nails. That can remove layers of your nail in the process, leaving them brittle and dry.[9]
-
2Cover cotton balls in 100% acetone. The gel won’t come off if you don’t use 100% acetone. Take 10 pieces of cotton balls and soak them in your acetone. The cotton balls should be big enough to cover your whole nail.
- Use caution when you're working with the acetone, as it's a harsh chemical. Also, keep in mind that the acetone is very drying to your nails, so they could be brittle afterward.[10]
-
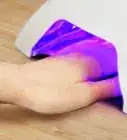
3Wrap tin foil around your fingertips. Take one of you cotton balls and place it on your nail, covering your entire nail. With the cotton ball in place, wrap the nail and the tip of your finger with tin foil. Do this over the rest of your nails.[11]
- It is recommended to do this one hand at a time. It is very difficult to use foil-covered fingers to wrap the second hand.
-
4Let sit and then remove one at a time. Let the foil stay wrapped for 15 minutes. Don’t try pulling it open to check if it’s working—keep it shut. After 15 minutes, remove the wrapping one nail at a time. The gel will have started to peel back. Use a cuticle stick to push the gel off your nail.
- If there is gel stuck that you can’t remove with the cuticle stick, re-wrap your nails with another acetone soaked cotton ball and foil. Let sit for another 15 minutes and try again.
-
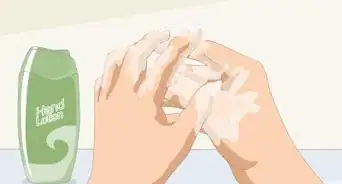
5Finish with cuticle oil. Once again, you want to finish with cuticle oil. Massage cuticle oil into the skin around the base of your nail.[12]
- If your nails look rough, apply cuticle oil to the surface of your nail and buff them using a nail buffer.


Community Q&A
-
QuestionWhat shape should I file my nails into before I apply the gel?
 Mia RubieMia Rubie is a Nail Artist and the Owner of Sparkle San Francisco, a nail studio based in San Francisco, California. She has over eight years of nail artist and management experience and is known for her push-the-envelope designs and artistic eye for colors. Her clients include Sephora, Target, and Vogue. Her work has been featured in the San Francisco Chronicle and StyleCaster. She holds a BBA focusing on Entrepreneurial and Small Business Operations from San Francisco State University. You can find her work on her Instagram account @superflynails.
Nail ArtistYou can really choose any shape you want. However, I like the look of a more elongated or rounded nail. -
QuestionI used a UV lamp and proper polish, but my nails fell off in a day! What went wrong?
 Aleeza446Community AnswerDid you remember to wipe away any oils from your nails with acetone first? Failure to do this often results in the gel nail slipping off the surface.
 -
QuestionDo I remove the sticky layer of gel builder between building the gel?
 Community AnswerIf you want to you can, but it is not necessary. You just have to remove the sticky layer when done with the whole manicure.

References
- ↑ http://skincare.lovetoknow.com/Gel_Nails_Acrylic_Nails
- ↑ http://allwomenstalk.com/8-nail-shapes-and-how-to-choose-the-one-for-you/8/
- ↑ Mia Rubie. Nail Artist. Expert Interview. 23 April 2020.
- ↑ https://www.cosmopolitan.com/style-beauty/beauty/how-to/a4797/why-you-should-never-ever-cut-your-cuticles/
- ↑ http://www.nailsplash.com/page/gelnails
- ↑ https://asliceofstyle.com/gel-nails-tutorial/
- ↑ http://www.whatthegelnails.com/gel-polish-f-a-q/
- ↑ Mia Rubie. Nail Artist. Expert Interview. 23 April 2020.
- ↑ Mia Rubie. Nail Artist. Expert Interview. 23 April 2020.
- ↑ Mia Rubie. Nail Artist. Expert Interview. 23 April 2020.
- ↑ https://www.allure.com/story/how-to-remove-gel-manicure-without-ruining-nails
- ↑ https://www.allure.com/story/how-to-remove-gel-manicure-without-ruining-nails
About This Article

To apply gel nails, first cut and file your nails so they’re all the same length. Then, apply cuticle oil to your cuticles to loosen them, and push them back with a cuticle pusher. Buff each of your nails, which will remove built-up oils and help your gel nails last longer. Wipe your nails off with an alcohol wipe when you’re finished. Next, apply a base coat to your nails. Cure the base coat under a UV lamp for 30 seconds. Then, paint your nails with gel nail polish. Cure the first coat under your UV lamp. Apply more coats until you have an opaque finish, curing your nails after each coat. Finally, apply a top coat and cure your nails one last time. To learn how to remove your gel nails, keep reading!