This article was co-authored by Madeleine Johnson. Madeleine Johnson is a Hair Stylist and Hair Extensions Specialist based in Beverly Hills, California. She is affiliated with Hair by Violet Salon in Beverly Hills. Madeleine has over six years of hairstyling experience as a licensed cosmetologist. She specializes in microbead extensions and tape-in extensions. She trained under celebrity extension artist Violet Teriti (Chaviv Hair) and earned her cosmetology license from Santa Monica College.
wikiHow marks an article as reader-approved once it receives enough positive feedback. In this case, several readers have written to tell us that this article was helpful to them, earning it our reader-approved status.
This article has been viewed 141,964 times.
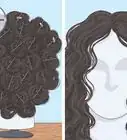
Tape-in extensions are great if you want to temporarily lengthen your hair, add volume, or add in some faux-highlights, as they aren’t permanent and are relatively simple to put in. They do not require special heat tools, so they can be applied at home without the assistance of a stylist.[1] You will first need to section off the top portion of your hair. Then, slowly tape in the extension one by one. You will have to be careful while wearing the extensions, as they're very prone to tangling. Brush your hair more frequently and take extra time in the shower.
Steps
Sectioning Your Hair
-
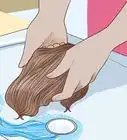
1Wash your hair. Extensions will last longer if you apply them to clean hair. Before applying your extensions, wash and dry your hair as you normally would.[2]
-
2Make a part across your scalp. About an inch from the nape of your neck, use your finger or a comb to make a horizontal part. You will apply the extensions near the line made by the part. This way, your upper hair will hide the clips.[3]Advertisement
-
3Section off the top hair. You can use a hair tie or hair clips to secure all the hair above the part line. Just make sure it's completely secured. You do not want any hair falling down and getting in the way while you're securing your extensions.[4]
-
4Remove a thin portion of your hair from the non-clipped part. The idea is to sandwich a thin strand of hair below your part line between top and bottom extensions. The strand of hair you're sandwiching needs to be very thin, about 1⁄8 inch (0.32 cm). This is so the adhesive tape on both extensions can stick together through the hair. Grab a very thin strand of hair from the hair below your part line about the length of one extension. Make sure the hair is thin enough your fingers can feel one another through the hair.[5]
-
5Measure the section. Before attaching the extension, use a cloth tape measurer to measure the section of hair that you parted. This way, you can determine how many pieces of the extension you'll need to add along that section of hair. Do this for every section.


Applying Your Extensions
-
1Attach the bottom extension under the thin portion of hair. Take your strand of hair and lift it up a little. Remove the strip covering the adhesive on the bottom extension. Press on the bottom extension underneath the thin strand of hair you're lifting.[6]
-
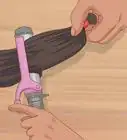
2Secure the top extension. Take the top extension. After removing the adhesive tape covering that extension, press on top of your strand of hair. The top and bottom extension should stick together. Then press them together with pliers for a few seconds to secure them.[7]
- If the extensions are not sticking, you used too much hair in your strand. Gently brush some hair off the bottom extension.
-
3Repeat the process. Move across your side part, repeating this process until you have added all the extensions. The precise number of extensions you are adding depends on the size of your head. You will likely use about 5 rows of hair extensions or more, depending on how voluminous you want your hairstyle to be.[8]
- If you plan to add extensions on the sides of your head, leave 1 inch (2.5 cm) of hair out horizontally, closest to the ear, and then continue applying the extensions.
- If you have a thin hairline, leave about 1 inch (2.5 cm) of hair out across your entire hairline before adding extensions, just to make sure that your hair has enough density to cover the tape-ins without making them noticeable.


Caring for Your Hair Afterwards
-
1Take extra time for hair care. Hair extensions tangle easily and extra hair means you'll take longer in the shower. Make sure to account for having more hair in the morning. Give yourself an extra 10 to 15 minutes to get ready every day.[9]
- When washing your hair, place a dollop of shampoo on your fingers and run your fingers through the extension rows to lift out debris. Always use a conditioner after, mid-shaft to ends, never from the roots.
- Putting your hair in braids can help reduce the chances of tangling.
- Before going to the pool or in the ocean, take a shower first so that the hair and extensions absorb the fresh water first, then comb through some conditioner to protect the extensions and prevent tangling. This will also protect the extensions from the chemicals and salt that can discolor them.
-
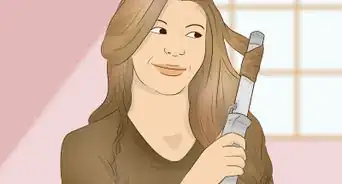
2Brush your hair regularly. Extensions are prone to tangling. To keep your hair looking fresh and natural, brush your hair at least twice a day while your extensions are in place.[10]
- Take care of your extensions as if they were your own hair.
- Remember, hair care may take extra time when you're wearing extensions.
- Synthetic extensions are more prone to tangling than human hair extensions.
-
3Secure your hair overnight. As hair tangles easier, you should secure your hair overnight while wearing extensions. Pull your hair into a loose ponytail or braid it before bed. It can also help to sleep on silk pillows.[11]


Community Q&A
Did you know you can get expert answers for this article?
Unlock expert answers by supporting wikiHow
-
QuestionHow long will tape-in hair extensions last?
 Laura MartinLaura Martin is a Licensed Cosmetologist in Georgia. She has been a hair stylist since 2007 and a cosmetology teacher since 2013.
Licensed CosmetologistTape-in extensions can last for up to two months. They may come out sooner if you wash your hair frequently.
Support wikiHow by unlocking this expert answer.
-
QuestionAre tape extensions bad for your hair?Laura MartinLaura Martin is a Licensed Cosmetologist in Georgia. She has been a hair stylist since 2007 and a cosmetology teacher since 2013.
Licensed CosmetologistThey can be. All extensions add weight to your hair that can lead to breakage. Tape-ins should be removed by a stylist who can dissolve the adhesive and carefully remove them.Support wikiHow by unlocking this expert answer.
-
QuestionCan tape-in hair extensions be reused?Laura MartinLaura Martin is a Licensed Cosmetologist in Georgia. She has been a hair stylist since 2007 and a cosmetology teacher since 2013.
Licensed CosmetologistYes, but only up to three times. After this, the hair will start to look dry.Support wikiHow by unlocking this expert answer.
Things You'll Need
- Tape-in hair extensions
- Comb
- Hair ties or clips
- Cloth tape measurer
- Pliers


References
- ↑ http://hairextensionmagazine.com/hair-extension-methods/
- ↑ https://bellatory.com/hair/DIY-Hair-How-to-Install-Tape-In-Hair-Extensions
- ↑ http://www.hair-extensions-hotstyle.com/content/8-how-to-apply-hair-extensions
- ↑ https://bellatory.com/hair/DIY-Hair-How-to-Install-Tape-In-Hair-Extensions
- ↑ https://bellatory.com/hair/DIY-Hair-How-to-Install-Tape-In-Hair-Extensions
- ↑ https://bellatory.com/hair/DIY-Hair-How-to-Install-Tape-In-Hair-Extensions
- ↑ https://bellatory.com/hair/DIY-Hair-How-to-Install-Tape-In-Hair-Extensions
- ↑ https://bellatory.com/hair/DIY-Hair-How-to-Install-Tape-In-Hair-Extensions
- ↑ http://www.collegefashion.net/beauty-and-hair/i-tried-it-tape-in-hair-extensions/
About This Article

Tape-in hair extensions are a good solution if you want to temporarily lengthen your hair without doing a ton of work. They can last up to 2 months. To start, wash and dry your hair since the extensions will last longer on clean hair. When your hair is ready, make a horizontal part across your scalp about an inch from the nape of your neck. Put the top of your hair into a clip to secure it. Then pick up a small section of your hair and lift it up a little. Remove the strip covering the adhesive on the bottom of the extension and press it underneath the strand of hair. Then, remove the tape covering on the top extension and press it to the top of the strand of hair. If the extensions aren’t sticking together, simply use smaller strands of hair. Repeat this process until you’ve added all of the extensions. You’ll likely need at least 5 extensions to create the look of a full head of hair. To learn how to care for your new extensions, read on!