This article was co-authored by wikiHow Staff. Our trained team of editors and researchers validate articles for accuracy and comprehensiveness. wikiHow's Content Management Team carefully monitors the work from our editorial staff to ensure that each article is backed by trusted research and meets our high quality standards.
There are 18 references cited in this article, which can be found at the bottom of the page.
The wikiHow Video Team also followed the article's instructions and verified that they work.
This article has been viewed 103,798 times.
Learn more...
Bleached and frayed shorts are really fashionable, but store-bought ones can get very expensive. Luckily, it is possible to create your own bleached and frayed shorts at home for a fraction of the cost. All you need are a pair of shorts (or jeans to turn into shorts), scissors, and bleach!
Steps
Cutting Jeans into Shorts
-
1Get a pair of old jeans you don't mind cutting up. It's okay if the jeans are too long or too short, but make sure that they fit you in the thighs and hips. If you are starting with a pair of shorts, cut the bottom hems off along the stitching, then click here to continue.[1]
- You can use brand-new jeans or shorts, but wash them first in case the fabric is not pre-shrunk.
-
2Make a mark on the jeans where you want the shorts to end. Spread the jeans out on a flat surface, then make a mark on the left and right inseam where you want the shorts to end. A ball point pen should be enough to get the job done, but if the jeans are too dark, you may want to use a piece of chalk instead.[2]
- It would be a good idea to add 1 inch (2.5 cm) to the overall length of your shorts. They will appear shorter once you fray them.[3]
- You can wear the jeans while making the mark, but be sure to take them off when you are done.
Advertisement -
3Trace the new cuff of your shorts based on your marks. Make the lines angle slightly upwards towards the outer seams. Try to make the lines on both cuffs as even as possible. Don't worry about the back of the pants for now.
- Use a pen and ruler to make your lines nice and straight. If the fabric is too dark, use chalk.
-
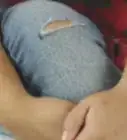
4Cut through the front layer of fabric based on your tracing. Pinch the front layer of fabric on 1 of the legs, then make a slit. Cut along the line that you drew, starting at the inseam and finishing on the outer seam. Repeat the process for the other leg.[4]
-
5Cut the back layer of fabric at a slight, downward curve. Pull open the slit in the front of the pant leg so that the fabric in the back is visible. Cut through the back fabric from outer seam to inseam at a downward curve so that it looks like a semicircle or semi-oval. Repeat the process for the other pant leg.[5]
- The curve should be 1 to 1 1⁄2 inches (2.5 to 3.8 cm) tall.
- If you don't want the back to be curved, match it to the front edge instead. Keep in mind that this will reveal more of your thigh when you wear the shorts.[6]
Fraying the Shorts
-
1Wash and dry the shorts if you want a natural effect. One of the easiest ways to fray shorts is to wash them immediately after cutting them. Simply toss the shorts into the washer with the rest of your laundry, and start a cycle. Dry the shorts in a dryer to further fray the hems.
- If any of the hanging strands turn too long, trim them with scissors.
-
2Pull the white threads apart by hand if you want to control the fraying. Find the white threads along the cut edge of the cuff, and pull them against the grain. For example, if the white threads are pointing to the right, pull them to the left. Work your way around the first cuff, then do the next cuff.[7]
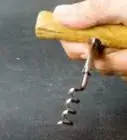
- If the white threads aren't sticking out, slide a needle under them to loosen them and pry them away from the blue threads.
- If you are having trouble plucking out the white threads, use a pair of tweezers.[8]
-
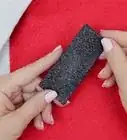
3Sand the cut edges if you don't want to wash the shorts yet. Lay the shorts on a flat surface, then run a sanding block downwards across the cut hem. Make sure that you cover your work surface with something that can get scratched up, such as a sheet of cardboard.[9]
- The grit of the sanding block does not matter, although a lower, coarser grit will get the job done faster.
- If you don't have a sanding block, try a wire brush (like what you'd used on a grill), or a scrap of sand paper.
-
4Add more holes and fraying as desired, but don't get carried away. The shorts will fray a little bit each time you wash and dry them. Remember, you can always go back and fray your shorts more, but you can't un-fray them!
- If you want to add holes to your shorts, you should do that before you bleach them. Click here to learn more about this.
Bleaching the Shorts
-
1Find a well-ventilated area and protect your skin and clothing. Set up in a well-ventilated area that won't be damaged by bleach, such as outdoors. Put on an old set of clothing you won't mind getting bleached. Finally, pull on a pair of rubber gloves.
- If you choose to work outdoors, be aware that the bleach may kill the grass.
- Working in a bathtub or shower would work well, but be sure to open up the bathroom window or turn the fan on.
-
2Prepare a solution of bleach and water in a plastic tub or bucket. How much bleach and water you use depends on how white you want your shorts to get. If you want to bleach your shorts white, use equal parts of bleach and water.[10] For a more subtle effect, use 1 part bleach and 2 parts water.[11]
- Make sure that the container is made from plastic, as a metal one could react with the bleach. The container needs to be big enough to submerge the shorts.
-
3Dip the shorts into the bleach. How far you dip the shorts into the bleach depends on how far you want the bleach effect to go. You can dip them all the way into the bleach for an all-over effect, or you can dip them partway for an ombre effect. If you want a tie dye effect, crumple the shorts up first, then wrap rubber bands around them.[12]
- If you are dipping the shorts all the way into the bleach water, they may not stay submerged. In this case, weigh them down with a glass jar or vase.
-
4Leave the shorts in the bleach water for 15 to 60 minutes. The longer you leave the shorts in the bleach water, the greater the effect will be. Be aware that the water and shorts may turn orange as you soak them. Do not be alarmed; this is normal. The orange tint should go away when you rinse the shorts.[13]
- Alternatively, you can dip the shorts into the water, then pull them out and leave them on a plastic bag to dry for 60 minutes.[14]
-
5Use a bristle brush to blend gradients and ombres, if desired. Place the shorts onto a plastic bag. Dip an old toothbrush or a coarse bristled brush into the bleach. Scrub the brush against the bleached areas into the unbleached areas. Let the bleach sit on the shorts for about 30 to 60 minutes, then rinse and dry the shorts again.[15]
-
6Rinse the shorts with water once they reached the desired effect. Check on the shorts every 15 minutes. As soon as they reach the desired level of lightness you want, pull them out of the bleach, and rinse them in cool water. Keep rinsing the shorts until the water runs clear.[16]
- If you tie dyed the shorts, remove the rubber bands first.
- Remember to wear your rubber gloves for this step.
- You must rinse the bleach out completely, or it will ruin your other clothes the next time you do laundry.
-
7Let the shorts dry to see the final effect. The shorts will lighten as they dry, allowing you to see the results of the bleaching process. If the shorts still aren't light enough for you, you can bleach them a second time.
Adding Holes
-
1Decide where you want to put the hole. You don't have to add holes to your shorts, but they are a great way to add a vintage-y touch. The best place to add holes is somewhere in the front. Avoid placing holes in pockets or in the seat of your shorts.
- Skip this entire section if you don't want to add holes.
-
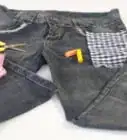
2Sketch out 2 horizontal, parallel lines where you want the hole to go. The length of the lines does not matter, but something between 1 to 2 inches (2.5 to 5.1 cm) would be ideal. Make sure that both lines are the same length. You'll have something that looks like an = sign.
- The space between the lines will create the height of your hole. Something between 1⁄2 and 1 inch (1.3 and 2.5 cm) would be ideal.
- A pen should work for most shorts, but if the fabric is too dark, use a piece of chalk instead.
-
3Cut along the lines with scissors. Pinch the fabric between your fingers and make a cut along 1 of the lines. Slide the scissors into the slit, and finish cutting along the line. Do this for both lines.[17]
- You can cut the slits with a craft blade, but slide a piece of cardboard into the shorts first so that you don't cut through the back.
-
4Pull apart the white threads between the 2 slits, but don't pull them out. Find the white threads along all 4 cut edges. Pull them across the grain, just like you did with the cuffs. Be careful not to pull the threads out.[18]
-
5Pull the blue threads out from between the 2 slits. Ignore the cut edges above and below the parallel slits. Instead, focus on the scrap of fabric between them. Find the blue threads, and pull them out. As you pull the threads out, the remaining white threads will form a hole. You may find this step easiest to do with tweezers.[19]
- Don't worry if some of them rip; this will give your shorts a more vintage-y look.
- Don't try to rip or break the remaining white threads just yet. Wait until you wash and dry your shorts for the first time. They might break on their own.


Community Q&A
-
QuestionWhen hemming jeans at home, you can always tell. They never look the same as the original hem. How do I achieve that specific distressed, thicker hem with the variance in color?
 Community AnswerYou can use a nail file to distress the jeans at the new cut and use tweezers to pull at the new hem to get the desired distressed look.
Warnings
- Always wear gloves when handling bleach. Work in a well-ventilated area.⧼thumbs_response⧽
Things You'll Need
- Shorts or jeans
- Pen or chalk
- Fabric scissors
- Tweezers or sandpaper (optional)
- Plastic tub
- Water
- Bleach
- Rubber gloves


References
- ↑ http://stylecaster.com/how-to-fray-the-hem-of-your-jeans/
- ↑ https://www.youtube.com/watch?v=h2MOKRkVmBY&feature=youtu.be&t=35s
- ↑ https://www.youtube.com/watch?v=ps4Bc4BFkYE&feature=youtu.be&t=1m35s
- ↑ https://www.youtube.com/watch?v=h2MOKRkVmBY&feature=youtu.be&t=45s
- ↑ https://www.youtube.com/watch?v=h2MOKRkVmBY&feature=youtu.be&t=1m5s
- ↑ https://www.youtube.com/watch?v=xh3v9a5GqhU&feature=youtu.be&t=2m
- ↑ https://www.youtube.com/watch?v=h2MOKRkVmBY&feature=youtu.be&t=1m45s
- ↑ https://www.youtube.com/watch?v=ps4Bc4BFkYE&feature=youtu.be&t=3m55s
- ↑ http://stylecaster.com/how-to-fray-the-hem-of-your-jeans/
- ↑ https://www.youtube.com/watch?v=h2MOKRkVmBY&feature=youtu.be&t=3m10s
- ↑ https://www.youtube.com/watch?v=xh3v9a5GqhU&feature=youtu.be&t=2m43s
- ↑ https://www.youtube.com/watch?v=h2MOKRkVmBY&feature=youtu.be&t=3m15s
- ↑ https://www.youtube.com/watch?v=xh3v9a5GqhU&feature=youtu.be&t=3m13s
- ↑ https://www.youtube.com/watch?v=h2MOKRkVmBY&feature=youtu.be&t=3m26s
- ↑ https://www.youtube.com/watch?v=ps4Bc4BFkYE&feature=youtu.be&t=10m12s
- ↑ https://www.youtube.com/watch?v=xh3v9a5GqhU&feature=youtu.be&t=4m25s
- ↑ https://www.youtube.com/watch?v=ps4Bc4BFkYE&feature=youtu.be&t=6m30s
- ↑ https://www.youtube.com/watch?v=ps4Bc4BFkYE&feature=youtu.be&t=7m4s
- ↑ https://www.youtube.com/watch?v=ps4Bc4BFkYE&feature=youtu.be&t=7m55s
About This Article