This article was co-authored by Bess Ruff, MA. Bess Ruff is a Geography PhD student at Florida State University. She received her MA in Environmental Science and Management from the University of California, Santa Barbara in 2016. She has conducted survey work for marine spatial planning projects in the Caribbean and provided research support as a graduate fellow for the Sustainable Fisheries Group.
This article has been viewed 44,760 times.
A barometer measures changes in the pressure of the air.[1] Changes in air pressure are used to predict the weather: when air pressure drops, there is a storm on the way, but when pressure increases, the weather is likely clearing up. Using a few household supplies you can make a simple barometer that can give you a general idea about the local air pressure.
Steps
Building a Tin Can Barometer
-
1Gather your materials. To make a tin can barometer, you will need a tin can, a balloon, a rubber band, glue, two plastic straws or coffee stirrers, construction paper, and an index card. Most of these items should be easily found around the home.
- If you don’t have a tin can, any container with a large-mouth (diameter of 1.5 -2 inches), plastic or glass, will work for this barometer. A bottle with a narrow mouth will not work.
- A rubber or latex glove will also work in place of a balloon.
-
2Cut the end off the rubber balloon. You will use the balloon to cover the mouth of your container. In order to get a piece that will stretch over the mouth, you must first cut the end off the balloon. Snip off the entire straight/narrow part of the balloon, just below where the round part of the balloon begins.
- If you are using a rubber glove, cut off the fingers of the glove and cut the glove down one of the sides so you have a flat piece of glove that can cover the entire mouth of your container.
Advertisement -
3Stretch the rubber balloon tightly around the mouth of the container. Slide the balloon onto the wide-mouthed bottle or jar so that it is stretched completely flat across the mouth of the container. Secure the balloon or glove in place with a rubber band around the sides.
- Ensure the seal is tight around the rubber band and that no air is leaking into or out of the container.
-
4Cut a small arrow out of construction paper to attach to the straw. Draw and cut out an arrow small enough to fit into the end of the straw. Alternatively, if you are using a coffee stirrer, cut it small enough to glue onto the end of the stirrer. This arrow will help you determine the relative pressure more accurately.
-
5Glue the straw or stirrer with the arrow to a second straw or stirrer. The more length of arm that extends past the edge of the container, the more accurate your relative pressure readings will be. To extend the length of the arm, stick one straw inside another and glue or tape them together. If you are using coffee stirrers, simply glue or tape two of them together.
- Make sure the arm is still straight and doesn’t bend at the join between the two pieces.
- Use sticks which are very light (drinking straws are perfect for this project) so that the weight of the stick does not cause the rubber to stretch.
-
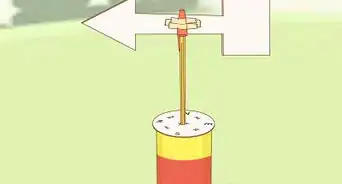
6Glue the straw or coffee stirrer arm to the middle of the balloon. Place a small dab of white craft glue in the center of the balloon and place the end without the arrow into the glue. Place a small piece of tape over the arm to hold the straw in place while the glue sets.
- After the glue is dry, you can remove the tape.
-
7Label the index card with a weather gauge. Make a mark in the middle of the card where the arm points when it is directly horizontal. Above the middle line, draw an arrow pointing up and write “High Pressure”. Below the middle line, draw an arrow pointing down and write “Low Pressure”.
- When the arm points toward “High Pressure”, the weather is usually sunny with clear skies.
- When the arm points toward “Low Pressure”, the weather is likely cloudy and/or rainy.
- Tape the index card to the wall next to the barometer.
-
8Arrange the barometer so that the arrow points to the weather gauge index card. Place the barometer in a place away from activity where no one can knock it over. Arrange it so that the end of the arm points horizontally at the center of the index card weather gauge.
-
9Observe the pressure changes from your barometer. When the pressure increases, the balloon over the can will deflate. This will cause the arm to point up towards “High Pressure”. When air pressure decreases, the balloon will inflate causing the arm to point down towards “Low Pressure”.[2]
- Although this barometer cannot tell you the exact air pressure, you will still be able to determine the relative air pressure and predict the weather outside!


Building a Liquid Change Barometer
-
1Gather your materials. For this barometer you will need a marker, an empty ketchup bottle, a drinking glass, and water. The bottle does not have to be a ketchup bottle. It just needs to be able to rest upside down on the rim of the drinking glass without touching the bottom of the glass.[3]
-
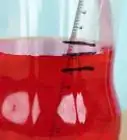
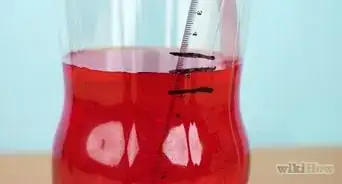
2Make marks 2 centimeters apart along the entire side of the bottle. Starting at the top of the bottle, make a black mark every 2 cm until you reach the bottom of the bottle. These markings will serve as a relative scale to measure changes in pressure.[4]
- Number the marks starting with 1 at the top of the bottle until you reach the last mark at the bottom. The bottle will be upside down in the glass, so write the numbers with the bottle upside down.
-
3Fill the bottle half-way with water. Using tap water, add enough water to the empty bottle until it is about half-way full. The exact amount of water added does not matter.
-
4Place the glass on top of the bottle and quickly flip it over. This process can lead to some spilling if you’re not quick enough. The water will come out of the bottle and fill the glass part way, but the water level in the bottle will be higher than that in the glass.
- If the water level in the bottle isn’t higher than in the glass, add more water to the bottle and try flipping it again.
-
5Add one more inch of water to the glass. When air pressure increases, more water will be pushed into the bottle. For the barometer to work properly, the bottle opening needs to stay submerged in water at all times. Adding this extra water ensures that the bottle will remain submerged during pressure changes.[5]
- You want the water level in the glass to be just above the lip of the bottle at all times.
-
6Observe changes in the water level of the ketchup bottle. When air pressure decreases, the water level in the ketchup bottle will decrease. Lower air pressure corresponds to rainy, cloudy weather. When the air pressure increases, the water level increases inside the ketchup bottle.[6] Higher pressure indicates sunny, clear skies.
- Take note of where the water level is in the morning. Check it again in the evening to see if it has changed.
- Compare the actual weather with the changes in water level. Can you predict the weather with relative changes in the water level of your barometer?


-Step-15.webp)

References
- ↑ https://www.teachengineering.org/view_activity.php?url=collection/cub_/activities/cub_weather/cub_weather_lesson02_activity1.xml
- ↑ http://www.weatherwizkids.com/experiments-barometer.htm
- ↑ https://www.teachengineering.org/view_activity.php?url=collection/cub_/activities/cub_weather/cub_weather_lesson02_activity1.xml
- ↑ https://www.teachengineering.org/view_activity.php?url=collection/cub_/activities/cub_weather/cub_weather_lesson02_activity1.xml
- ↑ https://www.teachengineering.org/view_activity.php?url=collection/cub_/activities/cub_weather/cub_weather_lesson02_activity1.xml
- ↑ https://www.teachengineering.org/view_activity.php?url=collection/cub_/activities/cub_weather/cub_weather_lesson02_activity1.xml
About This Article