This article was co-authored by wikiHow Staff. Our trained team of editors and researchers validate articles for accuracy and comprehensiveness. wikiHow's Content Management Team carefully monitors the work from our editorial staff to ensure that each article is backed by trusted research and meets our high quality standards.
There are 9 references cited in this article, which can be found at the bottom of the page.
The wikiHow Video Team also followed the article's instructions and verified that they work.
This article has been viewed 42,608 times.
Learn more...
Making a birdhouse out of a milk carton is a fun and easy project. If you’re a parent or teacher, it’s a great way to teach kids about nature, arts and crafts, and recycling. All you’ll need is a utility knife and a few other simple tools. In no time at all, you can turn an ordinary milk carton into a creative, environmentally-friendly shelter for nearby feathered friends.
Steps
Constructing Your Birdhouse
-
1Rinse out the milk carton with dish soap and warm water. If you’re recycling a container that held milk or juice, wash it out thoroughly before turning it into a birdhouse. Be sure to rinse away all soapy residue, then let the carton dry completely.
- For best results, use a 1⁄2 gallon (1.9 L) or 1 gallon (3.8 L) carton. Small, single serving milk cartons aren't large enough to use as birdhouses.
Tip: You can also order unused empty milk cartons online. This is a good option if you need a large number of cartons, such as for a classroom project or birthday party activity.[1]
-
2Cut out a 1 1⁄2 to 3 in (3.8 to 7.6 cm) hole on 1 side of the carton. Trace a circle on a side of the carton about 2 to 3 in (5.1 to 7.6 cm) from the bottom. Then use a utility knife or scissors to cut out the circle. The hole will allow birds to enter the birdhouse.[2]
- The right size for the hole depends on the birds in your area. For most wrens and songbirds, a 1 1⁄2 in (3.8 cm) hole is ideal. If you want to attract larger birds, such as screech owls, make the hole 3 in (7.6 cm) in diameter.
- Use caution with blades and other sharp objects. If necessary, have an adult help you cut the carton.
- To trace a perfect circle, use the bottom of a measuring cup, bottle cap, or other round object that’s 1 1⁄2 to 3 in (3.8 to 7.6 cm) in diameter.
Advertisement -
3Poke small drainage holes into the bottom of the carton. Use an ice pick, leather awl, or skewer to make small holes at each corner on the carton’s underside. The holes will provide ventilation and prevent water from pooling inside the house.[3]
- Remember to be careful with sharp tools and, if necessary, to get help from an adult.
-
4Punch a hole at the top so you can hang the birdhouse. Use a hole puncher to make a hole at the top of the carton where the slanted sides come together to form a flat edge. Position the hole in the middle of the top edge so the birdhouse’s weight will be evenly distributed when it hangs.[4]
- Try to punch the hole at least 1⁄2 in (1.3 cm) down the top edge of the carton. If you make the hole too close to the very top, the string might tear through the carton when you hang it.

Adding Decorations
-
1Glue 3 in (7.6 cm) sticks to the top of the carton to make a roof. Cut popsicle sticks or twigs from the yard with scissors or pruning shears. Each should be about 3 in (7.6 cm) long. Then paste them to the slanted sides at the top of the carton to form an overhanging roof.[5]
- The exact number of sticks you'll need depends on their size. Most milk carton are 4 to 5 inches (10 to 13 cm) wide. If you have 1⁄2 inch (1.3 cm) sticks, you'd need around 8 to 10 of them to cover each slanted side of the carton's top.
- Craft glue should start to dry in 5 to 10 minutes, but you should wait at least 24 hours before putting the birdhouse outside. That'll give the glue time to fully cure. Otherwise, any moisture or humidity outside could weaken the bond.
- The roof will provide shade and direct rainwater away from the birdhouse’s opening.
-
2Paint the carton’s exterior with water-based paint, if desired. If you’d like to add some color to your birdhouse, start with a coat of white primer to conceal writing and logos on the carton. Allow the first coat to dry for 4 to 6 hours, or according to the instructions, then add 1 to 2 top coats in a color of your choice.[6]
- As for color choice, go with a lighter hue. Generally, bird’s aren’t picky about the color of their shelter, but darker shades absorb light and can lead to overheating. Additionally, bright colors could attract predators, so it’s best to go with a less conspicuous option, such as tan, gray, or green.
Safety tip: Choose a non-toxic, zero-emissions, water-based product, and don’t paint the inside of the birdhouse. While the paint should dry within 24 hours, it’s wise to wait a few weeks before hanging the birdhouse to give fumes time to dissipate.[7]
-
3Try pasting buttons or construction paper cutouts onto the carton. To add personality to your birdhouse, you could also paste buttons, googly eyes, or other crafty details onto it. Try making flower designs with buttons, pasting leaf-shaped colored paper cutouts all over the carton, or decorating it to look like a bird.[8]
- You could even decorate the birdhouse to make it look like your own home. Paint it the same color as your home, make windows and other details out of construction paper cutouts, then paste the cutouts onto the birdhouse when the paint is dry.
- Avoid using shiny or reflective decorations, which could scare birds away.

Hanging the Birdhouse
-
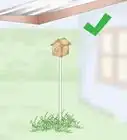
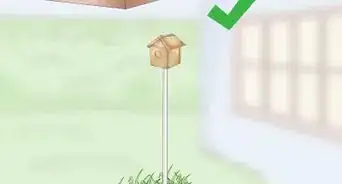
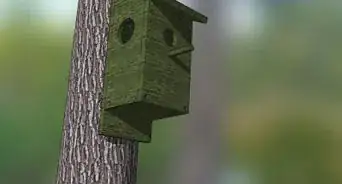
1Choose a quiet spot in your yard that’s within view of a window. Hang your birdhouse from a branch, eave, or other sturdy fixture. Look for a spot that’s away from car and foot traffic so any hatchlings in the nest will have privacy. At a minimum, hang the birdhouse 30 feet (9.1 m) away from areas of activity.[9]
- While the spot should be secluded, it should still be visible from a window or patio so you can admire your new feathered friends.
-
2Tie string or yarn through the hole at the top of the carton. Loop the string through the hole, then tie it securely in a double knot. Measure the height of the branch or post you’ll hang the birdhouse from to find the right length for the string. The string should be long enough so the birdhouse hangs at least 5 ft (1.5 m) above the ground.
- Hanging birdhouse at least 5 feet (1.5 m) above the ground will help keep out snakes, insects, and other predators and pests.
- For instance, if you plan on hanging the birdhouse from a 9 ft (2.7 m) branch, the string should be less than 4 ft (1.2 m) long.
- Use a string made out of nylon or another synthetic material instead of one made of cotton twine. Natural fibers wear away over time. Additionally, go with a sturdy product with a diameter of at least 2 millimeters (#30 gauge or higher).
-
3Place small rocks or sand inside the carton to anchor it against the wind. To help prevent the birdhouse from blowing around wildly in the wind, line the bottom with sand, gravel, or small rocks. A 1⁄2 to 1 in (1.3 to 2.5 cm) layer should be enough to anchor the birdhouse.
- You can just use pebbles or rocks from your yard; there’s no need to use a store-bought product.
-
4Hang the box at least 5 ft (1.5 m) off of the ground. Loop the end of the string that’s not tied to the birdhouse around a branch, then tie it in a tight double knot. The best time to hang your birdhouse is in the late winter or early spring. That way, birds will have time to notice it and select it as a nesting site.[10]
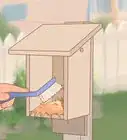
- If you want to use the carton as a bird feeder, simply add bird seed up to the circular opening. Check the feeder every week or so and refill it when necessary.
Encourage birds to nest: To attract birds, place nesting materials inside the birdhouse and in piles on the ground surrounding it. Good materials include dead leaves, twigs, moss, and pine needles. Avoid offering birds plastic, tin foil, or dryer lint.[11]


Community Q&A
-
QuestionCan I make it with a tin can?
 Community AnswerIf you have the right tools, like a sharp knife and sandpaper to sand the edges of the hole you cut. Try to use a bigger can if possible, and cut the circle 2 to 3 inches from the bottom so if birds nest in it, the nest won't fall out.
 -
QuestionIf I don't decorate it, will the birds still enter?
 Community AnswerYes, of course. Birds simply don’t require decorations and only need insulation against excess cold and heat, and shelter too (for themselves and their little ones).
Warnings
- Be careful with scissors, ice picks, utility knives, and other sharp tools. If necessary, ask an adult for permission or help.⧼thumbs_response⧽
Things You’ll Need
- 1⁄2 US gal (1.9 L) or 1 US gal (3.8 L) milk carton
- Pencil
- Utility knife or scissors
- Ice pick or skewer
- Hole puncher
- Glue
- Popsicle sticks or twigs
- String or yarn
- Non-toxic, water-based paint (optional)
- Paintbrush (optional)
- Construction paper (optional)


References
- ↑ http://la.audubon.org/sites/g/files/amh596/f/static_pages/attachments/prow_milk_carton_box.pdf
- ↑ https://nestwatch.org/learn/all-about-birdhouses/features-of-a-good-birdhouse/
- ↑ http://la.audubon.org/sites/g/files/amh596/f/static_pages/attachments/prow_milk_carton_box.pdf
- ↑ https://www.audubon.org/news/make-bird-feeder-out-recycled-materials
- ↑ https://www.parents.com/fun/arts-crafts/kid/make-a-milk-carton-bird-feeder/?slideId=slide_24c8860d-5854-48ac-b5d3-1bea57663125#slide_24c8860d-5854-48ac-b5d3-1bea57663125
- ↑ https://www.seattletimes.com/life/lifestyle/what-birds-want-in-a-birdhouse/
- ↑ https://nestwatch.org/connect/news/to-paint-or-not-to-paint/
- ↑ https://www.parents.com/fun/arts-crafts/kid/make-a-milk-carton-bird-feeder/?slideId=slide_ff2f2108-9fd1-4131-8a3b-e6ae432cd84b#slide_ff2f2108-9fd1-4131-8a3b-e6ae432cd84b
- ↑ https://www.seattletimes.com/life/lifestyle/what-birds-want-in-a-birdhouse/
- ↑ https://www.audubon.org/news/make-bird-feeder-out-recycled-materials
- ↑ https://www.allaboutbirds.org/providing-nest-material-for-birds-dos-donts/
- ↑ https://nestwatch.org/learn/all-about-birdhouses/nest-box-placement/
- ↑ https://www.seattletimes.com/life/lifestyle/what-birds-want-in-a-birdhouse/
- ↑ https://nestwatch.org/learn/all-about-birdhouses/features-of-a-good-birdhouse/
About This Article