This article was co-authored by wikiHow Staff. Our trained team of editors and researchers validate articles for accuracy and comprehensiveness. wikiHow's Content Management Team carefully monitors the work from our editorial staff to ensure that each article is backed by trusted research and meets our high quality standards.
This article has been viewed 131,558 times.
Learn more...
A custom-made toy chest will be much-appreciated by the child who receives it. Adults who won’t be tripping over toys on the floor anymore will be happy too! Building a toy chest is a super-easy DIY project that you can do with just a few tools, the right hardware, and some wood, plywood, or MDF cut to size. Alternatively, use a premade table top and a metal bucket to make a table with a toy storage bin underneath. It’s so simple, you can even do it with the help of the kids for a fun afternoon project!
Steps
Assembling a Wooden Box
-
1Plan how big you want to make the chest and buy the right amount of wood. Plywood or MDF are the most economic choices for the wood, but you can use any type of wood you want. Use a solid wood instead if you want to give the chest a natural finish.[1]
- Use boards that are 1⁄2 in (1.3 cm) thick.
- A toy chest that is 29 in × 18 in (74 cm × 46 cm) and 13 in (33 cm) high is a good size if you aren’t sure.
- You can get different types of solid wood, plywood, or MDF at a lumber yard or home improvement center.
- MDF stands for medium-density fibreboard. It is a bit denser than plywood and has a smoother surface, but is not as strong as plywood and can sag under heavy weight. Plywood is slightly more expensive, but is stronger than MDF.
-
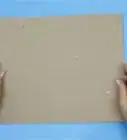
2Lay out 6 pieces of 1⁄2 in (1.3 cm) wood for the chest. Lay out the pieces on a flat work surface in the shape of the box. Place the bottom in the middle with the front, back, and sides laid beside it where they will go. Put the lid off to the side for now.[2]
- Use 2 29 in × 13 in (74 cm × 33 cm) pieces for the front and back and 2 18 in × 13 in (46 cm × 33 cm) pieces for the sides.
- Use 1 29 in × 17 in (74 cm × 43 cm) pieces for the bottom and 1 30 in × 18 in (76 cm × 46 cm) piece for the top.
- You can adjust the measurements if you want to make the chest larger or smaller.
Tip: Get the pieces cut for you at a home improvement center to make the assembly super fast and easy. If you have the tools and know-how, you can cut the pieces yourself.
Advertisement -
3Sand the pieces with 120-grit sandpaper to remove any splinters. Sand the edges of the boards by hand or with an electric sander so that there are no splinters or sharp edges. Sand the surfaces of the boards if there are any rough spots.[3]
-
4Put a thin line of wood glue along the edges of the pieces where they will touch. Slowly squeeze out a bead of carpenter’s glue along the lower edges of the sides, front, and back where they will sit against the bottom piece. Squeeze a line of the wood glue along the left and right edges of the sides where they will overlap the front and back pieces.[4]
- Don’t worry if you accidentally squeeze out a bit too much glue. You’ll be able to wipe away the excess when you put the pieces together.
-
5Stand up the pieces around the bottom and clamp them in place with bar clamps. Start by lifting the front and back pieces and holding them in place against the front and back edges of the bottom. Lift the side pieces up next so they rest against the bottom as well as overlap the ends of the front and back pieces. Clamp everything in place with bar clamps.[5]
- This will be easiest if you have someone help you hold the pieces in place while you clamp them.
- You can use a moist rag to wipe away any excess glue that comes out of the cracks after you clamp everything together.
-
6Nail the pieces together with finish nails every 3–4 in (7.6–10.2 cm). Use 1.5–2 in (3.8–5.1 cm) finish nails. Hammer them all along the bottom edges into the bottom board, as well as up the sides where the sides overlap the ends of the front and back pieces.[6]
- Try to hammer the nails as flush with the surface of the wood as possible so you will have a smooth finish when you paint over them.


Finishing a Wooden Chest
-
1Paint the assembled box and the lid piece with acrylic or latex paint. Use a medium-sized paintbrush, such as a 4 in (10 cm) brush, to paint the toy chest and lid a color of your choice. Paint with the grain in a back-and-forth motion until you have given everything an even coat.[7]
- You can leave the inside of the chest unfinished to save time and paint.
- If you used a solid wood instead of plywood or MDF, you can leave the box with a natural finish or use a wood stain to finish it instead of painting it.
Tip: If you can still see the wood after 1 coat of paint, then let it dry for about an hour, then give it another coat.
-
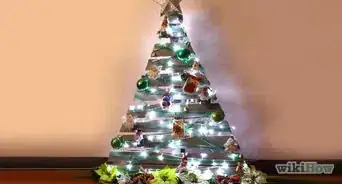
2Let the pieces dry for at least 1 hour before you attach the lid. Let it dry completely so that you don’t mess up the paint or get paint on the hardware when you add the lid to finish assembling the chest. You can add other touches to decorate it when the paint is dry if you want.[8]
- For instance, you could try painting on designs with stencils or gluing on letters to personalize the chest.
-
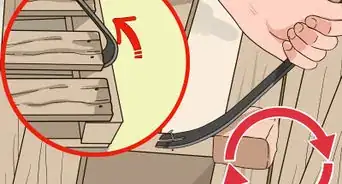
3Screw a piano hinge to the back of the box and lid to attach it. Place the lid on top of the box so that the back edge is flush with the back of the box. Place the piano hinge so that 1 side is against the back edge of the lid and 1 side is against the back of the box. Screw it into place with the provided hardware or 1.5–2 in (3.8–5.1 cm) wood screws.[9]
- You can use 1 long piano hinge in the middle of the box and lid, or, alternatively, 2 shorter piano hinges at each corner.
- Piano hinges are a strip consisting of 2 metal sides joined by a continuous hinge all the way along the middle. They can be purchased at a hardware store or home improvement center.
-
4Attach lid supports to the inside of the box and lid to hold the lid open. Lid supports will keep the lid from falling shut on its own when someone is rooting around for toys in the box. There are different types of lid supports, so you will need to follow the manufacturer’s instructions to attach them.[10]
- In general, you will just need to screw the lid supports to the inside of the back of the box and to the inside of the lower edge of the lid while it is open to attach them.
- You can buy lid supports at a hardware store or home improvement center.
-
5Put caster wheels on the bottom of the box if you want to be able to roll it. This is optional, but will make your new toy chest more mobile. Attach a caster wheel in each corner of the bottom of the chest using the provided hardware for the final touch.[11]
- If the caster wheels come with screws that are longer than 1⁄2 in (1.3 cm), then only screw into the holes that you can align under the sides of the box, or use shorter screws if you have to screw into the bottom of the box so they don’t poke through on the inside.
- You’ll be able to find caster wheels at a hardware store or home improvement center. You can always add them later on if you decide you want to.


Making a Bucket Toy Bin
-
1Sand a premade 24 in (61 cm) table round to smooth it. Start with 120-grit sandpaper to smooth out any rough spots. Switch to 220-grit and sand the whole table top, going with the grain, until it has a smooth, even finish all over.[12]
- You can buy a prefabricated round table top at a home improvement center, or get one custom cut there from a solid piece of wood if they don’t have them for sale.
-
2Stain the table top with gel stain and foam brushes. Stir the gel stain well with a stir stick or scrap piece of wood before you begin. Use foam brushes to work the stain into the wood, going with the grain.[13]
- Gel stain is thicker than liquid stain and is easier to use. It’s a great choice if you want to do this project with your kids because it is more straightforward to use.
Tip: Give the table top 2-3 coats if you want a deeper, darker finish.
-
3Wipe off the excess stain with a rag and let it dry. Follow the manufacturer’s instructions for the amount of time to let the gel stain soak in and dry. Let the stain dry between coats if you plan on applying more than one.[14]
- You can seal and protect the finish with brush-on or spray-on polyurethane if you want, or leave it as is.
-
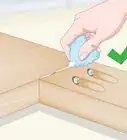
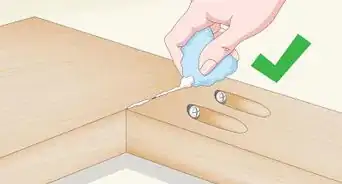
4Create a seal on the underside of the table top with rope. Flip the table top over and place a 17 gallon (45.42 L) galvanized tin tub in the center of it. Trace around the bucket with a pencil. Use a hot glue gun to glue 3⁄4 in (1.9 cm) rope to the underside of the wood 1 in (2.5 cm) inside the traced circle.[15]
- Check that the table top sits flush on the tin bucket right away after you create the seal. Peel the rope off and adjust it to get a tight, flush fit if you need to.
-
5Attach table legs if you want to make the storage bin taller. Use 4 4–6 in (10–15 cm) prefabricated table legs. Use a drill with a metal bit to drill holes for the legs in the bottom of the bucket and attach them with the provided hardware.[16]
- You will be able to find different kinds of prefabricated table legs at a home improvement center, where you got the premade table round. It’s up to you if you want to use wooden ones or any other style that you like.


Community Q&A
-
QuestionShould I put a sealer over the painted toy chest?
 AgewalkerCommunity AnswerIt will make it last longer, so it's a good idea to finish it in some way.
 -
QuestionWhat size should a toy chest be?
 Community AnswerThat depends on how many toys your child has, so you will have to go with your best judgment. Make sure the toy box is slightly bigger than necessary to fit all of the toys.
 -
QuestionWhere do I buy lid supports?
 Community AnswerYou can find these at a hardware store.
Things You’ll Need
Wooden Toy Chest
- 2 29 in × 13 in (74 cm × 33 cm) pieces of 1⁄2 in (1.3 cm) plywood or MDF
- 2 18 in × 13 in (46 cm × 33 cm) pieces of 1⁄2 in (1.3 cm) plywood or MDF
- 1 29 in × 17 in (74 cm × 43 cm) piece of 1⁄2 in (1.3 cm) plywood or MDF
- 1 30 in × 18 in (76 cm × 46 cm) piece of 1⁄2 in (1.3 cm) plywood or MDF
- Piano hinge
- Wood glue
- Bar clamps
- Finish nails
- Rag
- Drill
- Wood screws
- Lid supports
- Latex or acrylic paint
- Paintbrush
- Caster wheels (optional)
- 120-grit sandpaper
- Hammer
Bucket Toy Bin
- Premade 24 in (61 cm) table round
- 120-grit and 220-grit sandpaper
- 17 gallon (45.42 L) galvanized tin tub
- Coil of 3⁄4 in (1.9 cm) thick rope
- Hot glue gun
- Pencil
- Gel stain
- Rag
- Foam brushes
- Polyurethane (optional)
- Drill with metal bit (optional)
- 4 4–6 in (10–15 cm) table legs (optional)
- Wrench (optional)


References
- ↑ https://www.adventuresofadiymom.com/2015/04/how-to-build-toy-box.html
- ↑ https://www.thisoldhouse.com/how-to/how-to-build-toy-chest
- ↑ https://www.thisoldhouse.com/how-to/how-to-build-toy-chest
- ↑ https://www.remodelaholic.com/build-plywood-toy-storage-box-wheels/
- ↑ https://www.thisoldhouse.com/how-to/how-to-build-toy-chest
- ↑ https://www.thisoldhouse.com/how-to/how-to-build-toy-chest
- ↑ https://www.remodelaholic.com/build-plywood-toy-storage-box-wheels/
- ↑ https://www.ana-white.com/woodworking-projects/build-toybox-or-toy-chest
- ↑ https://www.thisoldhouse.com/how-to/how-to-build-toy-chest
- ↑ https://www.thisoldhouse.com/how-to/how-to-build-toy-chest
- ↑ https://www.remodelaholic.com/build-plywood-toy-storage-box-wheels/
- ↑ https://www.bobvila.com/articles/diy-toy-chest/
- ↑ https://www.bobvila.com/articles/diy-toy-chest/
- ↑ https://www.bobvila.com/articles/diy-toy-chest/
- ↑ https://www.bobvila.com/articles/diy-toy-chest/
- ↑ https://www.bobvila.com/articles/diy-toy-chest/
About This Article