This article was co-authored by wikiHow staff writer, Sophia Latorre. Sophia Latorre is a Content Manager on the wikiHow team. Before joining wikiHow, Sophia worked as a technical editor and was published in six International Energy Agency (IEA) Wind Annual Reports. Now, she writes, edits, and reviews articles for the wikiHow Content Team, working to make the content as helpful as possible for readers worldwide. Sophia holds a BA in English from Colorado State University.
There are 10 references cited in this article, which can be found at the bottom of the page.
This article has been viewed 6,468 times.
Learn more...
Freight classes are assigned in order to determine the cost of shipping and the higher the freight class, the higher the cost. Density is the most important factor, so start by calculating the density of your item in pounds per cubic feet. Match the density to a freight class, then adjust the class based on the type of item and it’s stow-ability, handling, and liability. To determine the cost, reach out to various shipping companies and supply them with the dimensions and freight class of your shipment to get estimates.
Steps
Calculating Density
-
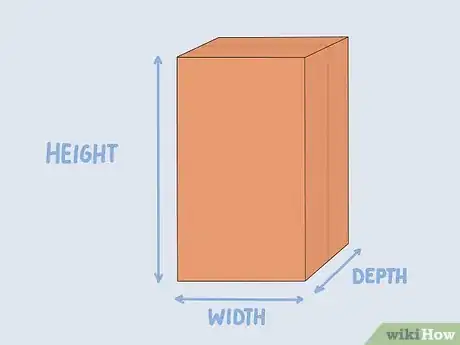
1Measure the width, height, and depth of the package. Use a tape measure to find the dimensions of your shipment in inches. Be as precise as possible in order to get an accurate freight classification. Include the pallet or skid in your measurement, if your package is on one.[1]
- Repeat the process for each package if your shipment has more than one.
-
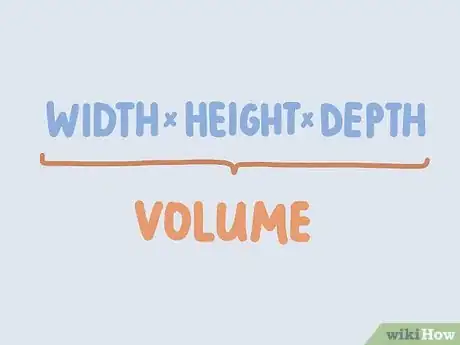
2Multiply the width, height, and depth to find the total cubic inches of the package. Simply multiply all 3 numbers together to find the volume in cubic inches.[2]
- For instance, your package might have a width of 145 inches, a height of 220 inches, and a depth of 75 inches. Multiply 145 by 220 by 75, which is equal to 2,392,500 cubic inches.
Advertisement -
3Divide the sum by 1,728 to convert to cubic feet. Since you took your measurements in inches, you must convert to cubic feet before you can determine the density. Just take your volume measurement and divide it by 1,728, which is the number of cubic inches in a cubic foot.[3]
- For example, if your package is 2,392,500 cubic inches, divide 2,392,500 by 1,728. This comes out to 1,384.5486. Round to 1,384.55, which is the number of cubic feet.
-
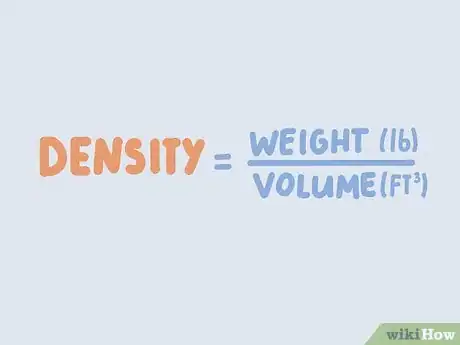
4Calculate the density by dividing the weight in pounds by the number of cubic feet. Start by weighing the item in pounds. Take this number and divide it by the volume in cubic feet.[4]
- For instance, if your package weighs 2,350 pounds and has a volume of 1,384.55 cubic feet, divide 2,350 by 1,384.55 to get a density of 1.697 pounds per cubic feet.
Determining Freight Class
-
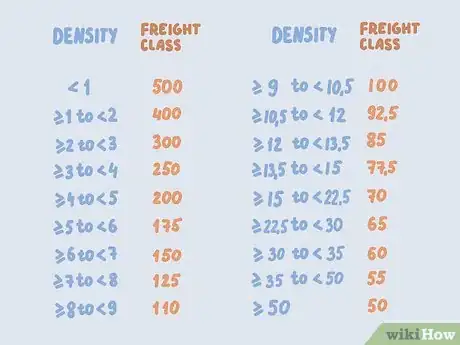
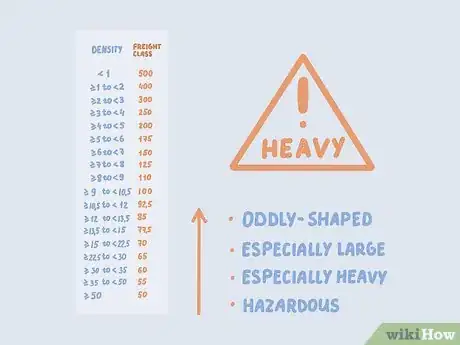
1Match your density to a freight class. Density refers to how heavy the shipment is compared to its size. The National Motor Freight Traffic Association (NMFTA) devised 18 different freight classes spanning the numbers 50 to 500. Items in lower freight classes have a higher density and are less expensive to ship.[5]
Freight Density (pounds per cubic foot) = Freight Class
<1 = 500
≥1 to <2 = 400
≥2 to <3 = 300
≥3 to <4 = 250
≥4 to <5 = 200
≥5 to <6 = 175
≥6 to <7 = 150
≥7 to <8 = 125
≥8 to <9 = 110
≥9 to <10.5 = 100
≥10.5 to <12 = 92.5
≥12 to <13.5 = 85
≥13.5 to <15 = 77.5
≥15 to <22.5 = 70
≥22.5 to <30 = 65
≥30 to <35 = 60
≥35 to <50 = 55
≥50 = 50 -
2Adjust the freight class based on what kind of item you’re shipping. The National Motor Freight Code (NMFC) associated with your item could raise or lower the freight class of your shipment. Look online for an NMFC code list and find the item you plan to ship. Compare the item code with the density code and use whichever one is higher.[6]
- Nearly every item has a code, even if it’s uncommon to ship it. For instance, bricks on a pallet: 50, clothing items: 77.5, lawnmowers: 92.5, radios: 125, motorcycles: 150, wind instruments: 150, bamboo furniture: 250, and kayaks or canoes: 300.[7]
- If the item you’re shipping is categorized as Not Otherwise Indicated (NOI), use the density to determine the freight class.[8]
-
3Increase the freight class if the item is hard to stow. If your shipment is oddly-shaped or especially large or heavy, it might be categorized into a higher freight class than what it’s density alone suggests. This is also true if your shipment is hazardous.[9]
- Hazardous materials are assigned different hazard classes and must be labeled with their contents and class. For instance, explosives are in class 1, gases are in class 2, and flammable liquids are in class 3.[10]
-
4Assign your shipment a higher freight class if it’s difficult to handle. If you’re shipping fragile items that must be handled with care or can’t be stacked, increase the freight class. If the dimensions of the shipment are odd or hard to manage, this could also bump up the freight class.[11]
- Shipments that are hard to load, unload, or carry may be more expensive, as are those that are fragile, including glass, ceramic, porcelain, paintings and sculptures, bronze and stone, and laboratory and musical equipment.[12]
-
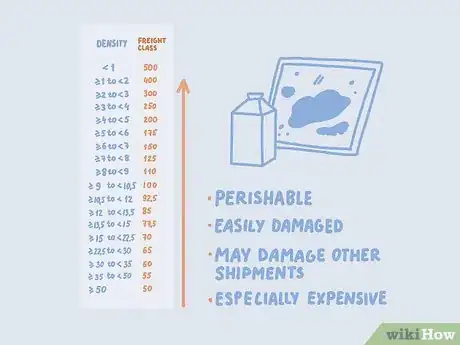
5Raise the freight class if your shipment has any liability issues. Items that are perishable, easily damaged, or especially expensive could move your shipment from a lower freight class to a higher one. If your package has the potential to damage other shipments or if it’s likely to be stolen, assign it a higher class.[13]
- Perishable items include those that need a temperature- or humidity-controlled environment, including food items like fruit, vegetables, dairy, and meat, as well as things like plants or live fish.[14]
- Keep in mind that the higher the freight class, the more expensive the item will be to ship.
References
- ↑ https://www.tranzact.com/resources/freight_class_calculator
- ↑ https://sciencing.com/find-cubic-feet-4531317.html
- ↑ https://sciencing.com/convert-inches-cubic-feet-4530253.html
- ↑ https://my.yrc.com/national/html/densityCalculation.shtml
- ↑ https://www.tranzact.com/resources/freight_class_calculator
- ↑ https://www.freightcenter.com/freight-class
- ↑ https://www.freightcenter.com/tools/freight-class-lookup-tool
- ↑ https://www.freightcenter.com/freight-class
- ↑ https://www.freightquote.com/how-to-ship-freight/freight-class-density-calculator/
- ↑ https://www.freightquote.com/how-to-ship-freight/shipping-hazardous-materials-classes/
- ↑ https://www.freightquote.com/how-to-ship-freight/freight-class-density-calculator/
- ↑ https://www.lam.co.mz/en/LAM-Cargo/Load-products/Special-Cargo/Fragile-Cargo
- ↑ https://www.freightquote.com/how-to-ship-freight/freight-class-density-calculator/
- ↑ https://www.fedex.com/en-us/shipping/perishables.html
