This article was co-authored by wikiHow Staff. Our trained team of editors and researchers validate articles for accuracy and comprehensiveness. wikiHow's Content Management Team carefully monitors the work from our editorial staff to ensure that each article is backed by trusted research and meets our high quality standards.
There are 8 references cited in this article, which can be found at the bottom of the page.
This article has been viewed 39,186 times.
Learn more...
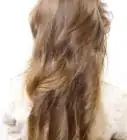
Banana buns are the latest hairstyle, hailing straight from France. They may seem complex but are actually quite simple to do! The basic banana bun involves twisting together three strands of hair. The rolled banana bun involves simply rolling your hair up into a tube! You can even step things up by using rhinestone pins or loosening a few wisps of hair.
Steps
Creating a Twisted Banana Bun
-
1Divide your hair into three equal-sized sections, like starting a braid. You want to have two side sections and a back, center section. This style works best on slightly dirty hair.[1] It does not matter if you have curly, wavy, or straight hair.[2]
- If you hair is freshly washed or very smooth, consider spraying it with some dry shampoo or texturizing spray. This will help give it some texture and make styling easier.[3]
-
2Tie the middle section into a low ponytail. Keep the hair tie low, about the middle of your hair.[4]Advertisement
-
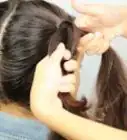
3Pull right strand across the middle strand, like starting a braid. Twist the strand a little as you cross it so that it is more like a rope. You want the strand to be just above the hair tie, or covering it.[5]
-
4Pull it under the middle strand so it's pointing to right. Keeping a hold on the right strand, pull it under the old middle strand (the strand currently on the right). You want the tail end of the strand to be pointing to the right.[6]
-
5Drag the left strand under the other two strands. Once again, give the left strand a twist as you cross it so that it becomes more like a rope. You want to finish with the tail end of the left strand pointing to the right as well.[7]
-
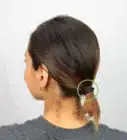
6Secure everything with pins. You can use bobby pins or U-shaped pins.[8] How many pins you use depends on how long, thick, and heavy your hair is.
-
7Leave the tail ends down or pin them in place. This really depends on how you want your bun to look like in the end. For a messier look, leave the tail ends of the strands hanging down. For a cleaner look, tuck the tail ends under the bun and pin them into place. If you have very long hair, you may need to wrap them around the bun a few times first.[9]
-
8

Creating a Rolled Banana Bun
-
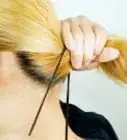
1Pull you hair back into low pony tail. Do not tie your hair, however. Instead, hold it in your right hand, with your thumb under the tail and your forefinger on top of it.
-
2Start rolling you hair around your forefinger. Grab your hair with your left hand. Keeping it spread out and flat, start wrapping it upward around your right forefinger. Work your way from the top of your hair down to the ends.
- Make sure that you are wrapping towards the tip of your finger.
- Do not twist the hair like a rope. Keep it flat like a sheet. This will give you a tube-shaped roll of hair.
-
3Tuck the hair ends in. As you roll your hair, your hair may start to take on a cone shape. This is a good start, but it will be difficult to hold together. Gently push the ends of your hair into the rolled up hair while pulling your forefinger out. Gently hold your rolled up hair with your right hand. It will be wider on the right and narrower on the bottom.
-
4Insert some spin pins. Spin pins are spiral shaped pins, with two prongs at one end. Insert a spin pin on the right side of the bun, prong-side-down. Grip it by the smooth, folded tip, and twist it in.[12] Insert another pin through the bottom-center of your bun.
- Each brand of spin pin may be a little different. In most cases, you will need to twist them in counterclockwise.[13]
-
5Spray your bun with hairspray, if desired. Since your bun is rolled, it should hold its shape pretty well. You can help the style last longer, however, by lightly misting it with some hairspray.
Things You'll Need
Creating a Twisted Banana Bun
- Hair tie
- Bobby pins
Creating a Rolled Banana Bun
- Two spin pins


References
- ↑ http://www.purewow.com/beauty/banana-bun-hairstyle
- ↑ https://www.brit.co/banana-bun-hairstyle-trend-for-french-girl/
- ↑ http://www.purewow.com/beauty/banana-bun-hairstyle
- ↑ http://www.byrdie.com/french-girl-hair-banana-bun/slide6
- ↑ http://www.byrdie.com/french-girl-hair-banana-bun/slide6
- ↑ http://www.byrdie.com/french-girl-hair-banana-bun/slide6
- ↑ http://www.byrdie.com/french-girl-hair-banana-bun/slide6
- ↑ http://www.byrdie.com/french-girl-hair-banana-bun/slide6
- ↑ http://www.purewow.com/beauty/banana-bun-hairstyle
- ↑ http://www.purewow.com/beauty/banana-bun-hairstyle
- ↑ http://www.byrdie.com/french-girl-hair-banana-bun/slide2
- ↑ https://www.youtube.com/watch?v=Qngf8eXsrzQ
- ↑ https://www.youtube.com/watch?v=Qngf8eXsrzQ/
- ↑ http://www.allure.com/story/banana-buns-on-pinterest
- ↑ http://www.byrdie.com/french-girl-hair-banana-bun/slide6
- ↑ http://www.byrdie.com/french-girl-hair-banana-bun/slide3
- ↑ http://www.byrdie.com/french-girl-hair-banana-bun/slide6
About This Article