This article was co-authored by Christine George. Christine George is a Master Hairstylist, Colorist, and Owner of Luxe Parlour, a premier boutique salon based in the Los Angeles, California area. Christine has over 23 years of hair styling and coloring experience. She specializes in customized haircuts, premium color services, balayage expertise, classic highlights, and color correction. She received her cosmetology degree from the Newberry School of Beauty.
There are 11 references cited in this article, which can be found at the bottom of the page.
wikiHow marks an article as reader-approved once it receives enough positive feedback. In this case, 84% of readers who voted found the article helpful, earning it our reader-approved status.
This article has been viewed 494,320 times.
Adding layers to curly hair can make your hairdo springier and more vibrant. Cutting them yourself can save you a lot of money, but giving yourself a haircut can be intimidating. It's not that hard, though, if you start with the right tools. Remember to cut curly hair while it's dry so you can see the shape of your haircut as you go. Work slowly in sections to add layers that completely transform your look!
Steps
Getting Your Hair Ready to Be Cut
-
1Find some sharp shears and a wide-tooth comb. Don't use just any scissors—find some shears especially made for cutting hair, as these will be sharp enough to avoid tearing the ends of your hair when you cut it. A wide-toothed comb is also important when working with curly hair. In fact, the wider the better! This will detangle your hair and it won't stretch out the hair as much and will help prevent frizz.[1]
-
2Wash, condition, and detangle your hair. Add conditioner and detangle your hair completely. Depending on the kind of conditioner you use, you can comb it through or just apply it and wash it. Detangling your hair will allow you to work with it more easily. Making sure your hair is properly moisturized will help you better identify what hair is damaged and needs to go—sometimes the ends of your hair appear damaged when, in fact, they're just dry.[4]Advertisement
-
3Dry your hair. Air-dry your hair, or dry it with a microfiber towel, which is gentler on your hair. Air-drying or gentle towel drying will allow your curls resume their ordinary shape and length. Cutting your hair while it's dry allows you to see immediately what the final cut is going to look like. Furthermore, curls spring up and get shorter as they dry, so you're at risk of cutting your layers too short if you chop them while they're wet.[5]
- It's okay if your hair is a little damp, as long as it is not wet.
- Cutting dry hair gives you less control over it, so if you're finding it too hard to manage sectioning and cutting completely dry hair, you can lightly dampen it with a spray bottle.[6]


Removing Overall Length
-
1Divide your hair in half into two sections. Make a part down the center of your head, starting in the middle by your forehead and continuing all the way back to the nape of your neck. Pull the sections forward over your shoulders.[7]
-
2Put hair ties on each section where you want to make a cut. Tie a hair band over the entire section, and slide the ties down until they're just above where you want your final length to be.[8]
- If you have shorter hair, use clips to section your hair into two or more pieces, and place a clip just above where you want to cut.
- At first, aim to trim off an inch or two less than you plan to ultimately cut. You'll probably have to cut more as you even out the length, and you don't want to end up with too-short hair. You can always remove more later.
-
3Cut the sections off under your hair tie. Chop your hair in a straight line. Use multiple cuts to get all the way through the section. This will leave you with blunt-cut ends.[9]
- If you want to thin out the ends of your hair and make them look more blended, cut upwards into each section, at a slight angle.[10]
-
4Undo the sections and tidy up the length. Remove your hair ties or clips and visually assess your hair. If you see any extra long strands, give them a quick chop. Use two mirrors to look at the back of your hair and straighten out any uneven edges.
- Make sure your hair is the same length on both sides of your head. Pull strands of hair from each side forward and verify that they're the same length. You may need to put your hair back in sections and cut a little bit more off of one side.
- If you're having difficulty getting all of your hair to be one even length, you can also try gathering up all of your hair into a ponytail on top of your head and cutting the ends. This will add some layers into your hair as well. Use clips if your hair is too short for a ponytail.[11]


Cutting Layers into Your Hair
-
1Divide your hair into four sections. Part your hair down the middle from front to back until your hair is divided in half. Next, divide these halves by making a part from your ear moving backwards towards the middle part.
- To part your hair, you can draw the tip of a comb across your scalp. Alternately, put your fingertips on either end of where you want the part to be, and drag your fingers towards each other until they meet.[12]
- To make the finished hairstyle look more natural, use a zig-zag shape when you part your hair. The different sections will blend together more easily.[13]
- Once you've separated out each section, secure the hair with a clip to keep it in place.
EXPERT TIPChristine George is a Master Hairstylist, Colorist, and Owner of Luxe Parlour, a premier boutique salon based in the Los Angeles, California area. Christine has over 23 years of hair styling and coloring experience. She specializes in customized haircuts, premium color services, balayage expertise, classic highlights, and color correction. She received her cosmetology degree from the Newberry School of Beauty.Professional Hair Stylist Christine George
Professional Hair StylistCutting layers into curly hair helps balance it. When you add layers to curly hair, it will remove a lot of the weight from the length. That helps keep the top of your hair from flattening out, and your curls will be lighter and bouncier.
-
2Pull the front middle section straight up over your head. Undo the clip keeping the section in place and stretch it up vertically, perpendicular to the floor. You can also pull it out slightly at an angle away from your head.[14]
- For shorter layers, hold your hair straight up over your head.
- If you prefer longer layers, hold your hair straight out, away from your head, parallel to the ground. If you use this method, the top layers will be longer and closer in length to the bottom layers.
-
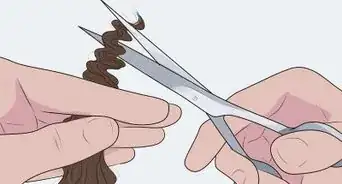
3Grasp the ends of the hair between your index and middle fingers. With your hand that is not holding the scissors, use your first 2 fingers to grab the section of hair at its base, closest to your scalp. Slide your fingers up the length of the hair until you reach the point where you want to make a cut.
- Look for damage at the ends of your hair. If you see frizz or breakage, try to remove all of it when you cut your layers.
- Angle your fingers so that you will cut the hair to be shorter in the front and longer in the back. This type of cut will help push your hair away from your face.[15]
- Trim only a small amount of hair at first. You can always go back later and take more off, but it can be tough to fix a haircut if you cut too much off.[16] However, keep in mind that you will need to trim about 1 in (2.5 cm) from the ends to notice layers forming.
-
4Cut the hair off above your fingers. Use several small chops until you've trimmed all of the hair. Then, angle your scissors so they're nearly parallel to your hair, and cut a few times into your hair to thin the ends out slightly.[17]
-
5Repeat the process on the next section. Unclip one of the sections next to the first. Pull the hair straight up, or at the same outward angle that you used when you cut the first section. Use the first section as a guide to determine how much hair to trim—hold up both pieces of hair next to each other, and cut off the new section to be the same length as the first.[18]
- When pulling sections upwards to trim them, try to use the same amount of tension so that one section doesn't end up shorter than another.
-
6Continue lifting and cutting each section in the same way. Bring each section up and forward to the same imaginary point above your head before making the cut. Because the hair on the bottom of your head has further to travel when it is lifted up above your head, it will end up being longer than the hair on top of your head.[19]
- Don't try to use this process for the bottom sections at the nape of your neck. If you leave these unlayered, they will provide a strong, heavy bottom layer. If you layer them, the ends of your hair might appear too thin.[20]
-
7Finish your cut by trimming any areas that stick out. Once you are done cutting the basic layers, let your hair fall naturally around your head, like you would normally wear it. If there are pieces that look too long or that stick out too far away from the rest of your hair, give them a quick trim.[21]
- The overall shape of your hair should be fairly even and symmetrical. If the curls on one side of your head are sticking out a lot farther than they are on the other side, resection the longer hair and trim each of these sections to be a little shorter.


Things You'll Need
- Sharp shears
- Wide-toothed comb
- Shower
- Conditioner
- Spray bottle of water
- Wall mirror
- Handheld mirror
Warnings
- Avoid brushing your curls. Brushing your hair makes it more likely to break, which in turn makes it frizzier. If your hair needs to be detangled, wash and condition it, and while the conditioner is still in, run a wide tooth comb through your hair. This is helpful whether you have tight or loose curls.⧼thumbs_response⧽


-Step-17.webp)


References
- ↑ https://www.samvilla.com/pro/blog/how-to-cut-style-and-maintain-curly-hair/
- ↑ http://www.curlynikki.com/2013/05/how-to-trim-your-own-hair.html
- ↑ https://www.samvilla.com/pro/blog/how-to-cut-style-and-maintain-curly-hair/
- ↑ https://www.cosmopolitan.com/uk/beauty-hair/a25144/difference-between-dry-and-damaged-hair/
- ↑ https://www.allure.com/story/curly-haircut-technique
- ↑ https://www.naturallycurly.com/curlreading/haircuts/tips-for-trimming-curly-hair
- ↑ https://www.youtube.com/watch?v=Xt9o5wMZMyo
- ↑ https://www.youtube.com/watch?v=Xt9o5wMZMyo
- ↑ https://www.youtube.com/watch?v=Xt9o5wMZMyo
- ↑ https://www.youtube.com/watch?v=Xt9o5wMZMyo
- ↑ https://www.thisisinsider.com/how-do-i-cut-my-hair-2018-4#trim-modestly-4
- ↑ https://www.americansalon.com/step-by-steps/how-to-section-hair-precision-and-accuracy
- ↑ https://www.samvilla.com/pro/blog/how-to-cut-style-and-maintain-curly-hair/
- ↑ https://behindthechair.com/articles/long-layers-new-approach/
- ↑ https://behindthechair.com/articles/long-layers-new-approach/
- ↑ https://www.thisisinsider.com/how-do-i-cut-my-hair-2018-4#trim-modestly-4
- ↑ https://www.refinery29.com/en-us/how-to-cut-your-own-hair
- ↑ https://behindthechair.com/articles/long-layers-new-approach/
- ↑ https://behindthechair.com/articles/long-layers-new-approach/
- ↑ https://behindthechair.com/articles/long-layers-new-approach/
- ↑ https://behindthechair.com/articles/need-help-cutting-styling-curls/
About This Article
To cut curly hair into layers, first part the back of your hair and divide it into 2 sections. Put hair ties on each section at the length you want to trim it. Then, use scissors to cut each section just below the hair tie. After you’ve cut off this length, undo your hair ties and divide your hair into 4 sections for layering, with 2 sections at the top of your head and 2 at the bottom. Pull one of the top sections forward over the top of your head then grasp the ends of your hair with your index and middle fingers, about an inch from the ends. Make sure to angle your fingers so the layers will be shorter in front and longer in the back. Cut just above your fingers, examine the length, then cut more if necessary. Continue this process with each section of hair until you have the shape and length you want. For tips on choosing the right haircut equipment, read on!


-Step-17.webp)


