X
wikiHow is a “wiki,” similar to Wikipedia, which means that many of our articles are co-written by multiple authors. To create this article, 30 people, some anonymous, worked to edit and improve it over time.
This article has been viewed 177,349 times.
Learn more...
Ever seen those pictures where an object or person is on a plain-colored background (i.e. Cut Out)? They may look like they're done with expensive image editing software, but in fact, many are done with MS Paint, producing more accurate results.
Steps
-
1Obtain the image that you want to cut out. This is best done if the contrast between object and background is high; this makes it easier to trace the edge of the object later.
-
2Open up the image in MS Paint.Advertisement
-
3Left and right click on the bright green color on the color palate (not at the same time). You should notice both of the small "selected color" boxes go green.
-
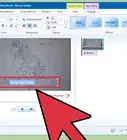
4Pick up the Select tool. Start with the areas that you can easily remove. Select areas of the background and delete them. You will notice they go green as you do this.
-
5Zoom in. Now to look a little closer. On the tool-bar click the zoom tool (magnifying glass) and on the box below click 2X. The image will double in size.
-
6Continue working on deleting the background with the select tool. Work carefully. If you chop out a bit by accident, press "Ctrl + Z" to undo the last change.
-
7Zoom in again, except this time, zoom to 8X. Scroll along until you see the top of the image.
-
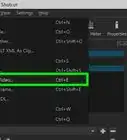
8Choose the straight line tool. Select the second thickest line from the box below.
-
9Look carefully for the rough outline of the image. If you haven't had much practice at this before, it really does help to have a high contrast. Start to draw around the outline, taking off the squares where it is dark. Use short lines where more detail is required, and don't try to get everything with this tool yet. The image will start to look "messy" at this point, but don't worry. It's temporary.
-
10Select the curvy line tool when you come to your first curve. Drag the line (straight) across the curve. Now bend the line around the curve.
- If you get the curve wrong, don't try to adjust it. Hitting "Ctrl + Z" will undo the line, allowing you to try again.
-
11Erase all the "redundant" waste. Select the eraser tool when you've gone around the entire object. By default, the box below should have selected the second-largest eraser. If not, select it.
-
12Zoom back out to 1X once you've taken away all the waste.
-
13Examine the work for areas where the edge has been missed or could be softened. Zoom into them and use the pencil tool to edit the image pixel-by-pixel if necessary.
-
14Zoom out to 1X.
-
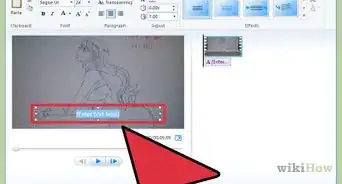
15Change the palate color your chosen background color and select the fill tool (paint bucket). Click anywhere on the green background to change the background color. You're done!
-Step-1.jpg)
-Step-2.jpg)
-Step-3.jpg)
-Step-4.jpg)
-Step-5.jpg)
-Step-6.jpg)
-Step-7.jpg)
-Step-8.jpg)
-Step-9.jpg)
-Step-10.jpg)
-Step-11.jpg)
-Step-12.jpg)
-Step-13.jpg)
-Step-14.jpg)
-Step-15.jpg)
Advertisement
Warnings
- After making one curved line, don't attempt to make another. Each curved line will accept two modifications, and trying to make another will destroy your first. Click onto any other tool after finishing your curved line first and then click back onto it.⧼thumbs_response⧽
- Do not scroll up or down when using the eraser. It creates a thick slice right through your image that cannot be undone, forcing you to revert to your last save. (though if you catch yourself in time, clicking the right mouse button while the other is pressed down can undo it)⧼thumbs_response⧽
Advertisement
Things You'll Need
- MS Paint
- Your image
- Plenty of time and patience


About This Article
Advertisement