This article was co-authored by wikiHow Staff. Our trained team of editors and researchers validate articles for accuracy and comprehensiveness. wikiHow's Content Management Team carefully monitors the work from our editorial staff to ensure that each article is backed by trusted research and meets our high quality standards.
There are 12 references cited in this article, which can be found at the bottom of the page.
The wikiHow Video Team also followed the article's instructions and verified that they work.
This article has been viewed 17,820 times.
Learn more...
Plate decoration is a simple, fun way to bring color to your home. For an easy way to draw images and messages, try using permanent markers. Bake-on ceramic paints are a great way to create longer-lasting art. You can also use decoupage glue to cover your plates in paper patterns. No matter what you choose, decorating is best done for plates you don’t plan to eat off of so you can avoid accidentally ingesting the materials.
Steps
Decorating with Permanent Marker Ink
-
1Clean the plate with rubbing alcohol and a paper towel. Dampen the paper towel, wringing it out to remove excess moisture. Make sure you remove all dust, fingerprints, and stains from the plates, since any debris can prevent your decorations from setting properly. Wait about 5 minutes for the rubbing alcohol to dry.[1]
- You can get rubbing alcohol from your local general or drug stores.
-
2Draw designs on the plate using permanent marker oil pens. Oil pens tend to hold up better in the wash than standard permanent markers. Use the pens and even stencils to create words or images around the plate’s rim. Although permanent markers are generally considered non-toxic, they haven’t been ruled food-safe, so draw only on plates you don’t plan on using.
- Some design examples you can create are leaves, flowers, or seashells around the plate’s rim. Pens are also good for writing notes or messages.
- If you would like to decorate a plate you can still eat off of, start with a clear plate. You can flip the plate over and draw your design on the back. Since the marker is on the outside, using the plate is still safe.
- Another option is to use alcohol ink and rubber stamps. Push the stamp into the ink, then press it against the plate. You no longer have to draw a complicated image by hand.
Advertisement -
3Erase mistakes right away with rubbing alcohol. The ink takes a few minutes to dry, so it is a forgivable material to work with. Dampen a clean paper towel with a little bit of rubbing alcohol, then carefully rub away the mistake. Continue decorating the plate afterward.
- Avoid waiting too long. The plate will dry eventually. When you’re happy with the decoration, be careful not to touch it for about 3 to 5 minutes.
-
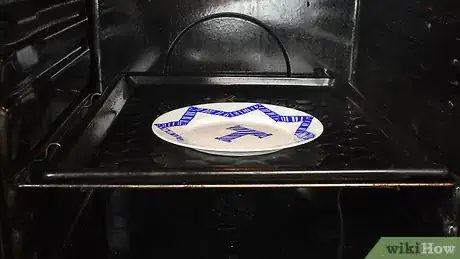
4Bake the plate at 350 °F (177 °C) for 30 minutes. Preheat the oven while the decorations dry. When the oven reaches temperature, put the plate on the middle rack of your oven. Give it plenty of time so the decoration sets correctly.[2]
-
5Cool the plate in the oven for at least 30 minutes. The plate will be hot after baking, so avoid taking it out right away. If you try to take it out, it may crack as well as burn your hands. Wait until the plate feels cool to the touch before handling it.
- You can bake the plate a second time to ensure the ink sets in. If you can, let the plate rest 24 hours before you use it so the decorations have plenty of time to set.
- Your results may vary when washing plates. Putting them in the dishwasher is safe but may degrade the decorations. Stick to washing them by hand with a soft sponge or try covering the decorations with a dishwasher-safe decoupage glue to protect them.
Using Ceramic Paint
-
1Wash and dry the plate with rubbing alcohol. Dampen a paper towel with some rubbing alcohol. Make sure it isn’t dripping when you use it to scrub the plate. When you’re done, let the plate dry.
- Rubbing alcohol is the most efficient way to remove hidden debris like fingerprints, but you can also try soap and water.
-
2Draw your design on paper with a pencil and marker. Get a piece of standard printer paper big enough to hold your design. Sketch the design out in pencil first. Get creative with it! You can draw shapes like leaves and flowers, or you sketch letters for phrases. When your design is done, trace over the outlines with a black permanent marker.[3]
- If you plan on creating multiple decorations, you don’t need to make them on the same sheet of paper. You can cut the paper later to fit the decorations on the plate.
- Another way to make the design is using a computer program. Art programs like Photoshop and GIMP are great ways to create designs.
- Although you can paint the design on the plate freehand, creating a stencil first leads to neater decorations.
-
3Tape the paper to a piece of transfer paper. You will need some masking tape to hold the pieces of paper together. Align your design over the transfer paper, then tape the edges together. The transfer paper will allow you to draw the design onto your plate.[4]
- You can get transfer paper at most art supply stores. Carbon paper is a similar product that also works well but may leave a residue that can prevent paint from binding to the plate.
-
4Cut away excess paper to leave a 1⁄2 in (1.3 cm) border. Use a sharp pair of scissors to cut the design down to a more manageable size. Test it out by holding it against the plate. If you are able to fit the design in place and tape it down, you likely will not have any problems working with it.[5]
- Leave a small border of excess paper so you have a place for the tape. Tape helps you hold the paper to the plate so it doesn’t slide around while you’re working.
-
5Use a pencil to trace the design on the plate. Position your design on the plate, then use more masking tape to hold the transfer paper steady. Make sure the transfer paper is down against the plate. Then, trace the outlines of your design. Draw directly on the design paper, pushing down hard to force the pencil’s graphite onto the plate.[6]
- Check the plate before you throw away the paper. Make sure your design is visible. You may need to go over some sections again to get the graphite to stick.
-
6Color your design using ceramic paint and a paintbrush. Keep a cup of water nearby to rinse off your brush when you need to switch colors. Slowly fill in the traced design. Start along the edges and work towards the center. You can also use a ceramic paint pen to darken the outlines so they stand out more.[7]
- Look for bake-on ceramic paints at art supply stores. These paints are semi-glossy and tend to be long-lasting.
- Ceramic paint is non-toxic, but it hasn’t been ruled food-safe, so stick to decorating plates you don’t plan on using. You can also try painting the outside surface of a clear-colored plate so you can still use it.
-
7Bake the plate for 30 minutes at 300 °F (149 °C). Warm up the oven, then put the plate on the center rack. Give it plenty of time to heat and then cool. Once it is cool to the touch, it will be safe to use or put on display.[8]
- Painted plates can generally be washed in the dishwasher. The intense heat and force may wear out the paint faster than normal, so wash the plates by hand if that is a concern to you.
Applying Decoupage Glue and Paper
-
1Clean the plate with a paper towel dampened in rubbing alcohol. Scrub the entire plate to eliminate smudges and debris that can prevent the paper from sticking in place. You can also try using water and dishwashing detergent.
-
2Cut a design out of a thin piece of paper. You can make a design out of most types of paper. Tissue paper and vellum work very well, but also try patterned wrapping paper, napkins, or images from a magazine. Trim the paper into shapes, such as flowers, if you wish.[9]
- As an alternative, wrap a piece of patterned paper around the outside of a clear bowl after spreading the glue. The pattern serves as a simple decoration.
-
3Spread a thin layer of decoupage glue over the plate. Choose a dishwasher-safe glue, since this is the most water-resistant type of glue available. Use a foam brush or a soft-bristled paintbrush to cover the area you wish to decorate. Keep the glue in as thin a layer as possible.[10]
- The glue is non-toxic but it isn’t considered food-safe, so only decorate plates you don’t plan on using.
- To make more elaborate decorations, consider getting clear-colored plates. Flip the plates over and decorate the outsides. Your plate will be safe to use and your decorations will still be visible.
-
4Place the decoration over the glue and smooth it out. Press down on the paper until it lays completely flat. Push out any creases or air bubbles. Any parts that stick up aren’t sealed to the plate and may compromise the decoration later.[11]
-
5Spread another layer of decoupage glue over the paper. Dip your brush back into the glue and paint over the paper. Spread the glue as thin as you can. All you need is a thin layer over the paper to bind it to the plate.[12]
- You can add more decorations on top of the second layer of glue. This can be useful if your design has overlapping parts, such as with a flower. You could glue on the shape of the flower first, then add details in a second layer.
-
6Dry the glue for at least 2 hours. Set the plate on a stable surface exposed to open air, such as a countertop. Over time, the glue will begin to fade, turning a clear color as it dries. Touch it to see if it still feels tacky. If it feels sticky, it needs more time to dry.[13]
- For the best results, allow the glue to cure for up to 28 days before using or washing the dish.
Warnings
- No art supply used to decorate plates is considered food-safe. Although many are considered non-toxic, letting them come into contact with food is not recommended.⧼thumbs_response⧽
Things You’ll Need
Decorating with Permanent Marker Ink
- Plate
- Paper towel
- Rubbing alcohol
- Permanent marker
- Oven
Using Ceramic Paint
- Plate
- Paper towel
- Rubbing alcohol
- Bake-on ceramic paint
- Black ceramic paint marker
- Paintbrush
- Water
- Paper
- Transfer paper
- Tape
- Pencil
- Scissors
- Oven
Applying Decoupage Glue and Paper
- Plate
- Paper towel
- Rubbing alcohol
- Paper
- Scissors
- Decoupage glue
- Foam brush
- Oven
References
- ↑ https://www.youtube.com/watch?v=0B3L4qmqnI4&feature=youtu.be&t=84
- ↑ https://www.homedit.com/diy-baked-sharpie-plates/
- ↑ https://www.education.com/activity/article/paint-plates/
- ↑ https://www.youtube.com/watch?v=3zKC6nDuOaw&feature=youtu.be&t=47
- ↑ https://www.youtube.com/watch?v=iYxsZKVxdoM&feature=youtu.be&t=114
- ↑ https://www.youtube.com/watch?v=3zKC6nDuOaw&feature=youtu.be&t=102
- ↑ https://www.youtube.com/watch?v=iYxsZKVxdoM&feature=youtu.be&t=236
- ↑ https://www.education.com/activity/article/paint-plates/
- ↑ https://www.youtube.com/watch?v=mpjH_214K8Q&feature=youtu.be&t=27

