This article was co-authored by wikiHow Staff. Our trained team of editors and researchers validate articles for accuracy and comprehensiveness. wikiHow's Content Management Team carefully monitors the work from our editorial staff to ensure that each article is backed by trusted research and meets our high quality standards.
This article has been viewed 6,772 times.
Learn more...
If you’re looking for a classic, simple manicure that adds some extra heft and protection to your nails, then a diamond manicure is the way to go. Utilizing resin glue and a powder, diamond manicures help strengthen nails while making them appear thick and healthy. Though the initial manicure is clear, it can be dressed up with basic polish, gems, or nail stickers for a different look. It’s also easy enough to do at home.
Steps
Cleaning Up Your Nails
-
1Scrub nails clean. Before applying anything to your nails, make sure they are completely clean. Take a kitchen sponge or scrubber or a bath rag and buff the tops of your nails. This will help get rid of any dirt or debris that could interfere with the application of the diamond manicure.
- This is also a good time to get the dirt out from under your nails. You can use a rag for this, or a nail file if you are finding the dirt hard to reach.
-
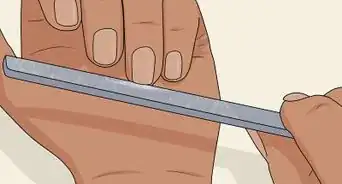
2Shape and clip nails. After your nails have been cleaned, cut and shape them into the style you want. There are a multitude of different nail shapes like round, square, oval, and stiletto. The style you choose may depend on the length of your natural nail. For example, if you have very short nails, it will be difficult to achieve the look of stiletto nails and you may want to stick with square or round tips.
- Make sure the shape and length of your nails are even.
- If you have fake nails, you can style them whichever way you like.
Advertisement -
3Rinse and dry nails. Remove any residue left from filing and clipping your nails. First wipe down each nail with a dry cloth, then run them under warm water. You want to make sure there is no gritty material left to add bumps in the manicure. After you’re sure everything has been cleaned, gently dry your nails with a towel.


Using Resin and Diamond Powder
-
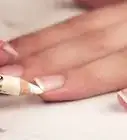
1Apply gel resin to your nail. Take a brush-on gel resin like IBD’s 5-second resin and apply it to each of your nails. Make sure to brush off any excess resin from the applicator before you start coating your nails, as it can cause coverage to be uneven. Start at the base of the cuticle and swipe up. Make sure each stroke is even and smooth. You should only need one coat, but feel free to apply a second if you feel your first coat was too thin.
- You can find resin gel at any beauty supply store like ULTA, Sephora, or Amazon.
-
2Dip nails in crystal powder. Once your nails have been coated in resin, prepare the diamond powder to dip them. This is an acrylic powder that adds durability and strength to your nails. You can find it online or at any store like ULTA, where beauty products are sold. It should come in a clear powder, however, you can also find diamond powder in different colors. To apply, simply open the four ounce container and dip your nail inside. Make sure to press down with the top of your nail first, lightly. The powder will adhere to the resin immediately and you can remove your finger.
- You shouldn’t have to dip your nail into the powder more than once, though it can take practice.
- Only do one finger at a time.
-
3Spray with catalyst spray. This spray will help the resin set. Hold the bottle 16-18 inches away from your nails and press down on the pump to achieve an even spray. If you hold the bottle too close or don’t pump down hard enough, the product can glob onto your nails and cause divots.
- Try pumping the spray into a sink or trash can a few times to make sure it’s spraying evenly.
- The catalyst spray will help speed up the process of setting your nails. However, you still want to wait two to three minutes for them to set completely before doing anything that could potentially harm your manicure.
- If you don’t have a catalyst spray, you can also use a top coat polish. Just make sure that you wait 10-15 minutes for this to dry completely.[1]


Adding Accessories
-
1Try mixing in glitter. If you want a simple addition to your diamond manicure, try adding a coat of glittery polish. You can find glitter polish in a myriad of colors from metallic silvers and golds to brightly colored greens, blues, and reds. If you don’t want to paint over the diamond manicure, you can also find powder mixes that contain glitter in them. This will allow you to skip the extra step of applying glitter later on.
-
2Attach some jewels. Try adding some fake diamonds to the base or tips of your cuticles for a bit of extra glam. You can also try fake sapphires, rubies, and emeralds. These little gems can be attached with a bit of nail glue and tweezers. Put them on every nail or just one or two for a bit of character.
- If you’re feeling adventurous, try coating an entire nail in tiny gems.
-
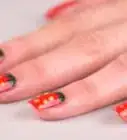
3Use nails stickers for accents. One of the easiest ways to add designs or patterns to your nails is through nail stickers. They come in a multitude of shapes, sizes, and designs, and can be customized to fit your nail size. Try geometric shapes, floral prints, stripes, or polka dots. Sticking with a basic black or white is also a great way to keep the style versatile.


Maintaining Your Diamond Manicure
-
1Reapply a layer of top coat every few days. To prevent chipping, add another layer of a clear top coat every three to four days. This will not only help prevent divots or cracks in your nails, but will also help keep them shiny.[2]
-
2Cut nails down as needed. If the tips of your nails have chipped, clip them back into an even shape. Use a nail file to smooth out the edges and then apply a top coat to re-seal them.
- Even if only one of your nails has chipped, be sure to cut back all of them. Having your nails at uneven lengths when manicured can look sloppy and unprofessional.
-
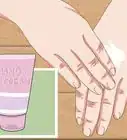
3Avoid harsh chemicals in cleaning products. Stick with mild soaps rather than the harsh alcohol content of hand sanitizer. This can dry out your nails and lead to chipping. Try wearing rubber gloves to protect your nails when doing dishes or cleaning around the house.
-
4Watch for when your nails grow out. As your nails grow, you will notice a gap forming between the base of the manicure and the base of your cuticle. When the gap is big enough to be seen readily by others, it's a good sign that you need a new manicure. However, you can maintain the nail in the meantime by sealing it with top coat.
- You can also try something different like adding glitter or a different polish color to the base. This can create an ombre look.[3]


Community Q&A
-
QuestionWhere can I buy a Diamond Cel file for filing my nails?
 Community AnswerYou can buy a Diamond Cel file from any cosmetic store or beauty supply store.
Things You'll Need
- resin glue
- nail file
- nail clippers
- diamond/crystal powder
- catalyst nail spray
- top coat polish


References
About This Article