This article was co-authored by Virginia Kelley, MA, a trusted member of wikiHow's volunteer community. Virginia Kelley is an artist and art teacher from New York with over 30 years of experience. She has both a Bachelor's and a Master's degree in Art Education from SUNY-Buffalo State and has taught art at the K-12 and college levels. For the last 20 years, she has focused her work and teaching on watercolor.
This article has been viewed 16,129 times.
Learn more...
Using one-point perspective, you can depict an object or building straight on, with the second side receding to a vanishing point. The time spent learning this method is minimal and the resulting drawing is believable and pleasing to the eye. Since watercolor is a medium that lends itself to airy, fanciful subjects and transparent techniques, the subject of a romantic cottage is a watercolor classic. Let your imagination have free reign as you draw and paint this whimsical dwelling.
Steps
Sketching the Cottage
-
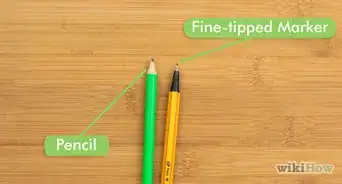
1Draw the house. Assemble your drawing supplies. A sheet of standard, 8 ½” X 11” computer paper, a sharp pencil, a ruler, a pencil sharpener and an eraser.
-
2Place your paper on a board or work surface in the landscape orientation. Draw a line from side to side at approximately the center. This is the “Horizon Line” or the place where the sky and earth meet. It is also referred to as “Eye Level.” At eye level, you will only see the front and one side of the rectangle.Advertisement
-
3To the far left of the center, place a dot to represent the “Vanishing Point.” As we view scenery outdoors, this is the spot where all things are so far away, they converge into a single dot.
-
4Construct the front of the house. It will be viewed at eye level. Draw a rectangle in the space to the right of the vanishing point on the horizon line, half above and half below.
-
5Use your ruler to run lines from the left side (or the side closest to the vanishing point) to and touching the vanishing point.
- Bear in mind that the only lines you will draw in this exercise will be horizontal, vertical (to the paper’s edges) or to the vanishing point.
-
6Draw a vertical line to indicate where the box or house ends. Erase the guide lines; the two lines to the vanishing point and the horizon line where it shows through the rectangle. Erasing the horizon line will make your rectangle appear to be a solid shape and will now be referred to as a cube.
-
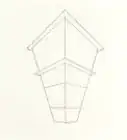
7Create a peaked roof. Make an X with your ruler from corner to corner on the first rectangle representing the front of the building. Through the center of the X, draw a vertical line. Make it as high as you want your roof peak to be.
-
8Connect the sides of the roof peak to form a triangle.
-
9Finish the roof. Mimic the slope of the roof at the back. Do this by placing your ruler against the angle and lightly dragging it to the back. Draw this line to close the roof shape.
-
10Draw the rooftop. Run a line from the roof peak to the vanishing point.
-
11Make the roof over hanging.
-
12Plan and block in windows and a door. Remember to use only two kinds of lines for this: vertical or to the vanishing point. Make doors rectangular shaped, tall enough for a person to pass through. Windows can be rectangles, squares, even round. To do round, make a square and round off the four corners.
-
13Do a chimney. This is a rectangle rising well above the highest peak of the roof. Add another line to give it depth.
-
14Erase all guide lines except the horizon line.


Embellishing the Drawing
-
1Transfer and embellish the drawing. Copy your house to a piece of 140 pound 11” x 14” watercolor paper from a pad.
- One method is to trace your sketch at the window. You might have to darken the lines of your house with pencil or fine line Sharpie for the sketch to show through onto the good paper. Hold your sketch behind the good paper and up to the light. Shift it around to determine where you want your house to go. Tack the sketch with masking tape it to the back of your good paper. Use a ruler for all lines.
- Another method is to use graphite paper from the art or craft store, an artist’s erasable version of carbon paper.
-
2Stand up your paper, step back and plan the composition for your painting. Ask yourself, what makes a house a country cottage? Do research on the internet. For ideas, Google “romantic cottages in watercolor” or “coloring pages of storybook cottages.“ Or, simply use your imagination and add whatever makes you happy.
-
3Consider the material of your house. Siding will provide depth and texture; stucco, brick, stone, wood shingles, etc.
-
4Study roofs. They come in a great variety. A thatched roof is often seen in country cottages in storybooks.
-
5Pay special attention to the door or entryway. Do extra lines around it for depth and solidity. Add a window (s), texture, doorknob, raised panels, etc.
-
6Treat your windows with special care. They will represent and showcase the life that happens inside the house. Add additional lines for moldings and still more to break up the space into panes. Add window boxes and/or shutters. Show character by having them arched, narrow, or in an attic space, shaped like an eyelid.
-
7Use accessories to add personal touches. Low walls, picket or stone fences, a trellis or an arbor, shrubbery or landscaping elements, trees, paths, a rock garden or path, flowers, flagstones, etc.
-
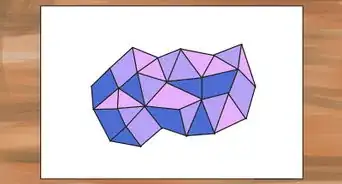
8Create a setting for the house. Draw landscape elements to place the house in a special setting. Vary types of tree shapes for interest.
-
9Use extra care showing a path. Angle it to the side, curve it and have it narrower close to the doorway and flare and fade it out as it goes into the scene. Drawing it straight down from the house and making it too rigid will have it appear to be standing upright, a situation to avoid.


Painting the Cottage
-
1Paint your house. Gather whatever watercolors you prefer, brushes, a water bucket and paper towel or tissues to help control the flow of paint.
-
2Mix big puddles of color and use a big brush. Flow the paint over the shapes.
-
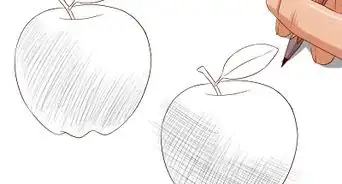
3Start painting at any spot. There is no right place to begin. Work with light, diluted washes initially. This will help you see your scene in color and is easy to make corrections if you wipe away a wet area with tissue. Allow the piece to dry before doing additional layers or washes. Use a hairdryer if you wish.
-
4Work on the painting until it satisfies you. Better to stop earlier rather than overworking it. Remember there are lots of ways to edit your work, sponging off to lighten areas, over painting with another color, etc. You can add finishing touches indefinitely as they occur to you. When finished, sign your work. Start a new painting at this point.
-
5Take pride in knowing that this special little dwelling is uniquely yours. Hang it when finished and enjoy retreating to it whenever you want. No packing required.


Warnings
- If you take photographs from life, use the buddy system and have someone else drive and pull the car to safety while you take photos from the open passenger window. This enables you to get the exact view you want as well. If you get out of the car to take a photograph, be sure to stay well clear of the roadway and traffic. Remember: Safety first.⧼thumbs_response⧽


About This Article