wikiHow is a “wiki,” similar to Wikipedia, which means that many of our articles are co-written by multiple authors. To create this article, 10 people, some anonymous, worked to edit and improve it over time.
This article has been viewed 52,321 times.
Learn more...
You're new on the photo staff at your city's newspaper. You've just come in from shooting a great set of photos from a fire in an apartment building downtown. After rushing into the newsroom to submit the photos by deadline, you plop in front of the photo staff computer. Now what? Here is a comprehensive list of directions on how to choose and edit a set of photos that are ready to run on tomorrow's front page.
Even if you don't work for a news company, this guide should provide a general outline for preparing a photo for printing, personal, business, or otherwise. If you want a guide for a specific piece of software, see the Related Articles section below.
Steps
-
1First, skim through your photos and choose your best five. Expand this to your best 15 if the Sun is running a slideshow online. Maintain variety: some close-ups of fire victims, broader shots of the burning building, and action photos of a fireman rushing out of the fray. If the photos are blurry, too dark, or simply lack to tell the story, cut them out.
-
2Next, open Adobe Photoshop and open your chosen photos.Advertisement
-
3Provide photo information. Choose File > File Info. In the window, enter your name in the “Author” entry. Write a brief caption in the “Caption” section describing where and when the photo was taken, what's going on in the photo if it is not obvious, and the names of people in the photo if possible.
-
4Adjust image size. In the top menu, choose Images. In the drop menu, click on Image size. Check the width and height in the “Documents” box (third and fourth entries) to be sure neither number is greater than 10 inches (25.4 cm) – adjust accordingly. Then, change the resolution (fifth entry) to 200.
-
5Change image mode to CMYK color. In the Images menu, hold the mouse over Mode and select CMYK from the menu. This may change the color composition slightly.
-
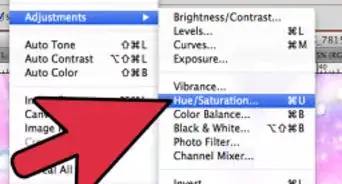
6If the lighting could be better, adjust the levels. Go to Images > Adjustments > Levels. You will see three arrows along a horizontal line. The one on the far left adds more shadows, while the one on the far right brightens highlights. The one in the middle adjusts mid-tones. While looking at the photo, move the arrows from right to left accordingly to create just enough contrast in the lighting without being overly dramatic. Err on the side of light, since printing presses tend to run colors slightly darker than what appears on the computer screen.
-
7If needed, crop the photo. In the toolbar on the left, select the square crop tool. It should look like a square object with a line going through the middle. Click and drag the object over the desired area, removing extraneous material. Adjust the cropping area by dragging any of the four corners from this selected area. When satisfied, hit ENTER. Avoid cutting off people's limbs or cropping a location that could leave out important contextual information.
-
8Sharpen the image. Go to Filter > Sharpen > Unsharp Mask. In the window, maintain “Threshold” at 0, “Radius” between one and two, and the sharpening amount around 75 percent. While looking at the photo, adjust the sharpening amount by dragging the arrow just below it to the right or left. The trick is to sharpen the image as much as possible without appearing too grainy.
-
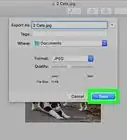
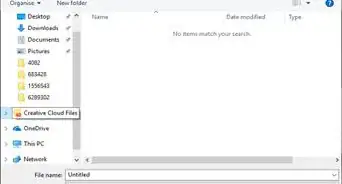
9Save every photo as a .PNG or .JPEG in a folder, possibly named "art", on your publication's server. After clicking File > Save As, go to the Art folder on the server. Look for drop menu with the file format and change it to .PNG or .JPEG. Name your photo with the original name and a suffix so that it is organized and obvious what image it came from and what its purpose is. For instance, your photo named "DSC_001.JPG" or "DSC_001.CRW" (Canon RAW) or "DSC_001.NEF" (Nikon RAW) after being edited will be saved as "DSC_001_PrintEdit.JPG" or "DSC_001_PrintEdit.PNG". Make sure you don't overwrite your existing photo if you chose to save in the same folder you imported your original photo to. Now, hit “Save.”


Warnings
- While you can do many more creative things with your photos in Photoshop, you will only use the software as an enhancement tool for purposes of a news publication. If you greatly alter the lighting or flip the image to face the opposite direction, you will be breaching the ethical standards of photojournalism. As a rule of thumb, the photo should only be altered as much as what you would do in a traditional darkroom, which includes cropping and basic lighting adjustments.⧼thumbs_response⧽


References
- These instructions reflect the procedures used on The Diamondback photo staff.