This article was co-authored by Hoffelt & Hooper. Hoffelt & Hooper is a small family-owned and operated business that was founded in 2016. The Hoffelt & Hooper team creates beautiful, personalized pieces of art including embroidery and DIY kits.
There are 8 references cited in this article, which can be found at the bottom of the page.
This article has been viewed 18,486 times.
Embroidering napkins adds a personalized, special touch. Whether you want to use embroidered napkins as extra special place cards or little party favors to commemorate a special event, your recipients will cherish the effort and sentiment. Luckily, you don’t have to be a professional artist to embroider napkins. By getting the proper supplies, carefully planning your design, and creating your stitches slowly and carefully, you can make beautiful embroidered napkins at home.
Steps
Gathering Your Supplies
-
1Choose your napkins. You can purchase cloth or linen napkins at any local home goods store, as well as any large stores like Target or Walmart. If you really want your embroidery to stand out, make sure to choose napkins that don’t have any other designs or patterns. You can embroider any color napkins, but make sure to consider the color of thread you’ll be using. By using light-colored napkins with dark threads and vice versa, you can ensure that your embroidery is clearly visible.[1]
-
2Select your needle and thread. When it comes to embroidery, this step is crucial. If you’re a beginner, it can be a daunting task to sort through the colors, let alone types, of thread that a craft store offers. For napkins, the common, cotton embroidery floss will work perfectly. It can be helpful to hold the embroidery floss against the napkins you will be embroidering to determine which colors you need. Grab some embroidery needles, and you’re all set.[2]
- If you have difficulty threading the embroidery floss through the small eye of the needle, consider purchasing a needle threader as well. This is a handy contraption that can make this task much easier.
Advertisement -
3Get an embroidery hoop. An embroidery hoop is an invaluable tool when it comes to embroidering napkins. It is a simple hoop that will clamp down on the napkin to hold it flat and taut, ensuring your embroidery is even and smooth.[3] These hoops come in different sizes depending on the size of the fabric and design that you’re working with. Make sure to purchase a hoop that can fit your design and can also fit into the size of the napkin.


Sketching Your Design
-
1Choose your design. When you’re deciding what to embroider onto your napkin, look for inspiration. If you are embroidering napkins to give as gifts, consider embroidering them with the recipient’s name or initials. If you’re embroidering napkins for a holiday party, consider holiday-themed designs. Check out the Internet, magazines, and patterns at the craft store to get an idea.[4]
- When you’re choosing a design, keep your skill level in mind. An experienced embroiderer may be able to create an intricate Thanksgiving turkey, but a beginner may want to stick to initials.
-
2Draw or print your design on paper. Before you start stitching away on your fabric, it’s important to perfect the design. You can handwrite the text or draw the design on paper, and you can also use the computer. You can find simple patterns online by doing a Google search, or you can use interesting fonts to create the text. Make sure to print it out the same size that you want the design. You will be transferring this exact design to the fabric, so make sure you get it exactly how you want it![5]Advertisement
-
3Trace the design onto the napkin with transfer paper. Once you’re satisfied with the design you’ve created on paper, it’s time to transfer it to the napkin. This is where your transfer paper comes in. Place the carbon transfer on top of the napkin, and then place your design on top of it. Using a pen, pencil, or any pointed object, trace over the design on the regular paper.[6]
- As you trace the design on your paper, you will be pressing the design into the transfer paper, which will in turn transfer your design to the napkin.
- It’s important that the paper and transfer paper do not shift during this step. If you need to, tape the paper and transfer paper to the napkins so they don’t budge.
Tip: Instead of using transfer paper to draw on the napkin, you can also try a water or heat erasable pen. This can lead to a more polished final product, because transfer paper designs are not removable.


Embroidering Your Design
-
1Place your napkin in your embroidery hoop. This is easiest to do after you’ve transferred your design to the napkin. Different hoops have different ways of holding the napkin, but all that matters is that there are no ripples in the fabric. The cloth should be held taut, with the design inside the hoop. Consider your hoop to be your easel – it holds your canvas up so that you can create your masterpiece.[7]
- If you don’t have an embroidery hoop or simply don’t want to use one, you can embroider your design without it. Just take extra care to make sure that you hold your napkin evenly and tightly so that there are no bulges or ripples in the finished embroidery.
-
2Thread your needle. Finally, you’re ready for the fun part. Grab your embroidery floss, and pull the end through the eye of the needle. This is where the needle threader may come in handy, if you have one. Otherwise, use a steady hand to slip the floss through the small opening in the needle. Pull a couple inches of thread through, so that it won’t easily slip back out as you’re working.
- The thread should be no longer than arms length.
- Tie a knot at the end of your thread. This will be the “stopper” that keeps your thread from sliding all the way through the cloth.
-
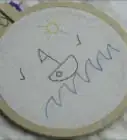
3Begin embroidering your design. To start, poke your needle through the backside of the napkin. The needle should emerge at the very beginning of your design. Pull your thread all the way through the fabric. Keep pulling until you feel the knot against the fabric, stopping your thread.
- It’s important to pull your thread all the way through the fabric with each stitch so that you don’t accidentally create any knots.
-
4Take your needle back through the fabric. About half a centimeter from where your needle came through, poke it back through the fabric the opposite way. This will create your first stitch. Again, make sure to pull your thread completely through the fabric.
-
5Continue backstitching the rest of your traced design. After you’ve pulled your thread through and have created your first stitch, you’ll begin the process of backstitching. Poke your needle back through the fabric from the backside, one stitch length away from the first one. Pull the thread through. Then, poke your needle at the same point that the first stitch ended, and pull your thread through.[8]
- In other words, you are creating a stitch backwards to connect it to the first stitch – hence the name backstitch!
- Continue poking the needle up through the napkin one stitch length away, connecting it to the prior stitch, and so on until you’ve filled in your entire traced design.
-
6Knot off the end of your embroidery. After you’ve completed embroidering your design, you need to tie off the end of your thread. Keep your needle threaded to make this process a bit easier. Tie the end of the thread around some of the stitching on the backside of the napkin. Then, run your needle through some of these stitches to camouflage the loose tail of the thread. Use your embroidery scissors to trim any excess thread.[9]


Community Q&A
-
QuestionHow do I select embroidery floss?
 Hoffelt & HooperHoffelt & Hooper is a small family-owned and operated business that was founded in 2016. The Hoffelt & Hooper team creates beautiful, personalized pieces of art including embroidery and DIY kits.
Embroidery ExpertsFocus on quality. Buy good quality embroidery floss, that won't bleed onto your napkins when wet. To test the quality of your floss, wash your fabric and see if the floss dye runs off into the water.
Things You’ll Need
- Napkins
- Pencil or washable marker
- Transfer paper
- Embroider hoop
- Embroidery floss
- Needle
- Embroidery scissors
- Needle threader (optional)


References
- ↑ http://www.marthastewart.com/921435/embroidery-how#176096
- ↑ http://www.marthastewart.com/921435/embroidery-how#167710
- ↑ http://www.needlework-tips-and-techniques.com/embroidery-hoops.html
- ↑ http://www.marthastewart.com/921435/embroidery-how#167710
- ↑ http://www.marthastewart.com/921435/embroidery-how#167710
- ↑ https://www.youtube.com/watch?v=FLnyEd23Dhg
- ↑ http://www.needlework-tips-and-techniques.com/embroidery-hoops.html
- ↑ https://www.youtube.com/watch?v=rZ_wVC84UmM
- ↑ https://www.youtube.com/watch?v=FLnyEd23Dhg
About This Article