This article was co-authored by Anthony "TC" Williams. Anthony "TC" Williams is a Professional Landscaper in Idaho. He is the President and Founder of Aqua Conservation Landscape & Irrigation, an Idaho Registered Landscape Business Entity. With over 21 years of landscaping experience, TC has worked on projects such as the Idaho Botanical Garden in Boise, Idaho. He is a Idaho Registered Contractor and a previously Licensed Irrigator in the State of Texas.
This article has been viewed 77,457 times.
A fence can define a homeowner's yard, mark a property line or keep children and pets away from the street. Simple garden fences are not difficult to erect, they just takes time, patience and a little DIY know-how. Keep reading to learn how to erect a fence.
Steps
Getting Started
-
1Locate and mark any buried utility lines. Before you erect your fence, it is important to locate and mark any buried utility lines in your area, so you can avoid them when erecting your fence. This may be done in the United States by calling 1-888-258-0808 or dialing 811.
-
2Be neighborly. It's a good idea to consult with your neighbor(s) before you begin your project. Make sure you agree on the exact property lines, and ask their permission to work on their property, as it is much easier to erect a fence when you can work on it from both sides.Advertisement
-
3Check local zoning laws. Local zoning laws may require your fence to fit within certain size and placement regulations, so it's important to consult with a local authority before you purchase any materials. This is particularly common if you live in a historic area.[1]
-
4Get a building permit. In some locations, a building permit is required before you can build your new fence. Check with your local government office to find out what applications you need to fill in.
-
5Select rot-resistant posts. An untreated post will only last about 3 to 7 years depending on soil condition and weathering. To extend the posts' lifespan by at least a few years, choose a naturally resistant wood such as cedar, yew, juniper, or oak. For best results (but a higher cost), buy pressure-treated posts that have been injected with water repellent.
- You can also buy water repellent stains and apply a few coats to the end of the post. These usually contain copper naphthenate, an irritant, so follow all safety instructions on the label.
- Wrapping the end of the post tightly with heavy roofing felt or tar paper is better than nothing.
- You'll need larger posts for the gates and corners, since these bear more weight.


Erecting the Posts
-
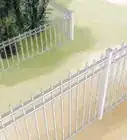
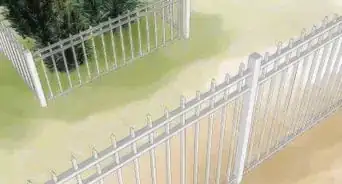
1Determine the spacing of the fence posts. Before you begin digging, it's important to carefully plan the location of each fence post.
- Fence posts are usually spread six to eight feet apart, with any corner posts being set first. Use larger posts for corners and gates.
- Use wooden pegs to mark the location of each post and use a string line to align the posts and mark the line of the fencing.[2]
-
2Dig the post holes. To dig each post hole, pull up the wooden peg and dig a hole approximately two feet deep, using a shovel and then a post hole digger. The post hole digger maintains the necessary width of the hole as it digs.
- When digging the post hole, a good rule of thumb is to make the hole deep enough to bury 1/3 of the length of the fence post. This gives them better stability, helping them to withstand heavy weight and high winds.[3]
- The post hole should be 10 to 12 inches wide.
-
3Position the posts. Position the posts in the center of each hole. Double check the distance between posts with a tape measure, then backfill the hole and brace the posts using three four-foot lengths of 2-by-4s, nailed diagonally to the post. This keeps the post in an upright position.
- Use a bubble level to check that each post is standing vertically upright, rather than leaning towards one side or the other.
-
4Fill the post holes. When all of the fence posts have been erected, you will need to fill them using either concrete or post mix.
- If using concrete, fill each post hole with the wet cement (which you should prepare according to the instructions on the packaging) and use a stick to stir the wet mix while pouring to eliminate any air pockets.
- Overfill the top of the hole with concrete, then use a trowel to slope the concrete away from the fence post. This prevents water from collecting around the base. Alternatively, you can stop pouring the concrete a couple of inches from the top of the whole, then fill with soil once the concrete is dry.[4]
- If you're using post mix (which has a significantly shorter drying time than concrete), you will need to half fill the post hole with water, then pour in the post mix until it reaches slightly below soil level. It is recommended that you wear a mask, goggles and gloves while you do this.
-
5Leave the concrete or post mix to dry. While the concrete or post mix is still wet, use the spirit level to make sure each fence post is completely vertical. Make any adjustments if necessary. Leave the concrete or post mix to dry completely. Concrete may take up to 48 hours to dry.


Attaching the Fence
-
1Check that the posts are level. Lay a piece of timber across the tops of two consecutive fence posts and use a bubble level to check that the tops are level. If they are not, cut the tops of the posts to the correct height using a circular saw, chain saw, reciprocating saw, or hand saw.
-
2Attach the fence panels. To attach the fence panels to the posts, you can either use rust resistant nails or exterior-grade brackets and screws.
- Using nails: Position each fence panel between two posts so that the edges of the panels reach the center of the posts. Use a spirit level across the top supporting rail to ensure the fence panel is level. Use 18d or 20d galvanized nails to attach the panel to the posts, through the top and bottom supporting rails. You may need another person to hold the panel in position as you do this.
- Using brackets and screws: Attach three brackets to the edges of each fence panel: one 8 inches from the top, one 8 inches from the bottom and one in the center. You can place a couple of off-cuts of gravel board, pressure-treated board, or spacer blocks at the base of each post to lift the fence panel off the ground while you work. Set each fence panel on top of the gravel boards then screw them to the posts. This prevents the wood from contacting the ground, where it would rot faster. (This three-rail system is the stronger option, but you can use two evenly spaced rails instead.)
- Note: Some store-bought fences will have mortise and tenon joints which you can simply slot into one another, instead of using nails or screws.
-
3Fit the gravel board, if using. In most cases, the bottom of the fence panels should not sit on the ground, as this makes them more susceptible to rot.[5] If you wish to fill in the gap between the bottom of the fence panel and the ground, simply leave the gravel board in the gap and nail each end to the fence posts.
- Spacer blocks not intended for ground contact should be removed after installing the fence.


Finishing Touches
-
1Attach post caps. If you wish, you can finish off the job using post caps. These are small wooden squares which you nail to the top of each post to give the fence a more polished look and prolong the life of the posts.[2]
-
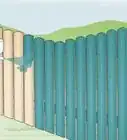
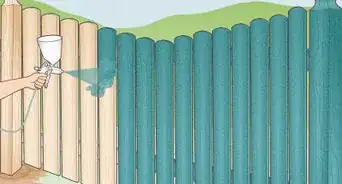
2Apply a paint, stain or waterproof finish to the fence. Applying a protective finish to your fence will help to keep it looking good for longer.
- A paint finish will allow you to match your fence to the color of your home or other outdoor furniture. The wood should be completely dry before you paint it and coated in primer. Make sure to use an exterior latex paint.
- Stains add a bit of life and color to the fence, while also preserving the natural look of the wood and allowing the grain to show through.
- A waterproof finish or repellent is necessary for woods that don't withstand moisture very well and are prone to decay. Such woods include spruce, poplar, birch and red oak.[1]


Community Q&A
-
QuestionIf I am erecting a 6' fence around my property, is there any regulation that says which side of the fence should face the neighbour? Bear in mind that one side of the panel doesn't look as good as the other side.
 Anthony "TC" WilliamsAnthony "TC" Williams is a Professional Landscaper in Idaho. He is the President and Founder of Aqua Conservation Landscape & Irrigation, an Idaho Registered Landscape Business Entity. With over 21 years of landscaping experience, TC has worked on projects such as the Idaho Botanical Garden in Boise, Idaho. He is a Idaho Registered Contractor and a previously Licensed Irrigator in the State of Texas.
Experienced LandscaperCheck local ordinances and talk with those on the 'other side' to be sure. As the old saying goes, "Good fences make good neighbors." -
QuestionWhich side of the panel should face the owner's land?
 Community AnswerThe back side of the panel faces in. The decorative side should face out so that passersby can see it.
Warnings
- Avoid sprinkler lines, wires and pipe drains when digging your postholes.⧼thumbs_response⧽
Things You'll Need
- Measuring tape
- Shovel
- Posthole digger
- Fence posts
- Wet cement
- Mason's line
- Fence panels
- 21/2-inch (6.35 cm) screws or 18d/20d nails
- Exterior grade brackets
- Drill or hammer
- Wheelbarrow
- Saw


References
- ↑ 1.01.1http://www.lowes.com/cd_Install+a+Wood+Panel+Fence_337564931_
- ↑ 2.02.1http://www.youtube.com/watch?v=7bwoaH1N76M
- ↑ http://www.diynetwork.com/how-to/how-to-install-a-fence/index.html
- ↑ http://www.channel4.com/4homes/how-to/diy/how-to-set-fence-posts
- ↑ http://www.cuprinol.co.uk/fences/put_up_a_fence.jsp#top
About This Article

Before erecting a fence in your yard, make sure to check your local zoning laws and obtain a building permit, if needed. Then, choose fence posts that have been treated with a water repellent and dig holes that are deep enough to bury ⅓ of the post’s length. Next, erect your posts, fill the holes with concrete, and wait up to 48 hours for the concrete to dry. Afterwards, attach the fence panels using nails or brackets, then apply a stain or waterproof finish to the fence. For more advice from our Landscaping reviewer, including how to locate and mark any utility lines before erecting your fence, keep reading.