This article was co-authored by David Balkan. David Balkan is a Professional Plumber, CEO of Balkan Sewer and Water Main Service, and President of Balkan Sewer and Drain Cleaning. As a hands-on owner of these companies for over 40 years, David is knowledgeable about water service lines, sewers, and drain line issues. David is a Committee Chairman of the Master Plumbers Council and has sat on the Executive Committee of the Sub Surface Plumbers Association of New York for over 30 years. His knowledge and solution-oriented approach contributed to Balkan Sewer and Water Main Service being the largest and most trusted service in New York City and the recipient of the 2017 Angie’s List Super Service Award.
There are 8 references cited in this article, which can be found at the bottom of the page.
wikiHow marks an article as reader-approved once it receives enough positive feedback. In this case, several readers have written to tell us that this article was helpful to them, earning it our reader-approved status.
This article has been viewed 2,282,473 times.
The annoying drip of a leaky faucet can cause higher water bills and irritation. Fortunately, it's easy to fix yourself if you can identify the type of faucet and get the necessary tools for the job. Why pay a plumber when you can fix a leaky faucet yourself? To fix leaks on the four most common types of faucet, follow these instructions.
Steps
Getting Started
-
1
-
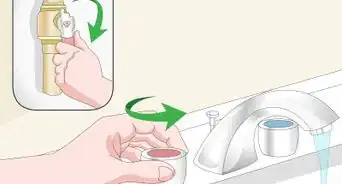
2Plug the drain. Use a sink plug if you have one or a rag. Nothing will ruin your day faster than having a screw or a washer go down the drain.Advertisement
-
3Determine what type of faucet you have. A compression faucet has two screw handles, one for hot and one for cold, and is the easiest to recognize by sight. The other three types of faucet all have one central, swiveling arm that you can swing from hot to cold as desired.[3] You may have to take your faucet apart before you know which is which, because the internal mechanisms at the base of their arms are all different:
- A ball faucet contains a ball bearing.
- A cartridge faucet contains a cartridge. The materials of the cartridge will vary, but handle often has a decorative cap.
- A ceramic-disk faucet contains a ceramic cylinder.


Fixing a Compression Faucet
-
1Remove each handle. Pry off the decorative cap if necessary (usually reading “Hot” or “Cold”), unscrew, and remove the handle.
-
2Use a wrench to remove the nut. Underneath, you will find the stem, which sits on top of the O-ring, which sits on top of a seat washer. The seat washer is usually made of rubber, which can get worn out after a while. If your faucet is dripping, this is mostly likely the culprit.[4]
-
3Pull out the stem. This will expose the O-ring, which will be thinner, and seat washer, which will be thicker.
- If the handles are leaky (as opposed to the faucet), replace the O-ring. Take the old one to the hardware store and use it to find a replacement.[5]
-
4Remove the seat washer. This will be held in place with an upside-down brass screw.
-
5Replace the seat washer. Since these washers vary in size, you might need to bring the old one in with you to a parts store to find an exact match. Coat the replacement in plumber’s grease before installing it.
-
6Reassemble each handle. Any minor leaks should now be fixed.


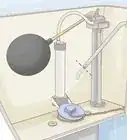
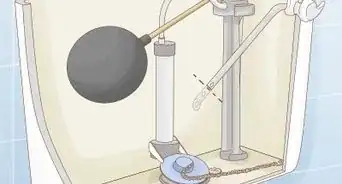
Fixing a Ball Faucet
-
1Buy a replacement kit. Ball faucets have several parts that will need to be replaced and some that require special tools. You won't need to replace the entire faucet, just the faucet cam assembly. All of the stuff you'll need, including tools, should be included in this type of kit that runs about $20 and is available in the plumbing section of most home repair shops.[6]
-
2Start by unscrewing and removing the handle. Lift off the handle and place it aside.
-
3Use pliers to remove the cap and collar. Also, loosen the faucet cam by using the tool provided in your replacement kit for this purpose. Remove the faucet cam, washer, and ball.
- This will look like a "ball and socket" joint in your body--a movable (usually white) rubber ball plugs the socket, stopping up the water and releasing it.
-
4Remove the inlet seals and springs. To do this, you will need to reach into the mechanism itself, probably using needle-nose pliers.
-
5Replace the O-rings. Cut off the old ones and coat the new ones in plumber’s grease before installing.
-
6Install new springs, valve seats, and cam washers. These should all be included in your kit, and should be essentially the reverse of the process you completed.
-
7Reassemble the handle. The leak should now be repaired.


Fixing a Cartridge Faucet
-
1Remove the handle. Pry off the decorative cap if necessary, unscrew, and remove the handle by tilting it backwards.
-
2Remove the retaining clip if necessary. This is a circular, threaded piece (usually plastic) that sometimes holds the cartridge in place and can be pulled out with pliers.[7]
-
3Pull the cartridge so that it stands straight up. This is the position the cartridge sits in when the water is on full blast.
-
4Remove the faucet spout. Set aside and locate the O-rings.
-
5Replace the O-rings. Cut off the old ones using a utility knife and coat the new ones in plumber’s grease before installing them.
-
6Reassemble the handle. The leak should now be repaired.


Fixing a Ceramic-Disk Faucet
-
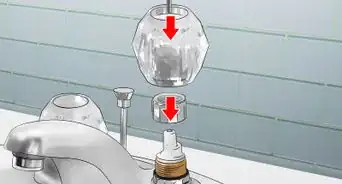
1Remove the escutcheon cap. After unscrewing and removing the handle, locate the escutcheon, which sits directly beneath the handle and is usually made of metal.
-
2Unscrew and remove the disk cylinder. This will expose several neoprene seals on the underside.
-
3Pry out the seals and clean the cylinders. White vinegar would work well for this purpose, especially if you have hard water. Soak them for several hours to work out the build-up and then assess whether or not they're reusable.[8]
-
4Replace the seals if necessary. If they look pitted, frayed, thin, or otherwise worn – or if you simply want to play it safe – bring them into the hardware store to find exact replacements.
-
5Reassemble the handle and very slowly turn the water on. Running the water too forcefully can crack the ceramic disk.


Community Q&A
-
QuestionDo I need to shut off the main water supply before I do this?
 David BalkanDavid Balkan is a Professional Plumber, CEO of Balkan Sewer and Water Main Service, and President of Balkan Sewer and Drain Cleaning. As a hands-on owner of these companies for over 40 years, David is knowledgeable about water service lines, sewers, and drain line issues. David is a Committee Chairman of the Master Plumbers Council and has sat on the Executive Committee of the Sub Surface Plumbers Association of New York for over 30 years. His knowledge and solution-oriented approach contributed to Balkan Sewer and Water Main Service being the largest and most trusted service in New York City and the recipient of the 2017 Angie’s List Super Service Award.
Professional Plumber & CEO of Balkan Sewer & Water MainNo, every sink has its own shutoff valve that you can use. It should be under the sink. You just need to turn the water supply to the sink off. -
QuestionHow do I determine the cause of a leaky faucet?
 Community AnswerIf it is leaking from the tap, it is probably the seat washer. If it is leaking from the handle, it is probably the O-ring.
 -
QuestionWhile my faucet has two handles, they do not have a top that I can remove (hot/cold). They have a very small hole on each side of the faucet, but I have no idea what tool to use. What kind of faucet is this?Community AnswerFrom your description, it could be the compression faucet type and that "small hole" on either side of the two handles is indicative of where to begin to unscrew them.
Things You'll Need
All Methods
- A Phillips-head (+) and flat-head screwdriver (-); even if your faucet uses Phillips-head screws, a flat-head screwdriver can be useful for prying
- Plumber’s grease (heat-resistant and non-toxic so it can be used with hot, potable water)
- Pliers
- Wrench
Compression Faucet
- Replacement seat washers
- Replacement O-rings (optional)
Ball Faucet
- Ball-faucet replacement kit
Cartridge Faucet
- Replacement O-rings
Ceramic-Disk Faucet
- Replacement seals (optional)
- White vinegar


References
- ↑ https://www.familyhandyman.com/plumbing/faucet-repair/how-to-repair-a-kitchen-faucet/view-all/
- ↑ David Balkan. Professional Plumber & CEO of Balkan Sewer & Water Main. Expert Interview. 29 April 2021.
- ↑ http://www.thisoldhouse.com/toh/article/0,,193895,00.html
- ↑ http://www.popularmechanics.com/home/improvement/electrical-plumbing/5-steps-to-fix-a-leaky-faucet-15470175
- ↑ https://www.thisoldhouse.com/ideas/fixing-leaky-faucet
- ↑ https://www.familyhandyman.com/plumbing/faucet-repair/faucet-repairs-fix-a-drippy-ball-type-faucet/view-all/
- ↑ https://www.homedepot.com/c/ah/how-to-replace-cartridge-sink-faucets/9ba683603be9fa5395fab90b852eb2e
- ↑ https://www.thisoldhouse.com/ideas/fixing-leaky-faucet
- Videos provided by TipsNNtricks
About This Article

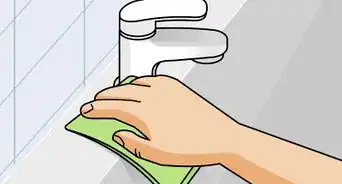
To fix a leaky faucet, first turn off the water to your faucet by twisting the valve under the sink. If there’s no valve, turn off the water supply for your whole house. Turn the faucet on to empty any water in the pipes, and plug the drain so nothing falls down it while you’re working. If there’s a set screw behind the faucet handle, use an Allen wrench to remove it, then take the handle off. Alternatively, if there’s a top screw cover on the handle, pry it off with a flathead screwdriver, then loosen the screw beneath it and remove the handle. With the handle off, use a wrench to loosen and remove the nut in the handle assembly. Pull the handle cartridge up and out of the sink. Use a cloth to wipe down all of the loose parts and the area around the handle. If the O-ring looks old or damaged, replace it. Get a matching replacement for the old cartridge, then insert the new cartridge back into the sink. Now tighten the nut back into place with the wrench and reattach the handle. Finally, turn the water back on and check that your faucet is no longer leaking. If you need to learn how to fix a compression or cartridge faucet, keep reading!