This article was co-authored by wikiHow staff writer, Janice Tieperman. Janice is a professional and creative writer who has worked at wikiHow since 2019. With both a B.A. and M.A. in English from East Stroudsburg University, she has a passion for writing a wide variety of content for anyone and everyone. In her free time, you can find her working on a new crochet pattern, listening to true crime podcasts, or tackling a new creative writing project.
There are 10 references cited in this article, which can be found at the bottom of the page.
This article has been viewed 6,111 times.
Learn more...
Collapsible backdrops are a lightweight, portable way to provide consistent backgrounds for your photographs. These backdrops are very flexible, and easy to collapse into a small circle and put away when you’re not using them. With these simple instructions, you’ll be able to store your backdrops in a matter of seconds.
Steps
Basic Folding Technique
-
1Hold the collapsible background in front of you horizontally. Shift the backdrop on its side so it’s completely horizontal. Then, place your hands on the right and left sides of the backdrop. To keep things balanced, set the bottom edge of the backdrop of the ground, which will make it a lot easier to collapse.[1]
- Collapsible backgrounds are pretty hefty, and it might be tricky to fold them up with just your hands. Instead, lean your elbows along the top edges, so you have a little bit more momentum when you go to fold.[2]
-
2Pull both sides of the backdrop towards one another. Use both hands to pull both sides of the collapsible material toward the middle of the backdrop. This may feel a little strange at first, but don’t worry—the material is flexible and designed to be folded up. At this point, the backdrop will be forming a slight “V” shape.[3]Advertisement
-
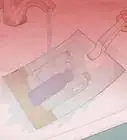
3Overlap the top edges of the backdrop so both sides touch. Continue pulling both sides of the backdrop toward one another, overlapping the top edges as you go. Now, your backdrop looks more like a circular disc instead of a rectangular shape.[4]
-
4Collapse the bottom of the backdrop into the circle. As you overlap the top edges of the backdrop into a circular shape, the back section will become circular as well. Give this back section of material a gentle nudge forward so it tucks under the rest of the backdrop.[5]


Storage and Setup
-
1Store the folded backdrop in a carry bag if it comes with one. Slide the backdrop into a circular carrying case, which makes it easy to transport. Simply zip up the carrying case to keep your backdrop secure, then unzip it once you’re ready to use your backdrop again.[6]
-
2Pull along both sides of the backdrop to reopen it. You don’t have to do much to get your equipment back to its full size. Simply pull the folded edges of material away from one another, and then let the backdrop do the rest! The backdrop will pull apart and flatten on its own.[7]
- Make sure you’re in an open area when you reopen your backdrop.
-
3Display the backdrop with a sturdy stand. Set up your backdrop stand somewhere in your studio where you’d like your backdrop to go. Clip the stand along the top edge of your backdrop, so it stays put. If your backdrop has them, wrap Velcro straps around the base of the stand for extra security.[8]


Warnings
- Don’t force the backdrop to collapse. If you force the backdrop to fold in a certain way, you might damage the material long-term.[10]⧼thumbs_response⧽


References
- ↑ https://m.youtube.com/watch?v=vryCyncvR0U&t=1m28s
- ↑ https://m.youtube.com/watch?v=-JRwBw5rCbQ&t=0m38s
- ↑ https://support.backdropexpress.com/hc/en-us/articles/115007592468-How-to-Fold-a-Collapsible-Backdrop
- ↑ https://m.youtube.com/watch?v=-JRwBw5rCbQ&t=0m28s
- ↑ https://m.youtube.com/watch?v=-JRwBw5rCbQ&t=0m29s
- ↑ https://m.youtube.com/watch?v=vryCyncvR0U&t=0m11s
- ↑ https://m.youtube.com/watch?v=vryCyncvR0U&t=0m18s
- ↑ https://savageuniversal.com/blog/how-to-set-up-your-collapsible-backdrop/
- ↑ https://m.youtube.com/watch?v=-JRwBw5rCbQ&t=0m59s