X
wikiHow is a “wiki,” similar to Wikipedia, which means that many of our articles are co-written by multiple authors. To create this article, 38 people, some anonymous, worked to edit and improve it over time.
This article has been viewed 116,850 times.
Learn more...
Want to set up a Minecraft server up for you and your friends to play on? If you've looked at renting servers, you may have been turned off by the costs. With services such as vps.me, you can set up a basic server without paying any money. If vps.me isn't for you, you can get yourself a free server through other means as well.
Steps
Part 1
Part 1 of 5:
Signing Up
-
1Select the Free package. Visit the vps.me homepage. Use the slider on the main page to select the far-left option, Package 1. This is the free package. Click the "Order" button.
-
2Select an operating system with Minecraft installed. Click the "OS Template" drop-down menu and select "Debian 6 32Bit With Minecraft Game Server". This template has the Minecraft server software preinstalled, which drastically cuts down setup time.Advertisement
-
3Choose a domain name. If you already own a domain name, enter it here. If not, you can leave it blank and have a domain assigned automatically. The assigned domains will be messier than a purchased one, but they're free.
-
4Register for an account. When you check out, you will need to register for an account. This includes entering your name, email address, country, address, and phone number for verification.
- You will need a valid phone number in order to verify your identity and receive the server.
-
5Confirm your phone number. After entering your information, click the “Confirm Phone Number” button. Click the button to send an activation code to your phone number. When you receive a text containing the code, type it into the field and click “Validate”.


Advertisement
Part 2
Part 2 of 5:
Configuring Your Server with SSH
-
1Wait 24 hours. After setting up your free server, you will need to wait 24 hours in order to continue setting up the server. After 24 hours, log back into the vps.me website and click the "My Servers" tab.
-
2Choose how you want to edit server files. You can either choose a FTP client like Filezilla or a SSH client PuTTY.In this section we will be using PuTTY.
-
3Download the PuTTY SSH client. This will allow you to connect to the server via command line and perform any configuration.
-
4Enter in the server information. Click the "SSH" option in the "My Servers" tab. This will open a pop-up with the SSH connection information. Copy the IP address displayed, and then open PuTTY.
- In the Session section, enter the IP address you copied into the "Host Name" field. In the "Port" field, enter the number after "-p" from the SSH pop-up.
-
5Connect to the server. With the server's address and port entered, click the Open button in PuTTY. You will be warned that the host key is not cached in your registry. Click Yes to proceed.
-
6Log in to the server. You will be prompted for login information after you connect. Enter root as your username, and then the password you created when you signed up for your account. If you can't remember the password, click the "Root" button in the "My Servers" tab to enter a new password.
-
7Open your Minecraft server settings. You can use the command line to edit your Minecraft server settings. Once you are connected to the server, type nano minecraft-server/server.properties to open the server properties file. You can then edit the properties so that the server is to your liking.
- Find the -Xmx entry in the server settings and change it to -Xmx384M.
-
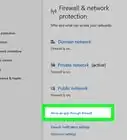
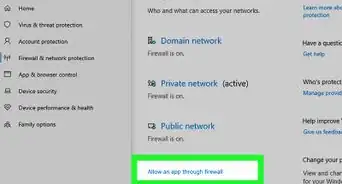
8Restart your server. After making the changes to your server configuration, you will need to restart the server. Return to your vps.me dashboard and click the "Reboot" button at the top of the "My Servers" tab. After the server reboots, you and your friends can connect to it!


Advertisement
Part 3
Part 3 of 5:
Configuring your server with FTP
-
1Wait 24 hours. In this time, the VPS is built.
-
2Download and install FileZilla. FileZilla is a popular FTP client, quite easy to use.
-
3Go to your vps.me "My Server" tab. Click on the SSH button and copy the IP address that appears there. You will also need the port.
-
4Open FileZilla. In the upper part of the program there will be some fields, "Host", "Username", "Password" and "Port". In the "Host" field put in the copied IP address from the SSH tab in Vps.me, but in front of it type sftp://; in the "Username" fill in "root" (without quotes); in the "Password" fill in the password that you received in the e-mail from vps.me after registering (the one you've chosen) and finally in the "Port" field fill in the port you copied from the SSH tab.
-
5Click Quickconnect.
-
6Find the minecraft server tab. The tab is by default /home/minecraft/minecraft-server.
-
7Locate the "server.properties" file. Right-click and choose view/open to open it with Notepad.
- Find the -Xmx entry in the server settings and change it to -Xmx384M
- In the server.properties file you can change a lot of other stuff. Note: if you want to have a cracked server, change the online-mode line from true to false.
-
8Extras. Also, in the minecraft-server file you can edit the world, ops, whitelist, etc... You can also try to install Bukkit!
-
9Restart your server. After making the changes to your server configuration, you will need to restart the server. Return to your vps.me dashboard and click the "Reboot" button at the top of the "My Servers" tab. After the server reboots, you and your friends can connect to it!


Advertisement
Part 4
Part 4 of 5:
Connecting to the Server
-
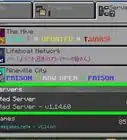
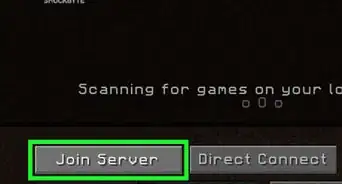
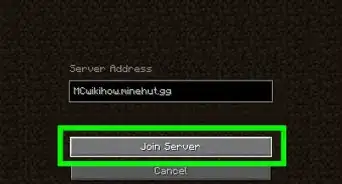
1Open the Multiplayer menu in Minecraft. You can add the server's IP address to your Minecraft server list. This way you won't have to enter it every time you want to connect.
-
2Click the “Add Server” button. This will open a new page for you to enter the server connection information.
-
3Enter in your server information. The IP address is the same one that you entered to connect via SSH or FTP. The port is 25565. You can enter any name that you want.
-
4Join the server. Once you enter in the connection information, the server will be added to your list. You can now connect to it like you would any other Minecraft server.


Advertisement
Part 5
Part 5 of 5:
Finding Other Options
-
1Browse other sites. There are some reports of vps.me being unreliable, and there's no denying that their free servers are on the slow side. If you want to get a free Minecraft server, there are several sites that offer free hosting, though the server options are usually fairly limited. Some of the more popular sites include:
- GratisServer.nu
- Aternos.org
- Zipp-Hosting.com
-
2Set up your own server. If you have a spare computer in your house, you can turn it into a dedicated Minecraft server for you and your friends. This can be significantly cheaper than renting one, as you only have to pay the power and internet costs from your home. See this guide for detailed instructions for creating your own server.
- Creating a Minecraft server is free; you don't even need to own Minecraft to set up a server.
-
3Get your server sponsored. If you are currently renting a server or want to set up a server, you can look into getting it sponsored. Usually you would apply for sponsorship from server hosts or from companies that would want to advertise. A sponsored server is paid for completely by the host, while still allowing you to run the server itself.
- In order to get a sponsorship, you will need to prove that your server can draw in a sustainable population.
- Sponsors usually want to be able to monetize the server, so be prepared to pitch servers that have donation plans.
- If your server offers unique features that help it stand out from all the other Minecraft servers, this looks very good to sponsors.
- When contacting a hosting company for sponsorship, be sure to use professional language and spell out in detail all the benefits your server would bring to their company.[1]


Advertisement
Warnings
- Your Minecraft Server that hosted on this VPS will only get 0.6 GHz speed of CPU a total of 1024 MB Ram, 5GB Space and 10GB Bandwidth.⧼thumbs_response⧽
Advertisement


References
About This Article
Advertisement