This article was co-authored by wikiHow Staff. Our trained team of editors and researchers validate articles for accuracy and comprehensiveness. wikiHow's Content Management Team carefully monitors the work from our editorial staff to ensure that each article is backed by trusted research and meets our high quality standards.
There are 7 references cited in this article, which can be found at the bottom of the page.
This article has been viewed 10,662 times.
Learn more...
Acoustic clouds are panels made out of sound-absorbing material that you hang from your ceiling. They’re useful for things like reducing ambient noise in a recording studio, making a room feel quieter, or muffling echoes in an open space such as a cafeteria or hallway. They also come in a variety of shapes, colors, and designs, and can add a stylish accent to a room. Hanging acoustic clouds isn’t too difficult if you have the right tools and fasteners.
Steps
Marking the Locations
-
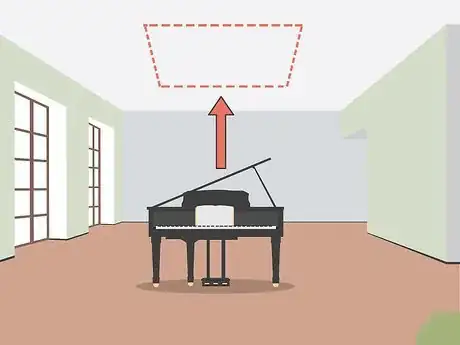
1Place the clouds above the areas that produce the most noise. If the room receives a roughly equal amount of noise throughout, then the ceiling above the middle of the room is the best location to absorb the most sound waves to reduce noise and reverberation. If there’s an area that produces much more noise, such as a bar or seating area, choose above that location to place your clouds.[1]
- For example, if you have a piano or a drumset in the room, placing the acoustic clouds above them will help reduce reflected sound.
- Placing the acoustic clouds in a corner or against a wall will make them less effective.
Tip: If you’re hanging multiple panels, place them above the areas that will produce noise, such as a speaker or stage, as well as above the seating area or the area where people are likely to be talking so the 2 sounds don’t overpower each other. You can hang as many panels as you like to reduce the overall noise in the room.
-
2Hold 1 of the clouds against the ceiling where you want to place it. Use your acoustic cloud panel to help you choose where you want to install it before you attach any fasteners to the ceiling. Use a ladder to reach the ceiling and hold the acoustic cloud flush against it in a location you think is a good place to hang it.[2]
- Have another person hold the ladder while you’re on it so it’s more stable.
- Because the clouds are so light, they don’t need to be hung from a stud or ceiling joist.
Advertisement -
3Use a pencil to mark the ceiling on the sides of the panel. While you’re holding the cloud against the ceiling with 1 hand, use a pencil to mark the ceiling at the center of 1 of the long sides of the cloud panel. Then, mark the ceiling on the other side of the panel directly across from the first mark.[3]
- If your acoustic clouds are square or rounded, choose 1 side to mark the center, then mark the center of the side across from it.
-
4Move the cloud to another spot on the ceiling and mark the 2 sides. Once you’ve marked the location where you want to place your first panel, move the panel to another spot on the ceiling where you plan to hang another one if you need more than 1 cloud. Use your pencil to mark the ceiling at the center of the 2 long sides of the cloud panel. Take your ruler or tape measure and check to make sure the marks are lined up.[4]
- If you’re only hanging 1 cloud panel, don’t worry about marking any other spots on the ceiling.
- For multiple panels, continue using your panel to mark the locations where you plan to hang additional ones.
-
5Measure the spacing between the panels for even placement. As you’re marking the locations for your panels, use a ruler or tape measure to make sure the space between the 2 sides of separate panels is even. If they aren’t, hold the panel back against the ceiling and replace the markings so they’re evenly spaced.[5]
- It will be much more difficult to correct a spacing issue after the acoustic clouds are already hung up!
Mounting the Clouds
-
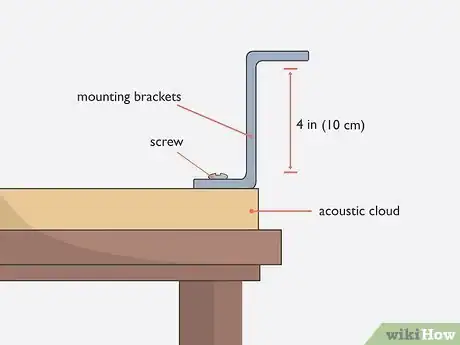
1Screw 4 in (10 cm) mounting brackets to the frame of the clouds. Place 1 of the brackets with the screw hole opening against the frame on the underside of the acoustic panel. Hold it in the center of 1 of the long sides of the panel and use wood screws and a screwdriver or power drill to attach it to the frame. Then, install another bracket across from it on the other side of the frame, facing in the same direction. Use your ruler or tape measure to make sure the brackets are installed so they line up evenly across from each other.[6]
- A 4 in (10 cm) gap between the acoustic cloud and the ceiling will help diffuse sound waves and reduce low bass notes.
- You can purchase mounting brackets and wood screws at studio equipment stores, at your local hardware store, or by ordering them online.
-
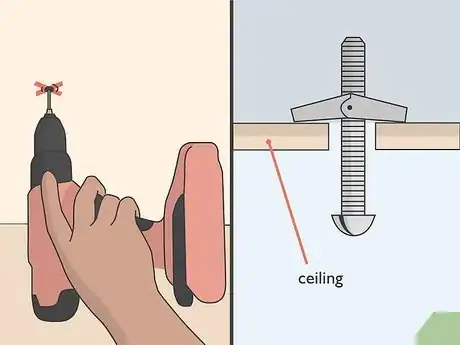
2Drill toggle bolts into the ceiling at the marked locations. A toggle bolt, also known as a butterfly anchor, is a fastener that’s used to hang objects on hollow walls. Take a power drill and attach a drill bit that fits the toggle bolt. Place a toggle bolt onto the bit and hold it against 1 of the marked locations on the ceiling. Drive the bolt into the ceiling leaving a 1⁄2 inch (1.3 cm) gap between the end of the bolt and the surface. Install the rest of the toggle bolts into the marked locations on your ceiling.[7]
- Leave a small gap so you can easily fit the brackets onto the toggle bolts.
- You can buy toggle bolts at studio equipment stores, at home improvement and hardware stores, or by ordering them online. Because the toggle bolts can be adjusted and tightened, you can use any type to fit your brackets.
-
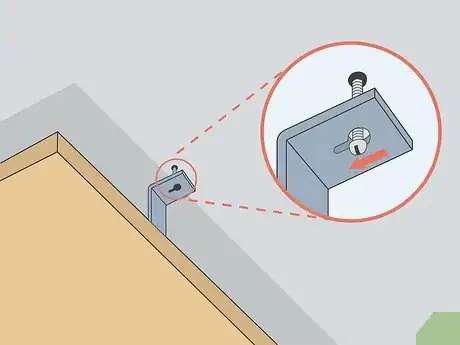
3Slide the brackets onto the toggle bolts. Take 1 of the acoustic clouds and carefully climb up the ladder with it. Align the brackets on the cloud panel with the toggle bolts on the ceiling. Slide the opening on both of the brackets onto the 2 toggle bolts. If you have other acoustic clouds, slide them onto the toggle bolts on the ceiling.[8]
- Make sure you slide the brackets all the way onto the toggle bolts so they’re centered.
Tip: If you’re having trouble lining up the brackets and toggle bolts, have a friend help you.
-
4Tighten the toggle bolts with a screwdriver. Once you’ve hung the acoustic clouds onto the toggle bolts on the ceiling, take a screwdriver and tighten each of the bolts until they’re flush against the surface. Give the acoustic clouds a little wiggle with your hands to make sure they’re held securely. If they move slightly, tighten the toggle bolts more.[9]
- If the clouds aren’t held securely, the brackets could make a rattling noise.
Things You’ll Need
- Power drill
- Ruler or tape measure
- Pencil
- Toggle bolts
- 4 in (10 cm) mounting brackets
- Wood screws
- Screwdriver
References
- ↑ https://youtu.be/CkQOcFbVZu8?t=384
- ↑ https://youtu.be/pSMwNl4drzo?t=13
- ↑ https://youtu.be/pSMwNl4drzo?t=32
- ↑ https://youtu.be/pSMwNl4drzo?t=51
- ↑ https://youtu.be/CkQOcFbVZu8?t=497
- ↑ https://gikacoustics.com/wp-content/uploads/2013/11/Cloud-Mounting-Brackets-Instructions.pdf
- ↑ https://youtu.be/pSMwNl4drzo?t=60
- ↑ https://gikacoustics.com/wp-content/uploads/2013/11/Cloud-Mounting-Brackets-Instructions.pdf
- ↑ https://gikacoustics.com/wp-content/uploads/2013/11/Cloud-Mounting-Brackets-Instructions.pdf


