This article was co-authored by Ricardo Mitchell. Ricardo Mitchell is the CEO of CN Coterie, a fully licensed and insured Lead EPA (Environmental Protection Agency) Certified construction company located in Manhattan, New York. CN Coterie specializes in full home renovation, electrical, plumbing, carpentry, cabinetry, furniture restoration, OATH/ECB (Office of Administrative Trials and Hearings/Environmental Control Board) violations removal, and DOB (Department of Buildings) violations removal. Ricardo has over 10 years of electrical and construction experience and his partners have over 30 years of relevant experience.
wikiHow marks an article as reader-approved once it receives enough positive feedback. In this case, 91% of readers who voted found the article helpful, earning it our reader-approved status.
This article has been viewed 342,015 times.
Ground rods are an important part of having a safe electrical system. They create a route for stray electricity, which occurs during a short or other malfunction, to have an efficient route out of a building. To begin installation, you need to find an appropriate location to install them and then drive them into the ground. Once the rods are in the ground, then you need to ensure that they are connected to the electrical system they are grounding correctly. With a bit of planning and care, you can install grounding rods for a new electrical panel or for an existing panel in order to minimize the threat of electrical fire and injury.[1]
Steps
Picking the Location
-
1Install the rod in a location near the electrical panel. Ground rods need to be installed in the ground outside in a spot where they can be hammered 8 feet (2.4 m) into the ground. There is no requirement for how close or far from a building they should go, but be sure to pick a spot that is convenient to get to and where you will have space to use tools to drive the rod into the ground.[2]
- If a grounding rod is too close to a building foundation, it could interfere with it. Because of this, it's best to keep it at least 2 feet (0.61 m) from the side of the building.
-
2Plan the route for the grounding electrode conductor. Once a ground rod is driven into the ground, it will need to be connected to the electrical panel inside. This is done with a wire called the grounding electrode conductor. It's important to factor its route in when picking a spot for the ground rod. Make sure the grounding cable can easily be routed to the panel from where the grounding rod is positioned.[3]
- If you have an idea of where you would like to drill a hole in your building to get the conductor inside, pick a spot for the grounding rod nearby.
Advertisement -
3Avoid locations where the ground is mostly rock or heavily compacted. Because you have to drive the rod 8 feet (2.4 m) into the ground, you want to avoid areas that are excessively rocky. While you wont always be able to avoid rocks or know they are there, avoid picking an area that you know is full of rocks.
-
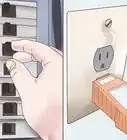
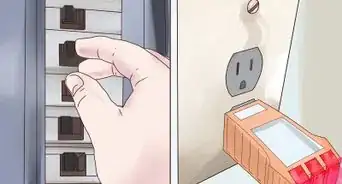
4Locate any wires or pipes in the path of the ground rod. Once you have picked a spot to put your ground rod, you need to make sure you will not damage anything in the ground when you install it. In many countries, there are hotlines you can call to have your utilities located free of charge. In the US, for example, there is a national hotline that you can call in order to notify your utilities that you need a locator.[4]
- It usually takes about 2-3 days for the utilities to come and do the locating, so plan ahead.
- If there is no locating hotline in your areas, you can call the utility companies directly that serve the building and ask them to locate their underground lines.


Putting the Rod in the Ground
-
1Purchase an approved grounding rod. Grounding rods need to made of specific conductive metals and they need to made to a specific length and width. Because of this, it's best to buy a rod that is specifically made for this use. Buying a listed rod, meaning it has been verified by a certification group, will ensure that your grounding rod is the correct size and material. Most home improvement and hardware stores stock approved grounding rods. [5]
- High quality grounding rods are typically made of high carbon steel for it's durability and electro-plated with copper for its conductivity and longevity.[6]
- In the US, ground rods need to be at least 8 feet (2.4 m) long. If they are listed, they need to be at least 1⁄2 inch (1.3 cm) wide and they will have a mark that says they are listed. If they are not listed, they need to be at least 5⁄8 inch (1.6 cm) wide.[7]
- A listed ground rod will have a marking near the top of it that states that it is approved. The mark allows an electrical inspector to immediately know you have used a proper rod.
-
2Start digging a hole with a shovel or post-hole digger. Because a ground rod is so long, it can be hard to get leverage on the top of it when you start installing it. To get the top down to a more manageable level, dig a hole 2–4 feet (0.61–1.22 m) deep. By putting the end of the ground rod in the hole, it will be easier to start hammering the top of the rod.
- If you don't want to dig a hole or you can't for some reason, you will need a ladder or step stool to get up high enough to start pounding in the top of the ground rod.
-
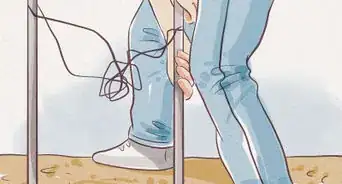
3Drive the rod into the ground. Using your hammer, drill, or driving tool, gradually drive the rod vertically into the ground. You need to drive your rod all the way into the ground. The electrical code states that it must have 8 feet (2.4 m) of contact with the ground, so you need to drive it all the way down.[8]
- Driving a ground rod into the ground can take a long time and can be difficult work. If you can find someone to take turns driving the rod, it will make for a much easier job.
- Some electrical inspectors will allow you to leave 1–2 inches (2.5–5.1 cm) sticking up out of the ground. However, some want the entire thing covered in earth.


Connecting the Rod
-
1Pull the grounding electrode conductor to the grounding rod. Once the grounding rod has been driven into the ground, you need to connect it to the electrical system of the building. Pull the grounding electrode conductor up to the top of the grounding rod, making sure it is long enough to make a permanent connection between them.[9]
- Give the grounding electrode a little bit of slack, so it's not extremely tight where it connects with the grounding rod. This will ensure that if it gets hit or pushed on, it won't get dislodged from the grounding rod.
- If the grounding electrode conductor has a sheath on it, the last 1⁄2 inch (1.3 cm) should be cut off, exposing the wire.
-
2Clamp the grounding electrode conductor to the grounding rod. There are specific clamps that are used to connect grounding electrode conductors to grounding rods. You will need 1 clamp. Put the end of the conductor and the end of the rod inside of the clamp and turn the screw on the clamp to press them together securely.[10]
- These clamps are sold in home improvement and hardware stores.
-
3Connect the grounding electrode conductor to the ground bus. The ground bus is where all the ground and neutral wires are attached in the electrical panel. To make the connection, slide the end of the grounding electrode conductor through one of the holes in the bus and tighten the screw in that hole until it holds the wire very tightly.[11]
- In some cases, the ground wires will be connected to the ground bus and the neutral wires are connected to the neutral bus. These 2 bars are then connected with a main bonding jumper. If this is the case, you can attach your grounding electrode conductor wherever it fits on either bus.[12]
- You need to be very careful when you are doing any work in an electrical panel. Make sure that your fingers, tools, and the grounding electrode conductor don't make contact with the energized bars in the panel, which are located behind the circuit breakers.
- If you are unsure about how to make this connection safely, hire an electrician to do the work.


Expert Q&A
-
QuestionWhat material should my ground rods be made of?
 Ricardo MitchellRicardo Mitchell is the CEO of CN Coterie, a fully licensed and insured Lead EPA (Environmental Protection Agency) Certified construction company located in Manhattan, New York. CN Coterie specializes in full home renovation, electrical, plumbing, carpentry, cabinetry, furniture restoration, OATH/ECB (Office of Administrative Trials and Hearings/Environmental Control Board) violations removal, and DOB (Department of Buildings) violations removal. Ricardo has over 10 years of electrical and construction experience and his partners have over 30 years of relevant experience.
Electrician & Construction Professional, CN CoterieGraph and ground rods are made of copper, because it's durable and it's a strong conductor.
Warnings
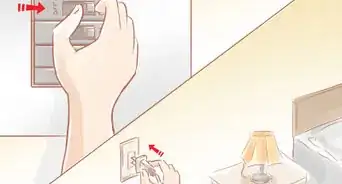
- It's important for all electrical systems to be grounded. Grounding can prevent fires and electrical injuries by giving uncontrolled electricity a route to the ground other than through property or people.⧼thumbs_response⧽
Things You'll Need
- Ground rod
- Ground rod clamp
- Grounding electrode conductor
- Sledge hammer, hammer drill with a ground rod bit, or a manual pile driving tool
- Shovel or post hole digger
- Screwdriver
- Drill
- Hammer


-Electric-Shock-Step-8.webp)


-Step-6-Version-2.webp)
References
- ↑ https://iaeimagazine.org/magazine/2006/03/16/ground-rod-electrodes-what-you-need-to-know/
- ↑ https://iaeimagazine.org/magazine/2006/03/16/ground-rod-electrodes-what-you-need-to-know/
- ↑ https://iaeimagazine.org/magazine/2006/03/16/ground-rod-electrodes-what-you-need-to-know/
- ↑ http://call811.com/before-you-dig/how-811-works
- ↑ http://www.adamselectric.coop/wp-content/uploads/2015/02/Grounding-Bonding.pdf
- ↑ Ricardo Mitchell. Electrician & Construction Professional, CN Coterie. Expert Interview. 6 May 2020.
- ↑ https://iaeimagazine.org/magazine/2006/03/16/ground-rod-electrodes-what-you-need-to-know/
- ↑ https://iaeimagazine.org/magazine/2006/03/16/ground-rod-electrodes-what-you-need-to-know/
- ↑ http://www.adamselectric.coop/wp-content/uploads/2015/02/Grounding-Bonding.pdf
About This Article

Before you install ground rods, call your local digging hotline so they can send someone to locate any wires or pipes that are in the path of where you want to put your ground rod. Once you’re sure there are no pipes or wires in the area, purchase an approved grounding rod set. Then, dig a hole 2-4 feet deep where you want to insert the rod. Drive the rod into the ground using a hammer, drill, or driving tool, until it’s all the way in. Once you’ve put the rod in, you’ll need to connect it the electrical system of the building. If you’re not sure how to do this, consider hiring an Electrician who can safely help you complete the process. To learn how to choose a good location for your grounding rod, read on!