This article was co-authored by wikiHow staff writer, Amy Bobinger. Amy Bobinger has been a writer and editor at wikiHow since 2017. She especially enjoys writing articles that help people overcome interpersonal hurdles but frequently covers a variety of subjects, including health and wellness, spirituality, gardening, and more. Amy graduated with a B.A. in English Lit from Mississippi College in 2011 and now lives in her hometown with her husband and two young sons.
wikiHow marks an article as reader-approved once it receives enough positive feedback. In this case, 86% of readers who voted found the article helpful, earning it our reader-approved status.
This article has been viewed 816,049 times.
Learn more...
If you want to build a pier or a dock, you need good, sturdy pilings or posts to support it. Unless you have the heavy equipment to drive the pilings into the ground, you’ll either need to use a jet of water to dig a deep hole or set the pilings in concrete footers. Jetting is better for sandy soil, while concrete is more stable for muddy beds.[1] Although this project may require some special tools and a couple of people to lend a helping hand, you’ll be able to enjoy fun on the waterfront for years to come!
Steps
Jetting Out the Water
-
1Choose pilings made of pressure-treated wood. In addition to remaining constantly waterlogged, your pilings will be subjected to tiny organisms that feed on wood, so you need something that will hold up over time. Pressure-treated wood has been preserved with special chemicals that will help it last longer when it’s exposed to harsh outdoor conditions. It's also the most cost-effective option.[2]
- Other options for pilings include plastic-coated wood and heavy-duty aluminum.
- Typically, pilings should be 6–8 in (15–20 cm) in diameter, but if your deck will weigh more than 10,000 lb (4,500 kg), choose 10–12 in (25–30 cm) pilings.[3]
- You’ll need to place a post about every 10 ft (3.0 m) along the dock in order to support its weight.[4]
-
2Rent a 2–3 in (5.1–7.6 cm) water jet from a home improvement store. Often, your local home improvement store will allow you to rent high-powered tools like a water jetter (which may also be called a hydro jet) for a short amount of time. This will prevent you from having to pay full price for a tool that you won’t use very often.[5]
- The cost of renting a water jet will vary depending on your location and the length of time you need it.
- These high-powered water pumps typically run on gasoline, and they come with either a 2 in (5.1 cm) or 3 in (7.6 cm) diameter hose. Either size will work, but since the hose gets heavy when it’s full of water, the 2 in (5.1 cm) hose may be easier to use.[6]
- If you don’t have access to a water jetter, you may be able to use a high-pressure garden hose instead, but the process will probably take longer.
Advertisement -
3Spray paint your pilings at 12 in (30 cm) intervals to monitor their depth. As you start to sink the pilings, it can be hard to keep track of how far they’ve gone into the ground. By marking them with spray paint, it will be easier to make sure your pilings are all installed at the same depth.[7]
- Burying the piling 4–6 ft (1.2–1.8 m) into the ground should give you a tight, secure fit.
-
4Measure the beams according to the height of your pier or dock. Your pier should sit about 3–4 in (7.6–10.2 cm) above the highest level the water will reach. Measure from the bed beneath the water to the maximum water line, then add on the depth that you plan to bury the pilings to get their total height.
- Even in a body of water that isn’t affected by tides, the water level may still fluctuate. If you’re not sure what the maximum water line is, ask other pier or dock owners in your area.
- Cut the beams a little longer than you’ll need them. You can always trim them later if you need to.
-
5Stand the first piling in the water. You’ll need to have 1-2 strong people to help you hold the piling in place, so bribe a few friends with lemonade and the promise of spending sunny days on the water.[8]
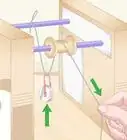
- If you don’t have anyone who can help you, use sturdy pieces of wood and a pulley system to create a tripod that can lift and hold the pilings in place.
-
6Aim the tip of the water jetter at the bottom of the piling and turn on the pump. The water will blow out of the hose with enough force to push the sand and silt out from under the piling. As this is happening, guide the piling further down into the earth until you reach the desired depth. If you need to, move the tip of the hose from side to side so the piling can go in evenly.[9]
- Repeat this process for the remaining pilings.
- If the force of the water isn’t enough to remove the sand, attach a PVC pipe with a 1 in (2.5 cm) diameter to the end of the hose to increase the pressure.
- Use the water jetter to push some of the dirt back into place after the piling is set.


Pouring Concrete Posts
-
1Measure the approximate length of the PVC you’ll need. Measure from the bed beneath the water to the highest level the water reaches in your area. Depending on how soft the earth is below the water, add another 1–2 ft (0.30–0.61 m) to that length—closer to 2 ft (0.61 m) for soft, silty beds.
- Multiply this length by the number of beams you will need to get the total length of PVC.
- When you’re choosing the beams that go inside of the concrete, add another few inches to account for the height of the pier or dock above the water.
-
2Purchase heavy-duty PVC with a diameter of 12–18 in (30–46 cm). For standard 8 ft (2.4 m) decks, a PVC pipe with a diameter of 12 in (30 cm) and a post with a diameter of 4 in (10 cm) should be sufficient.[10]
- If you’re building a deck that is larger than 8 ft (2.4 m), start with a PVC pipe of 18 in (46 cm) and a post that’s about 6 in (15 cm).
-
3Drive the PVC pipe 1–2 ft (0.30–0.61 m) into the ground. If you can’t push the pipe into the ground by hand, lay a spare piece of wood on top of the PVC and hit it squarely with a sledgehammer until you reach the desired depth.[11]
- It may help to spray paint the pipe in 1 ft (0.30 m) increments so you can tell how deep it is.
-
4Remove the water and mud from the pipe with a bucket and post-hole digger. Bail out the water that’s inside of the PVC pipe with a bucket, then use a post-hole digger to remove sand, silt, or mud from the bottom of the pipe. The pipe should be clear down to the bottom.
- While you can use a pump to clear out the pipe, doing it by hand is safer, since you don’t have to have electrical equipment near the water.
- If the ground is very hard, you may need to rent a mini-excavator.
-
5Mix quick-set concrete in buckets according to the package directions. Quick-set concrete, or Quikrete, can be mixed by hand. Pour the concrete mix into a bucket and dig a small hole in the mix, then add in water according to the package directions.
- The amount of concrete you’ll need depends on the size of your project. For a PVC pipe with a diameter of 12 in (30 cm) and a post of 4 in (10 cm), estimate about 2 bags of Quikrete per 1 ft (0.30 m) of height.
- If your pipe is 18 in (46 cm) in diameter and your post is 6 inches (15 cm), you’ll need about 5 bags per 1 ft (0.30 m).
- It may be a good idea to rent a concrete mixer for this project.
-
6Pour 10 in (25 cm) of concrete into the pipe, then insert the post. Lower the post into the PVC pipe and push it down into the concrete. By pouring concrete into the pipe first, the post will be more stable when you put it into place.[12]
- The PVC pipe will keep the water out of the concrete as it cures.
-
7Continue to pour concrete around the post. Keep working until you fill the PVC pipe all the way to the maximum water line. Work slowly to ensure you don’t end up with any air pockets in the concrete.
- This part of the process will take awhile, so it’s probably a good idea to get some friends to help you fill and carry buckets of concrete.
- You may have some excess pipe at the top. You can cut this off with a reciprocating saw after the concrete dries, if you like.
-
8Repeat for each post, then let the concrete cure for 3-4 days. No matter how excited you are about having a pier to lounge on, it’s important to let the concrete completely cure before you continue building your structure. After you poured all of that concrete, though, you’ll probably be glad to have a couple of days to rest before you start building the framework.


Community Q&A
-
QuestionWhat would be a good way to correct a dock that has begun sagging in the water because of its foundation settling over time?
 Community AnswerPut in a longer post. It's a rookie mistake, especially in mud, sometimes piles need to be in more than 10 feet. Using a piece of 1/2 inch rebar as a prod will give you a "feel" of the strata and an informed idea of how far in you need to sink them.
 -
QuestionHow far apart should I place pilings if the walkout is 5.5' wide and 23' in length?
 Community AnswerIt depends on the size of your timbers. I was taught that 2 inches will span 3 feet, 4 inches 6 feet, 6 inches 9 feet, and so on.
 -
QuestionHow many feet in the water must have piling Marine pilings?Community AnswerThat depends on how much weight it is holding. A very small walkway at 5 to 6 feet is sufficient. For a large deck or boat lift, 8 to10 feet is better. If you are on open water where there is wave activity, then you may want to go deeper.
Warnings
- Since jetting will loosen the soil around the pilings, your pier or dock may not be able to support as much weight as one with cement pilings.⧼thumbs_response⧽
- In some areas, jetting is discouraged because it can disturb wildlife. Check to see if there are regulations in your area. Often, low-pressure jetting is still permitted.⧼thumbs_response⧽


References
- ↑ https://cabinlife.com/articles/article/should-you-build-your-own-dock
- ↑ https://www.hunker.com/13425944/how-to-install-posts-in-the-water-for-a-dock-or-pier
- ↑ http://www.piledrivers.org/files/9971afc0-2754-41db-a9bc-849f87c51217--c38abc5c-4dca-402f-b252-e7e8f85df9f8/timberpilemanual.pdf
- ↑ https://cabinlife.com/articles/article/should-you-build-your-own-dock
- ↑ https://www.popularmechanics.com/home/tools/reviews/g996/8-tools-you-should-rent-and-not-buy/
- ↑ https://www.eng-tips.com/viewthread.cfm?qid=88689
- ↑ https://www.oregon.gov/ODOT/Construction/Doc_BridgeInspectorManual/07_bridge.pdf
- ↑ https://www.eng-tips.com/viewthread.cfm?qid=88689
- ↑ https://www.hunker.com/13425944/how-to-install-posts-in-the-water-for-a-dock-or-pier
About This Article

If you need to install posts in the water for a dock or a pier, measure and cut pilings made of pressure-treated wood. The pilings should be the length you need to support your structure, plus an extra 4-6 feet that you can bury in the ground. Have some friends help you stand the first piling in the water, then aim the tip of a high-powered hose or a water jetter at the base of the piling and turn on the pump. The force of the water should blast away the sand and mud beneath the wood, creating a hole so you can sink the piling. Keep reading to learn how to pour concrete posts!