This article was co-authored by Kevin Schlosser. Kevin Schlosser is a Home Improvement Specialist and the Owner of Home Tech Handyman Ltd. With over 20 years of experience, Kevin specializes in age-in-place installations, flooring, roofing, and general remodeling handyman services. Kevin holds a blend of construction and in-home technology-related certifications including NAHB Certified Age-in-Place Specialist, CEDIA membership and certifications, and a Certification from the Association of Certified Handyman Professionals. Also, he is in training to receive certifications in Construction, Project Management, and other CEDIA qualified system integrator certifications. He is fully-insured in the state of Colorado.
There are 8 references cited in this article, which can be found at the bottom of the page.
This article has been viewed 64,220 times.
Whether you’re going on to install hardwood, ceramic tile, or laminate, one of the most important steps of any flooring project is making sure the subfloor foundation is level. Level floors are critical for reducing gaps between the flooring material and substrate and preventing sagging and other structural complications. If you suspect that you’re working with an off-level foundation, you can get it ready for installation quickly by using a floor leveling compound.
Steps
Cleaning and Bonding the Subflooring
-
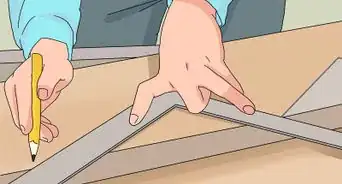
1Remove the existing flooring and check the level of the subflooring. Set down a 6 ft (1.8 m) level every few feet from one end of the room to the other. This will give you an idea of how much work you’ve got cut out for you, and where it’s needed most. A good general rule of thumb is that the foundation shouldn’t slope more than 3⁄16 inch (0.48 cm) every 10 feet (3 m).[1]
- If the area is very large, use a long, straight 2 in × 4 in (5.1 cm × 10.2 cm) board and set your level on top of it. If the floor is uneven, lift up the board until it is level so you’ll know how much flooring compound you’ll need to even it out.
- Floors are rarely perfectly level. It’s okay if the angle is off by a fraction of an inch in either direction.
- Keep in mind that “flat” isn’t the same thing as “level.” Minor defects may not be noticeable to the eye, but they will be to your level.[2]
- If you’re installing a new floor, make a note of where the foundation should be worn down or built up.
-
2Sand down high spots. More often than not, sagging or slanted flooring materials are responsible for off-level floors. Occasionally, however, there will be humps that cause the foundation to rise above a specified height. These can be dealt with by sanding down wooden subfloors with an electric sander, or by grinding them with a motorized angle grinder.
- Sanding and grinding produces a lot of dust. Be sure to wear eye protection and a facemask or ventilator while wearing down uneven subflooring.
Advertisement -
3Clean and repair old subflooring. Once the subflooring is exposed and free of high spots, prepare it for the new flooring by removing any remaining dust and debris. Vacuum the entire room, especially around the corners where dust particles tend to collect. Mop concrete subfloors with diluted muriatic acid to clear away traces of oil, wax, or adhesive that may be clinging to the surface.[3]
- Fill cracks in concrete subfloor and make sure the filled areas are level before cleaning the subfloor.
- A thorough cleaning is also necessary to get the subflooring ready to accept the liquid bonding agent.
-
4Cover the subflooring with a bonding agent. Starting with the edges of the room along the molding, spread on a thin coat with a wide, soft-bristled paintbrush. Work your way about a foot out from each wall, then use a roller or mop to apply the bonding agent to the larger area in the center.[4]
- The bonding agent will create a chemical connection with the leveling compound to help it set up more securely and last longer.
- Wear gloves, waders, and old clothing when working with liquid bonding agents and leveling compound. Once these materials get on something, they can be nearly impossible to get off.


Applying the Leveling Compound
-
1Mix the leveling compound to a creamy consistency. Most leveling compounds are sold in powdered form and just need to be combined with a little bit of water in order to be effective. Pour the powder into a 10 US gal (38 L) bucket and begin adding room temperature water little by little until the mixture thickens to slurry. It should be about the same texture as pancake batter.[5]
- Stir vigorously to break up lumps, but work quickly. Some compounds begin to set up in a matter of minutes.
- An electric drill with a mixing paddle attachment will make mixing quicker and more efficient so you can spread the compound before it hardens.
-
2Pour the compound over the subflooring. Starting in one of the far corners of the room, drizzle the wet compound into each of the sunken sections you identified while checking the level. Pour slowly to minimize splashes and splatters. The liquid will immediately seek out the lowest parts of the subfloor and fill them in.[6] At this point, all there is to do is let it work its magic.[7]
- Try not to over-apply the compound. In most cases, you’ll only need a layer between 1⁄4–1⁄2 inch (0.64–1.27 cm) thick to even out the worst imperfections.[8]
- To ensure that the finished floor turns out nice and flat, it’s best to go ahead and cover the entire surface. You’ll be able to chip away at what you don’t need later on.
- Be sure to work your way outward from the interior of the room, ending at the door. You don’t want to accidentally trap yourself in a corner!
-
3Smooth out inconsistencies with a hand trowel. By the time you’re finished pouring, the compound will have set enough to finish by hand. Spread it over the uneven foundation using long, arcing strokes, like you’re frosting a giant cake. Apply a consistent amount of pressure over the entire surface.[9]
- Focus on lumps and contours where the different pools have dried separately and formed noticeable seams.[10]
- Pressing down too hard on the compound while it’s still wet could accidentally form depressions.


Finishing the Flooring
-
1Allow the compound to dry. Quick-set leveling compounds typically harden to the touch in a matter of minutes. However, it will typically take them several hours to cure completely. Check the label on the product you’re working with to find out how long you can expect to wait before finishing your new level floor.[11]
- For the strongest, most durable finish possible, be prepared to let the compound dry overnight.
- Consider splitting your project up between 2 days—you can pour and smooth the compound on the first, then come back and touch it up on the second once it’s had a chance to set up.
-
2Sand the entire floor. Once the compound is dry, make another sweep with your electric sander to shave down slight differences in the height of the subfloor and even out rough patches. Sand from one end of the room to the other, pushing the sander along in a straight line and reversing your direction each time you reach the opposite wall.[12]
- Work your way from a low-grit sandpaper (around 24-40 grit) to a high-grit one (80-120 grit) to gradually smooth and blend the new surface.
- You may need to use a separate edge or corner sander to hit the areas closest to the walls.
-
3Check the level again. Place your level in several different spots as you did before to get a more accurate reading of the floor’s overall slope. The level shouldn’t be off by more than 3⁄16 inch (0.48 cm)—any minor deviations you happen to discover shouldn't impact the stability of the finished floor.
- If the floor is more than 3⁄16 inch (0.48 cm) off level at any point, further compounding or sanding may be necessary.
-
4Install the flooring. Now that your subfloor is level, you can proceed to put in hardwood, tile, laminate, or carpet without having to worry about any frustrating gaps or structural imbalances. Be sure to properly prep the leveled subfloor for whatever flooring material you’ve chosen.
- Always take the time to gauge and level your foundation when beginning any new flooring project.
- As long as your subfloor is perfectly level, everything that goes on top of it will be, too.[13]


Community Q&A
-
QuestionWhat can I use to level a floor?
 Kevin SchlosserKevin Schlosser is a Home Improvement Specialist and the Owner of Home Tech Handyman Ltd. With over 20 years of experience, Kevin specializes in age-in-place installations, flooring, roofing, and general remodeling handyman services. Kevin holds a blend of construction and in-home technology-related certifications including NAHB Certified Age-in-Place Specialist, CEDIA membership and certifications, and a Certification from the Association of Certified Handyman Professionals. Also, he is in training to receive certifications in Construction, Project Management, and other CEDIA qualified system integrator certifications. He is fully-insured in the state of Colorado.
Home Improvement SpecialistLeveling compound will fill in the lowest parts of your floor after you pour it.
Warnings
- Avoid applying leveling compound directly to wood subflooring materials without first employing a bonding agent. The runny liquid will absorb into the wood, which may cause splitting, leaks, or other severe structural damage.⧼thumbs_response⧽
Things You'll Need
- Long level
- Muriatic acid
- Self-leveling compound mix
- 10 US gal (38 L) bucket
- Water
- Floor bonding agent
- Electric drill with mixing paddle attachment
- Electric belt sander
- Motorized angle grinder (optional)
- Hand trowel
- Prybar
- Graded sandpaper
- Paintbrush and roller
- Shop vacuum and/or mop


References
- ↑ https://www.youtube.com/watch?v=afrUJ1YBtdE&feature=youtu.be&t=92
- ↑ https://www.askthebuilder.com/how-to-level-a-floor/
- ↑ https://www.lowes.com/projects/build-and-remodel/prepping-a-plywood-subfloor-for-hardwood-or-laminate-flooring/project
- ↑ https://www.ronhazelton.com/projects/how_to_level_a_floor_before_putting_down_hardwood_flooring
- ↑ https://www.theartofdoingstuff.com/how-to-pour-self-levelling-cement/
- ↑ Kevin Schlosser. Home Improvement Specialist. Expert Interview. 19 February 2021.
- ↑ https://www.todayshomeowner.com/video/how-to-level-a-subfloor/
- ↑ https://www.theartofdoingstuff.com/how-to-pour-self-levelling-cement/
- ↑ https://www.todayshomeowner.com/video/how-to-level-a-subfloor/
About This Article

To level a floor, start by removing the existing flooring. Then, mix leveling compound according to the instructions on the package in a large bucket. Once the compound reaches a creamy consistency, pour a thin layer into the sunken sections, then smooth out inconsistencies with a hand trowel. Work your way outward from the interior of the room, ending at the door so you don’t accidentally trap yourself in a corner. Finally, let your floor dry overnight before reapplying new flooring. To learn our Carpentry reviewer’s tricks on using a bonding agent to help the leveling compound last longer, scroll down!