X
wikiHow is a “wiki,” similar to Wikipedia, which means that many of our articles are co-written by multiple authors. To create this article, volunteer authors worked to edit and improve it over time.
This article has been viewed 220,467 times.
Learn more...
Here’s a tutorial on how to create arrows in four different ways.
Steps
Method 1
Method 1 of 4:
Using the Brush Tool
-
1Click the brush tool.
-
2Create a new layer by clicking the “create a new layer” icon or by typing the shortcut Shift+Ctrl+N.Advertisement
-
3Go to the brush tool and select wet media brushes>rough ink. Set the size to 200 pixels.
-
4Use the brush tool to draw an arrow on your new layer.


Advertisement
Method 2
Method 2 of 4:
Using the Line Tool
-
1Click on the brush and the path tool.
-
2Add a new layer by clicking the “create a new layer” icon and then change the brush size to 20 pixels.
-
3Using the line tool, click on paths and add an arrowhead on the start of the line. Set the size of the line to 10 pixels.
-
4Go to your paths window and draw the line tool.
-
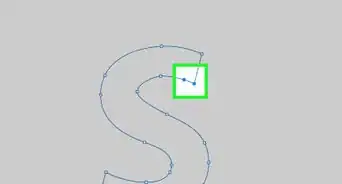
5Using the path you have drawn, right-click over the path layer on your paths window. Click "stroke path."
-
6Select the brush path and draw the arrow you have created.


Advertisement
Method 3
Method 3 of 4:
Using Shape Layers


Method 4
Method 4 of 4:
Using Built-In Vectors
-
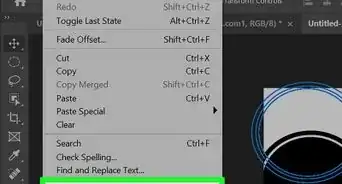
1Click "Window" at the top of Photoshop's entire user interface. You can see this "Window" button in all the images to follow. Your click opens a dropdown menu used to customize the Photoshop UI. Options here can very easily overwhelm the uninitiated. At this dropdown menu, hover on "Workspace" and then choose "Essential (Default)" to ensure you'll have visible each of the panels you need to follow the instructions below. More specifically, the "Tools" and "Options" panels are required.
-
2Press the "U" key to take control of your most recently used shape tool. There are multiple "shape" tools including the "line tool" from step 5.
Mac users should use the open-apple key instead of ctrl in the following steps.- Pressing the "U" key may or may not have given you control of "custom shape tool." i.e. you wound up with the "Polygon Shape Tool." Let's see. Look to your "Tools" panel and long-click the current shape tool button to reveal the sub-set of shape tools. Now click to select "Custom Shape Tool."
-
3Use the "Options" panel to specify how the Custom Shape tool will behave. The only crucial setting to specify is what shape the custom shape tool will be using. To do so, find the square thumbnail preview of the shape at hand and click the small down-arrow button on its right hand edge.
-
4Review the fly-out panel displaying available custom shapes for the custom shape tool to use. Note the gear icon to right of this panel. Click the gear to reveal more functions.
-
5From the gear's dropdown menu, click "All" to make available all of the custom shapes that are built in to Photoshop. Note other options below "all" to display other categories. They're all subsets of "all" and I say "YOLO. Load them all." Also note "Load Shapes..." which you may use in the future to import more shapes that are not built in to Photoshop. The internet is home to many free resources to expand your available custom shapes.
-
6Given the option to replace your current shapes, click "OK." "Append" will add the set to what's already in the panel. We wouldn't choose to append "all" as it'd create redundant options.
-
7Resize this panel to see all of your choices at once by grabbing the panel's bottom right-hand corner's diagonal dots. This design almost always indicates the option to resize by click & dragging your mouse.
-
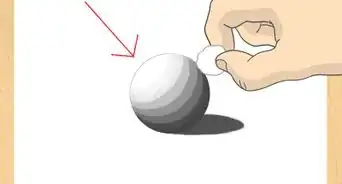
8Click to choose a custom shape (arrow.) You may elect to set more aspects of the custom shape tool with other controls on the "Options" panel. In this image I have specified a fill color orange, a stroke color of blue (stroke = outer border,) a stroke width, and a dashed pattern for the stroke. You may skip this. more on custom shape tool settings below.
-
9"Draw" the custom shape. To do this, click on your canvas in the spot that you intend for the top-left hand corner of this shape to be and drag to refine the size of this shape. As long as you keep that click held down, you can move the mouse about your canvas while seeing a live-preview of your shape in it's simplest definition: a single line that defines its would-be boundaries. Release the click and you've made an arrow. You can choose to hold down the shift key during this entire click-drag process to maintain a 1:1 aspect ratio (ratio of height to width) as you preview the shape's size. Most times you'll not want to distort (stretch) the shape which makes shift really helpful.


Advertisement


About This Article
Advertisement