This article was co-authored by Imran Alavi. Imran Alavi is a Marketing & App Development Expert and the CEO of Proleadsoft, a Digital Marketing and App Development firm based in San Francisco, CA. With over 10 years of experience, he specializes in Web Design, Search Engine Optimization (SEO), Search Engine Marketing (Google, Facebook, LinkedIn AdWords), App Development, and Software strategies for businesses. Imran holds a BS in Computer Science from the National University of Computer and Emerging Sciences, an MS in Computer Science from San Francisco State University, and has completed Stanford University Continuing Studies courses in Business, Marketing, and Communication.
The wikiHow Tech Team also followed the article's instructions and verified that they work.
This article has been viewed 816,626 times.
If you need to make business cards in a hurry and you don’t have fancy design software, Microsoft Word has the tools you need to make and print business cards. You can use templates to make the process easy but still maintain an individual feel, or you can create the cards completely from scratch. If you are creating cards from scratch, you can use the Table tool to help keep your cards at the proper size.
Steps
Using a Template
-
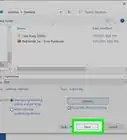
1Click the "File" menu and select "New". You'll be creating a new document from a business card template.
Tip: Using a template will allow you to quickly make a lot of professional-looking cards at once.
-
2Search for business card templates. Use the search field in the new document creation window to search for "business card". This will bring up a variety of free templates that you can use for business cards. There are templates for horizontal and vertical cards.Advertisement
-
3Select a template that you want to use. You'll be able to change any element of the template you'd like, including color, images, font, and layout. Pick the template that most closely matches the vision of your business card in your head. Click the "Create" or "Download" button to open the template in Word.[1]
-
4Fill out the information fields in the first card. If you're using Office 2010 or newer (and the template was designed for 2010 or new), you'll see your text appear in all of the business cards on the page. You'll only have to fill out information for one card this way. If the template is not designed to automatically fill out successive cards, you'll need to enter the data for each one manually.
-
5Change the format of any elements. You can select any of the text on the business card and change the format. You can switch fonts, change colors and size, and more, just like you would regular text.
- Since this is a business card, make sure that the font you choose is legible.
-
6Replace the logo (if necessary). If the business card template has a placeholder logo, you can click it to replace it with your own. Make sure that you resize your logo so that it fits, and that it doesn't look bad when the size has been changed.
-
7Proofread the cards. Make absolutely sure that your business cards do not have any typos or other mistakes. Your business card is one of the first impressions people will have of you, so you don't want to start off on the wrong foot.
-
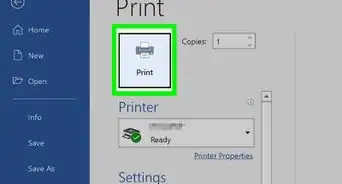
8Print the cards on stock, or send the file to a printer. If you're going to be printing the cards at home, you'll need high quality stock paper. Stick to white or off-white, and pick your finish. Most business cards don't have a finish, but some people prefer a glossier card. Many print shops will be able to open your saved business card template and print them for you as well.
- When purchasing paper, make sure that your printer at home can handle it. Check your printer's documentation or support site for details on the type of paper that it supports.
-
9Use a precision cutting tool to finish the cards. Once the cards are printed, you'll need to cut the sheet up. Each sheet will typically have ten cards on it. Don't use scissors or other methods of cutting that rely on you keeping a straight line. Instead, use a paper guillotine or precision paper cutter. Many print shops have these tools available for customers, or can do the cutting for you.
Tip: The standard US business card size is 3.5" x 2" (or 2" x 3.5" for vertical cards).


Creating From Scratch
-
1Create a new blank document. If you'd prefer to create your business card yourself, you can use the Table tool to make it easier.
-
2Click the "Page Layout" tab and click the "Margins" button. Select "Narrow" to make the margins a little smaller than the default setting. This will allow you to fit the business cards on the page.
-
3Click the "Insert" tab and then click the "Table" button. A grid will appear beneath the Table button.
-
4Create a 2 x 5 table. Use the grid to insert a table that is two cells wide and five cells high.
-
5Right-click on the table's selection crosshair and select "Table Properties". This will open the Table Properties window. The selection crosshair appear in the upper-left corner of the table when you hover over it.
-
6Set the alignment of the table to Center. This will make it easier to make the cards even.
-
7Click the "Row" tab and check the "Specify height" box. Enter 2" and change the drop-down menu to "Exactly".
-
8Click the "Column" tab and check the "Specify width" box. Enter 3.5" and change the drop-down menu to your preferred measurement such as "Inches".
-
9Examine your table. You should now have a table on your page that is separated into ten identical business card-sized cells. If the table doesn't fit, you may have to extend your bottom margin by a tenth of an inch.
-
10Right-click the crosshair again and select AutoFit. Choose "Fixed column width". This will prevent the table from changing shape as you add information to the first cell.
-
11Add your information to the first cell. You can use all of your regular Word formatting tools while typing in the cell. You can insert text boxes and images, change fonts, add color, or perform any other formatting that you'd like.
-
12Proofread the card. Before copying the information into each of the other cells, take the time to review it now for any errors or typos. If you proofread later, you'll have to change each cell instead of just changing the first before copying it.
-
13Select the entire first cell when you're satisfied. You can quickly do this by moving your cursor to the bottom-left corner of the cell until it turns into a diagonal arrow. Click and the cell's contents will be selected. Copy the contents of the cell to the clipboard.
-
14Place your cursor in the next cell and paste the copied information. You can click "Paste" in the Home tab, or you can press Ctrl+V. Your copied information will appear in the cell in the right locations. Repeat this for each of the cells on the page.
- Make sure that your business card is minimalistic. You can't realistically fit everything about your company into a single card—instead, focus on the most important info like your company logo, name, email address, physical address, website, and role in the company.[2]
-
15Right-click the crosshair again and select "Table Properties". Click the "Borders and Shading" button and select "None" for the border. This will ensure that parts of the cell borders don't appear when the cards are cut.
-
16Find good paper for the cards. You'll want a nice card stock paper to print your new business cards on. Make sure that your printer supports the type of paper that you get. You can also send your completed file off to a printer to have the cards professionally printed.
-
17Use a precision cutting tool. Avoid using scissors or other cutting tools that require you to maintain a straight line. Use professional paper cutting tools to make sure your cuts are even and properly measured. The standard US business card size is 3.5" x 2".


Community Q&A
-
QuestionDoes your logo need to be on your business card?
 Imran AlaviImran Alavi is a Marketing & App Development Expert and the CEO of Proleadsoft, a Digital Marketing and App Development firm based in San Francisco, CA. With over 10 years of experience, he specializes in Web Design, Search Engine Optimization (SEO), Search Engine Marketing (Google, Facebook, LinkedIn AdWords), App Development, and Software strategies for businesses. Imran holds a BS in Computer Science from the National University of Computer and Emerging Sciences, an MS in Computer Science from San Francisco State University, and has completed Stanford University Continuing Studies courses in Business, Marketing, and Communication.
Marketing ExpertIt's definitely a good idea to include your logo on your business card—just make sure that the logo on your card aligns with your company's branding guidelines. For instance, if your logo is normally blue and green, you wouldn't want to put a different color logo on your card. -
QuestionCan I have information printed on the back of the card? How do I do that?
 Community AnswerYou can put the paper back in the printer and print on the other side, just make sure the paper is facing up (with the already printed side facing the ceiling).
 -
QuestionHow can I write text over a picture?
 Community AnswerRight-click on the picture, click Wrap Text, and select Behind Text.
Sample Business Cards


References
About This Article

1. Click the File menu and select New.
2. Search for business card templates.
3. Select a template.
4. Fill out the fields in the first card.
5. Edit format, fonts, and colors.
6. Replace the logo (optional).
7. Proofread the cards.
8. Print the cards to cardstock.
9. Cut the cards.