This article was co-authored by wikiHow Staff. Our trained team of editors and researchers validate articles for accuracy and comprehensiveness. wikiHow's Content Management Team carefully monitors the work from our editorial staff to ensure that each article is backed by trusted research and meets our high quality standards.
There are 17 references cited in this article, which can be found at the bottom of the page.
wikiHow marks an article as reader-approved once it receives enough positive feedback. This article has 42 testimonials from our readers, earning it our reader-approved status.
This article has been viewed 4,790,701 times.
Learn more...
Chocolate is one of those foods that’s loved universally. You may not always have the option of heading down to the store whenever you feel a craving coming on, however, and store-bought chocolate often contains ingredients that are less-than-appealing, such as added sugar, dyes, and preservatives. Fortunately, it’s easy to make your own scrumptious, all-natural chocolate at home using a few basic ingredients.
Ingredients
- 1 cup (100 g) cocoa powder
- 1⁄2 cup (120 mL) coconut oil
- 4 tablespoons (59 mL) honey
- 1⁄2 tablespoon (7.4 mL) vanilla extract
- ¼ cup (25 g) confectioner’s sugar, 1⁄4 cup (59 mL) agave syrup, or 3-6 drops liquid stevia (optional)
Makes approx. 10 oz (283 g) of chocolate
- ¾ cup (140 g) cocoa butter
- ¾ cup (80 g) cocoa powder
- ¼ cup (30 g) milk powder, soy milk powder, almond milk powder, or rice milk powder
- 1 cup (100 g) confectioner’s sugar, 1 cup (240 mL) agave syrup, or 1–2 teaspoons (4.9–9.9 mL) liquid stevia
- Salt (optional—to taste)
Makes approx. 12 oz (340 g) of chocolate
Steps
Preparing an Easy 4-Ingredient Dark Chocolate
-
1Measure out your ingredients. For this recipe, you’ll need 1 cup (100 g) of cocoa powder, 1⁄2 cup (120 mL) of coconut oil, 4 tablespoons (59 mL) of honey, and 1⁄2 tablespoon (7.4 mL) of vanilla extract. Use a series of measuring cups to portion out each ingredient in a small cup or bowl.[1]
- Measuring your ingredients in advance will make the cooking process more efficient once it comes time to put it all together.
- If you like, you can also add ¼ cup (25 g) of confectioner’s sugar, 1⁄4 cup (59 mL) of agave syrup, or 3-6 drops of liquid stevia to lend a little more sweetness to your chocolate.[2]
-
2Melt 1⁄2 cup (120 mL) of coconut oil in a small pot over low heat. Turn on your cooktop to the lowest heat setting and add the coconut oil to the pot. Allow it to melt completely. Coconut oil has a low melting point, so this should only take a few seconds.[3]
- Keeping the coconut oil moving continuously at the bottom of the pot will help it liquefy faster.
Tip: If possible, use stainless steel cookware to prepare your homemade chocolate (or another type of nonstick cookware that’s safe to soak). Otherwise, cleanup can be quite a hassle.
Advertisement -
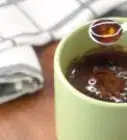
3Add 4 tbsp (59 mL) of honey and ½ tbsp (7.4 mL) of vanilla extract. Use a whisk or metal spoon to scrape the sticky honey into the pot. Then, drizzle in the vanilla. Stir the ingredients into the melted oil until they dissolve and form a thin, syrupy mixture.[4]
- Be sure to keep your cooktop on a low heat setting. If the oil gets too hot, it could scorch the sugars in the honey and spoil the flavor of the finished chocolate.
- If you wish to add any other sweeteners, such as confectioner’s sugar or stevia, do it at the same time that you add the honey and vanilla.
-
4Sift in 1 cup (100 g) of cocoa powder gradually. Rather than dumping all of the cocoa powder in at once, add it a little at a time. As you do, keep your whisk or spoon moving to help distribute the cocoa powder evenly throughout the mixture.[5]
- You’ll have an easier time mixing the cocoa into your other ingredients with a whisk than you would with a spoon or spatula.
-
5Take the chocolate off of the heat and continue stirring it as it thickens. You’ll know your chocolate is done when the chocolate takes on a smooth, dark color and the surface becomes slightly glossy. At this point, it just needs to be left to harden.[6]
- Removing the pot from the hot cooktop will prevent the chocolate from burning.
-
6Transfer the warm chocolate to a nonstick surface to cool. Carefully pour the chocolate out of the pot and onto a flexible nonstick baking mat or cookie sheet lined with parchment paper. Use a spatula to spread the chocolate about 1⁄2 inch (1.3 cm) thick.[7]
- You can also pour your chocolate into a decorative candy mold to create bite-sized treats with fun shapes.
- Avoid adding your chocolate to any nonstick type of container, or those treated with a commercial cooking spray. This usually won’t be enough to keep it from sticking.
-
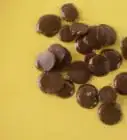
7Refrigerate your chocolate for 1 hour before enjoying it. Once it’s fully set, it will be firm enough to break into pieces or remove from the mold. Enjoy![8]
- Store your finished chocolate in the refrigerator, or simply keep it in a covered container on your countertop for easy access. Most types of dark chocolate have a shelf life of about 2 years.[9]
- If your chocolate begins to melt or soften at room temperature, you can place it back in the refrigerator at any point to harden it back up.


Making Sweet, Rich Milk Chocolate
-
1Create a makeshift double boiler using a pot of water and a mixing bowl. Fill the pot about halfway up and place it on the cooktop over medium heat. Then, set a small mixing bowl over the opening of the pot. The water will heat the bowl from underneath, allowing you to combine the various ingredients for your chocolate without burning them.[10]
- You want the water to be nice and hot, but not boiling. If the temperature is too high, it could easily scorch your chocolate as it cooks.
- A proper double boiler can help you get the job done with fewer pieces of cookware.[11]
-
2Melt ¾ cup (140 g) of cocoa butter in the heated mixing bowl. Keep the cocoa butter moving continuously at the bottom of the bowl to encourage it to melt faster. Cocoa butter melts at about the same speed as ordinary butter, and has a similar look in its liquid form.[12]
- You should be able to find cocoa butter in the baking aisle at any health food store, as well as some major supermarkets.
- If you’re unable to track down high-quality cocoa butter, you can use an equal amount of coconut oil as a substitute.[13]
-
3Sift ¾ cup (80 g) of cocoa powder into the melted cocoa butter. Add the cocoa powder little by little to reduce clumping. Use a whisk or metal spoon to stir the two ingredients together until the cocoa powder dissolves completely.[14]
- Make sure there are no lumps or dry pockets within the mixture.
-
4Shake in ¼ cup of milk powder and 1 cup (100 g) of confectioner’s sugar. Give the mixture another thorough stir to make sure the last of your dry ingredients are fully incorporated. You should notice the chocolate beginning to take on a lighter, more delicate color after adding the milk powder.[15]
- Use an equal amount of soy milk powder, almond milk powder, or rice milk powder if you're trying to stay dairy-free.[16]
- You can also substitute 1 cup (240 mL) of agave syrup or 1–2 teaspoons (4.9–9.9 mL) of liquid stevia for confectioner's sugar to sweeten your chocolate more nutritiously.
- Regular milk is too wet to use for making chocolate—excess moisture has a tendency to leave chocolate with a runny texture, making it impossible for it to set properly.[17]
Tip: A small pinch of salt can offset the sweetness of the sugar and give your chocolate a more complex flavor.
-
5Remove the bowl from the heat and stir the chocolate until it thickens. Fold the chocolate over on itself repeatedly from the bottom of the bowl. When you’re finished, it should be smooth, creamy, and free of lumps.[18]
- Your chocolate will still be somewhat thin at this point. Don’t worry—it will continue to thicken as it sets up.
- To turn up the flavor even more, consider mixing in other items like nuts, mint, or dried fruit.
Tip: Soak Raisins in Rum for an hour and use it as flavouring agent.
-
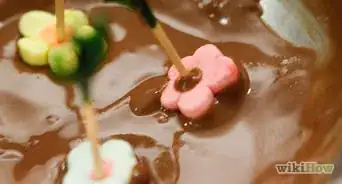
6Pour the chocolate onto a nonstick surface or into a candy mold. If you want your chocolate to harden into a single large sheet, spread it out over a nonstick baking mat or sheet of parchment paper to a thickness of about 1⁄2 inch (1.3 cm) edge-to-edge. To make individual treats, transfer the warm chocolate to a decorative mold.[19]
- You can also use a well-greased ice cube tray if you don’t have any candy molds available.
- Tap the bottom of your mold a few times to get rid of any bubbles that might have formed while you were pouring the chocolate.[20]
-
7Let your chocolate harden in the refrigerator for 1 hour. After your chocolate has had plenty of time to set up, break it into pieces or pop individual chocolates out of their molds and have a nibble.
- Store your homemade milk chocolate in a covered container on your countertop, or inside a pantry or another cool, dry place. It should keep for about 1 year (thought it will be a miracle if it actually lasts that long!)[21]


Community Q&A
-
QuestionWhat does "winnowing" chocolate mean?
 wikiHow Staff EditorThis answer was written by one of our trained team of researchers who validated it for accuracy and comprehensiveness.
Staff AnswerwikiHow Staff EditorStaff AnswerWinnowing is the action of removing the outer shells of roasted cocoa beans. Once the roasted cocoa beans have been winnowed, you're left with the cocoa nibs. At home, winnowing can be done by crushing the roasted cocoa beans inside a resealable bag, then use something like a cool hair dryer to blow away the shells and leave behind the nibs. -
QuestionHow can I store chocolate beans?wikiHow Staff EditorThis answer was written by one of our trained team of researchers who validated it for accuracy and comprehensiveness.
Staff AnswerwikiHow Staff EditorStaff AnswerCocoa beans are not as temperature sensitive as chocolate. However, they still need to be kept in proper conditions to ensure they remain at their best. Store unroasted cocoa beans in a cool and dry place, like the base shelf of a pantry or similar. Keep the beans away from any strong odors and away from roasted beans and other foods, as they can harbor bacteria before being roasted. Roasted cocoa beans need to be kept in an airtight container, again in a cool and dry place. -
QuestionDo I need to add vanilla to chocolate to help the flavor?wikiHow Staff EditorThis answer was written by one of our trained team of researchers who validated it for accuracy and comprehensiveness.
Staff AnswerwikiHow Staff EditorStaff AnswerAlthough this is often added as part of the process of making chocolate commercially, you don't need to add it when making chocolate at home. If you do want to add vanilla as a flavoring, don't use vanilla extract as the liquid will cause the chocolate to seize. Instead, use powdered form instead.
Things You'll Need
Dark Chocolate
- Small nonstick pot
- Whisk or metal spoon
- Flexible nonstick baking mat
- Spatula
- Cookie sheet and parchment paper (optional)
- Decorative candy mold (optional)
Milk Chocolate
- Small pot
- Water
- Small mixing bowl
- Whisk or metal spoon
- Flexible nonstick baking mat
- Cookie sheet and parchment paper (optional)
- Decorative candy mold (optional)


References
- ↑ https://www.youtube.com/watch?v=YkVi_1GflZc&t=50s
- ↑ https://www.precisionnutrition.com/chocolate-making
- ↑ https://thecoconutmama.com/coconut-oil-chocolate-bars/
- ↑ https://www.allrecipes.com/recipe/236212/homemade-melt-in-your-mouth-dark-chocolate-paleo/
- ↑ https://www.primalpalate.com/paleo-recipe/homemade-4-ingredient-dark-chocolate/
- ↑ https://www.youtube.com/watch?v=YkVi_1GflZc&t=152s
- ↑ https://www.precisionnutrition.com/chocolate-making
- ↑ https://www.allrecipes.com/recipe/236212/homemade-melt-in-your-mouth-dark-chocolate-paleo/
- ↑ https://sweets.seriouseats.com/2011/08/best-way-to-store-chocolate-how-to-store-bonbons.html
- ↑ https://bakingbites.com/2009/09/how-to-make-a-double-boiler/
- ↑ https://www.thekitchn.com/double-boilers-what-are-they-a-132018
- ↑ https://www.youtube.com/watch?v=R5wt7-NO4AM&t=48s
- ↑ https://poormansgourmetkitchen.com/homemade-milk-chocolate.html
- ↑ https://hebbarskitchen.com/homemade-chocolate-recipe-milk-chocolate/
- ↑ https://www.youtube.com/watch?v=R5wt7-NO4AM&t=86s
- ↑ https://www.livestrong.com/article/208885-vegan-substitutes-for-powdered-milk/
- ↑ https://damecacao.com/chocolate-making-milk-powder/
- ↑ https://www.namscorner.com/homemade-milk-chocolate-how-to-make-chocolate-in-home/
- ↑ https://www.youtube.com/watch?v=R5wt7-NO4AM&t=139s
- ↑ https://hebbarskitchen.com/homemade-chocolate-recipe-milk-chocolate/
- ↑ https://sweets.seriouseats.com/2011/08/best-way-to-store-chocolate-how-to-store-bonbons.html
About This Article
To make chocolate, first melt ½ cup (110 g) of coconut oil in a saucepan over low heat. Then, add ½ cup (65 g) of cocoa powder and 2 tablespoons (42 g) of honey to the saucepan and mix everything together for 2 minutes. Next, turn the heat off and mix in ½ teaspoon (2 g) of vanilla extract. Add a pinch of cinnamon, cardamom, or salt if you’d like to give your chocolate some spice. Then, stir everything together for 1 more minute. Finally, pour the chocolate into muffin-tin liners or silicone molds and store it in the refrigerator until it turns solid. To learn how to make easy dark chocolate with just 4 ingredients, read on!