This article was co-authored by wikiHow Staff. Our trained team of editors and researchers validate articles for accuracy and comprehensiveness. wikiHow's Content Management Team carefully monitors the work from our editorial staff to ensure that each article is backed by trusted research and meets our high quality standards.
There are 10 references cited in this article, which can be found at the bottom of the page.
The wikiHow Video Team also followed the article's instructions and verified that they work.
This article has been viewed 21,382 times.
Learn more...
Borax, also known as sodium borate, is a cleaning compound that you can find at your local grocery or drug store. Making crystals out of borax is an easy science experiment, and you can even grow crystals in the shape of ornaments or decorations. While it takes a little time for the crystals to grow, you get a fun result to show your friends.
Steps
Setting up the Jars
-
1Tie string to a pencil, popsicle stick, or butter knife. Tie one end of a string to a long object that will stretch over the top of a drinking glass or jar. Leave one end of the string long, but cut the other side short once you've tied it off.[1]
- A canning jar works well for this process because it can take a lot of heat. Pick a jar or glass that's fairly tall as the string will hang down into it.
-
2Form pipe cleaners into shapes if you'd like to make shaped crystals. Twist the pipe cleaners into any shape you'd like, such as a heart, star, or swirl. One popular shape is a snowflake; to make one, cut a pipe cleaner in thirds, and then twist them together in the middle. Shape the outer pieces into an angular pattern to create the snowflake.[2]
- You can also just grow crystals on the string, too.
- Make the shapes small enough to fit in the jar or glass without touching the sides.
Advertisement -
3
-
4Hang the shape in the drinking glass or jar to make sure it fits. Check that your pipe cleaner hangs so it doesn't touch the sides of the glass. If it touches, adjust it or try making another shape that's smaller. If you're just using a string, cut it so it doesn't hit the bottom of the glass but just hangs down the middle.[4]
- When you're done, take it back out.


Growing the Crystals
-
1Boil enough water to fill the jar. The jar will need to be mostly full, though you won't need to fill it to the very top edge. Pour water into your jar to measure how much you need. Dump the water from the jar into a small pot to heat it. Bring it to a boil and then take it off the heat.[5]
- You can also use an electric kettle or the microwave to heat the water.
-
2Pour the hot water into the jar. Set the jar on a trivet or pot holder to protect the surface below. Carefully add the hot water back to the jar, using a funnel if you need to. Fill the jar most of the way up with the hot water.[6]
- Be careful pouring the boiling water! It can burn you.
-
3Add Borax to the water until no more will dissolve into it. Add a spoonful of Borax to the jar and stir the mixture until it dissolves completely. Add a second spoonful and repeat the process. Keep adding Borax until you see a small pile of powder at the bottom of the jar that won't dissolve.[7]
- Be careful when handling Borax. Try not to get it on your skin or in your eyes.
- You'll likely need 3-5 spoonfuls, depending on the size of your glass or jar.
-
4Drop the string or pipe cleaner into the jar, using the flat piece to suspend it. Hang the string or pipe cleaner down into the jar, making sure it is completely covered in liquid. Also, check to see it's not touching the sides or the bottom.[8]
- You may need to work a minute or two to get the pencil or knife balanced on the jar.
- Cover the jar with plastic wrap.[9]
-
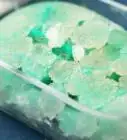
5Leave the jar alone to form crystals for at least a night. Place the jar somewhere it won't be disturbed. Jostling the jar could affect the formation of crystals. It helps to cover it with a tea towel or something else to keep it warm, as that will keep it from cooling too fast. Slowing down the cooling process will help you create larger crystals. Check your jar the next morning, and you should see some crystals![10]
- If you leave the jar for longer, you may get bigger crystals. However, slowing down the cooling process is more important for making larger crystals.
-
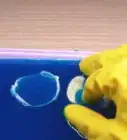
6Pour the Borax solution off and rinse your crystals. Once your crystals have formed, it's time to just enjoy them! Run them under running water for just a few seconds to rinse off the cleaning solution.
-
7Put the crystals on a paper towel or tea towel to dry. Before displaying them, let them dry off for a few hours. You can also hang them up to dry, but put a towel underneath them to catch the water.[11]
- Display your crystals on a shelf or hang them in a window or on a Christmas tree.


Coloring Your Crystals
-
1Use colorful pipe cleaners to make your shapes for a pop of color. The crystals that form from clear water are transparent, so the colorful pipe cleaners show underneath. Try a red pipe cleaner for a heart or a blue pipe cleaner for a snowflake. You could use a yellow pipe cleaner to make a star, sun, or flower![12]
- You can also combine colors, such as using a green pipe cleaner for a stem of a flower and a pink one for the flower.
-
2Add a dash of food coloring when you heat the water for an easy option. Gel food coloring tends to be the most intense, but any food coloring will work. Squeeze 10-15 drops into the water to tint it to a color you like and then make your crystals like you normally would! You can add the food coloring before or after you boil the water.[13]
- You can also mix the colors to get a tint you like. Add 8-10 drops of green with 4-5 drops of blue to get a blue-green, for instance.
-
3Paint your crystals with watercolors for a concentrated effect. Wait until your crystals have grown on your string or pipe cleaner. After rinsing the crystal off, dip a paintbrush into watercolor paint and brush it over the outside of the crystal. Over time, it will draw the color to the center, leaving the outsides clear.[14]


Community Q&A
-
QuestionHow long will it take in hours?
 Community AnswerIt takes less than an hour to make the solution. However, you need to leave the crystals to form at least overnight.
 -
QuestionCan you reuse the borax solution again and again?
 Community AnswerYou can reuse the borax solution over and over! Bring it to boiling in the microwave, and add more water and borax as needed.
Warnings
- Consuming Borax crystals can be dangerous. If you have younger children that might try to eat the crystals, make sugar crystals instead.⧼thumbs_response⧽
- Use an oven mitt when handling the boiling water.⧼thumbs_response⧽
Things You'll Need
- Boiling water
- Pipe cleaner
- Spoon
- Canning jar or large glass
- Borax
- Scissors
- String
- Pencil
- Food coloring, optional
- Watercolor paints, optional
- Paintbrush, optional


References
- ↑ https://www.scientificamerican.com/article/bring-science-home-crystals/
- ↑ https://www.education.com/activity/article/borax-sparklers-growing-crystals/
- ↑ https://www.scientificamerican.com/article/bring-science-home-crystals/
- ↑ https://www.scientificamerican.com/article/bring-science-home-crystals/
- ↑ https://www.scientificamerican.com/article/bring-science-home-crystals/
- ↑ http://www.bbbswnc.org/wp-content/uploads/2014/10/Borax-Crystal-Snowflake1-1.pdf
- ↑ http://www.bbbswnc.org/wp-content/uploads/2014/10/Borax-Crystal-Snowflake1-1.pdf
- ↑ https://www.education.com/activity/article/borax-sparklers-growing-crystals/
- ↑ https://www.scientificamerican.com/article/bring-science-home-crystals/
- ↑ http://www.bbbswnc.org/wp-content/uploads/2014/10/Borax-Crystal-Snowflake1-1.pdf
- ↑ https://sciencenotes.org/make-borax-crystal-snowflakes/
- ↑ https://www.education.com/activity/article/borax-sparklers-growing-crystals/
- ↑ http://www.bbbswnc.org/wp-content/uploads/2014/10/Borax-Crystal-Snowflake1-1.pdf
- ↑ https://gosciencegirls.com/crystal-snowflakes-experiment/
About This Article

To make crystals with Borax, start by tying a string to a pencil, popsicle stick, or butter knife. Next, form a pipe cleaner into the shape you want your crystals to be and tie the shape to the string. Then, boil enough water to fill your jar and pour it in. Add Borax to the jar a spoonful at a time until it won't dissolve anymore. Finally, drop the pipe cleaner into the jar and place it somewhere it won't be disturbed. Check back the next day to see your crystals! For tips on adding color to your crystals, read on!