X
This article was co-authored by wikiHow Staff. Our trained team of editors and researchers validate articles for accuracy and comprehensiveness. wikiHow's Content Management Team carefully monitors the work from our editorial staff to ensure that each article is backed by trusted research and meets our high quality standards.
This article has been viewed 11,014 times.
Learn more...
After dyeing your eggs for Easter, you probably have a cardboard egg carton left over. Instead of throwing it away or recycling it, why not cut it up and turn it into a bunch of cute chicks instead? All you need is some paint, paper, and glue. Best of all, you can fill these chicks with candy, and give them away as gifts or treats!
Steps
Part 1
Part 1 of 3:
Making the Body
-
1Cut two cups from an egg carton. The best type of carton to use is the cardboard kind. It soaks up paint much better. You can try using the foam kind, but the paint may not stick as well.
- Make sure that you cut the cups apart so that they are two separate pieces.
- Trim the edges so that they are nice and smooth. You want a nice round shape.
-
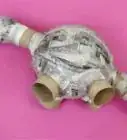
2Tape the cups together along one edge. Set the cups down, side by side, with the inside facing up. Fold a strip of masking tape over the edges where the cups are touching. This tape will act as a hinge.
- For extra security, close the cups, and add a strip of tape on the outside. Make sure that it's on the same side as the inside tape. You want to be able to open and close your chick.[1]
Advertisement -
3Paint the outside of the cups. Hold the cups from the inside, with the hinge resting loosely between your thumb and forefinger. Apply a coat of yellow acrylic or tempera paint. Make sure that you get the paint inside the crease between the two cups as well.
-
4Let the paint dry. If the color looks dull or dark, you may need to apply another coat or two of paint. Let the coat dry before applying the next one.[2]
-
5Consider painting the inside of the chicks. You don't have to do this, but it will give them a nicer finish. You can use the same color as you did for the outside, or a different color. If you plan on filling the chick with candy, try to use a non-toxic paint.[3] Most children's paints are, but double-check the label to make sure.

Advertisement
Part 2
Part 2 of 3:
Making the Beak, Wings, and Feet
-
1Get some orange and yellow paper. You can use construction paper or cardstock. You can also paint plain paper orange/yellow on both sides, and use that instead.
-
2Cut two triangle shapes out of orange paper for the beak. Make the beaks a little bit taller than you want them to be. This will allow you to attach them to the chick. The triangles should be the same size, and no larger than the bottom of your egg cups.
-
3Cut two triangle shapes out of yellow paper for the wings. The triangles can be the same size as the beak, or a little bit bigger. Again, make the wings a little bit longer than you want them to be, so that you can attach them to the chick.
-
4Draw feet shapes onto orange paper. Chicks have three toes, so draw something that looks like three skinny triangles attached together at the base. You will need two pieces. Make sure that they are smaller than the base of your egg carton cup.
-
5Cut the feet shapes out. Don't worry about folding the bottom edges to make a hinge.

Advertisement
Part 3
Part 3 of 3:
Putting the Chick Together
-
1Glue the feet to the bottom of your chick. Close the chick and glue the feet to the bottom cup. Make sure that the toes are pointing away from the hinge, and that they are sticking out from under the chick.
- The hinge will be on the back of the chick.
-
2Open the chick back up. Set the chick down on the table so that the inside hinge is facing up. Turn the cups so that one cup is facing you and the other is facing away from you.
-
3Glue the beak pieces to the top and bottom cups. Draw a line of glue along the bottom edges of the orange triangles. Press the triangles against the inside top and bottom edges of the egg cups. The beaks should be parallel to the hinge.[4]
-
4Glue the wings in a similar fashion to the sides of the bottom cup. This is the cup that has the feet attached. The upper cup should only have the beak piece attached.[5]
-
5Fold the beak and wings down. When you glued the beak and wing pieces down, they were sticking straight up. This is not very chick-like, so fold them down over the edges of the egg cup. Don't worry if they stick out a little.
-
6
-
7Fill the chick with candy, if desired. You can also turn it into a mini Easter basket by stuffing the bottom cup with Easter grass, and placing a few chocolate eggs on top.
-
8Close the chick. Set the chick down so that its feet are planted on the floor. You can adjust the beak and wing pieces as well, so that they stick up or down.
Advertisement
Things You'll Need
- Cardboard egg carton
- Yellow acrylic or tempera paint
- Paint brush
- Yellow paper
- Orange paper
- Scissors
- Glue
- Black marker or googly eyes


References
- ↑ http://onelittleproject.com/candy-filled-easter-egg-carton-chicks/
- ↑ http://onelittleproject.com/candy-filled-easter-egg-carton-chicks/
- ↑ http://onelittleproject.com/candy-filled-easter-egg-carton-chicks/
- ↑ http://onelittleproject.com/candy-filled-easter-egg-carton-chicks/
- ↑ http://onelittleproject.com/candy-filled-easter-egg-carton-chicks/
- ↑ http://onelittleproject.com/candy-filled-easter-egg-carton-chicks/
- ↑ http://www.dltk-kids.com/animals/mcarton_chick2.htm
- ↑ http://typicallysimple.com/spring-chicks-egg-carton-craft/
- ↑ http://typicallysimple.com/spring-chicks-egg-carton-craft/
About This Article

wikiHow Staff
wikiHow Staff Writer
This article was co-authored by wikiHow Staff. Our trained team of editors and researchers validate articles for accuracy and comprehensiveness. wikiHow's Content Management Team carefully monitors the work from our editorial staff to ensure that each article is backed by trusted research and meets our high quality standards. This article has been viewed 11,014 times.
Co-authors: 4
Updated: May 10, 2022
Views: 11,014
Categories: Animal Paper Art and Craft
Advertisement