wikiHow is a “wiki,” similar to Wikipedia, which means that many of our articles are co-written by multiple authors. To create this article, 63 people, some anonymous, worked to edit and improve it over time.
There are 9 references cited in this article, which can be found at the bottom of the page.
wikiHow marks an article as reader-approved once it receives enough positive feedback. In this case, 84% of readers who voted found the article helpful, earning it our reader-approved status.
This article has been viewed 650,013 times.
Learn more...
One of the best ways to get new lipstick is by recycling old crayons. While many name-brand lipsticks contain a wide array of chemicals, lipsticks made from crayons are non-toxic, include a single ingredient, and have been handled by you alone. Plus, producing customized shades can be lots of fun. This article will show you how to make lipstick out of crayons, and will also give you a few customization ideas.
- 1 non-toxic crayon
- ½ teaspoon shea butter
- ¼ to ½ teaspoon food-grade oil (almond, argan, coconut, jojoba, or olive)
- Cosmetic glitter (optional)
- 1-2 drops of essential oil or extract (optional)
Steps
Preparing Your Ingredients
-
1Select your lipstick container. You will need to store your lipstick in something so that it doesn't get dusty or dirty. Here is a list to give you some ideas:
- Contact lens case
- Empty lipstick or chap stick tubes
- Empty lip balm container
- Empty eye shadow or blush containers
- Pill boxes
-
2Clean and sterilize your container. If you have not already done so, clean your container well using soap and warm water. Wipe your container down using a cotton ball soaked with rubbing alcohol; use a cotton swab to get into small spaces, such as corners.Advertisement
-
3Keep the container open and set it aside. Your lipstick will start to harden quickly and you will need to pour it into its container before it sets. Make sure that your containers are within reach and open, so that they will be ready.
-
4Remove the paper from the crayons. You can do this by placing the crayon under warm, running water for a few minutes, then peeling the wrapper off.[3] You can also use a craft knife to score a shallow line down the length of the crayon and peel the paper off.
- Dispose of crayon parts that were not covered by paper, as these parts may be tainted with germs, bacteria or other crayon colors.
-
5Break the crayon into four equal parts. Hold the crayon between your fingers and snap it into smaller pieces. If you are having difficulties breaking the crayons, you can cut them using a sharp knife. Breaking the crayon into smaller pieces will not only make it easier to melt, but it will also make it easier to mix colors together.


Making the Lipstick Over the Stove
-
1Assemble a double-boiler. Fill a pot with 1 to 2 inches (2.54 to 5.08 centimeters) with water. Place a metal or heat-safe glass bowl on top of the pot. The bottom of the bowl should not be touching the surface of the water.
-
2Turn the stove on and bring the water to a boil. You will be using the hot steam to melt the crayon, butter, and oils.
-
3Once the water in the saucepan is boiling, reduce the heat to medium-low.[4] You are working in small amounts, so your ingredients will melt faster. Using a lower temperature will prevent them from melting too fast.
-
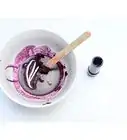
4Put the crayon pieces into the bowl and let them begin to melt. You can use all one color, or you can combine different colors to create your own unique shade. Stir the crayon pieces occasionally with a fork or spoon.
-
5Add the shea butter and food-grade oil into the bowl. You can use any type of food-grade oil, but some oils (such as coconut oil) might give the lipstick a more pleasant taste and smell than others.
- For a sheer lipstick, use ½ teaspoon of oil; for a more intense color, use only ¼ teaspoon.[5]
-
6Continue stirring the ingredients until everything is completely melted. At this point, you can also add in additional ingredients, such as extracts or essences, or even some cosmetic-grade glitter.
-
7Lift the bowl off the pot. Use oven mitts or a dish towel to lift the bowl so that you do not burn yourself.
-
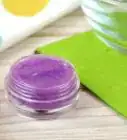
8Pour the lipstick into the empty container. Use a spoon to help guide it into the container so that the melted wax does not get everywhere.
-
9Allow the lipstick to cool. You can let it cool in the kitchen (or whatever room you were making it in), or you can leave it in the freezer or refrigerator.


Making the Lipstick Over a Candle
-
1Set a candle down on a heat-safe surface and light it. You can use a match or lighter. Make sure that you are working close to a sink, or have water close by, in case the candle tips over.
-
2Hold the spoon above the flame. Keep the spoon about one inch (2.54 centimeters) above the flame.[6]
-
3Place the crayon pieces into the spoon and let them melt. It will take about 30 seconds before the crayons start to melt.[7] Be sure to stir them occasionally using a toothpick.
-
4Add in the shea butter and oil, and stir some more using a toothpick. You can use any type of food-grade oil, but some types, such as coconut oil, will give the lipstick a nicer smell and taste.
- For sheer lipstick, use ½ teaspoon of your chosen oil.
- For a more intense color, use ¼ teaspoon of your chosen oil.
-
5Keep stirring the ingredients until they melt completely. At this point, you can add in other ingredients, such as an extract for flavor or cosmetic glitter for shimmer. If the spoon becomes too hot to hold, consider using an oven mitt or wrapping the handle with a towel.
-
6Pour the melted ingredients into the container. Once the ingredients have melted and there are no more lumps, pull the spoon away from the flame and carefully pour the melted lipstick into the container. Be sure to blow out the candle.
-
7Let the lipstick cool. You can leave the lipstick to cool in the room you were working in, or you can stick the container into the fridge or freezer.


Adding Variations to the Lipstick
-
1Consider adding some sparkle with cosmetic glitter. Avoid using craft glitter; even the finest grain craft glitter will be too chunky to use for lipstick. Try using some cosmetic-grade glitter instead; you can purchase it in a beauty shop or online.
- You can also use metallic crayons to create a pearlescent lipstick.
-
2Consider using castor oil to give your lipstick some shine. When making your lipstick, use castor oil instead of the food-grade oil.
-
3Create custom colors by mixing two or more crayon colors together. You can mix however many colors you want, so long as you end up with what amounts to one crayon. Here are some color combinations you can try:[8] [9]
- To deepen a pink color, add some deep burgundy.
- If the pink is too bright, add some peach-colored crayon.
- Create a shimmery red-violet by mixing 1 part Gold and 2 parts Red Violet. You can add more shimmer with some gold cosmetic glitter.
- Use one part each of Melon and Magenta to create a bright pink.
- Create a bright red using 1 part each of Red Orange and Wild Strawberry.
- For a creamy, neutral color, use 1 part each of Bittersweet and Peach.
- For a silvery purple, use 1 part each of Silver and Violet.
-
4Use extracts and essences and oils to add flavor and scent. You will only need one or two drops of your chosen extract, essence or oil. Keep in mind that certain flavors and scents will be stronger than others, so you will need to use a little bit more/less. Keep in mind that the flavor and scent will become stronger after the lipstick hardens.[10] Here is a list of extracts and essences that work well in homemade lipstick:
- Coconut
- Grapefruit or tangerine
- Peppermint
- Vanilla


Community Q&A
-
QuestionIs it okay to just add coconut oil only?
 Community AnswerYes it is but if you want a better scent, you might also wish to add the extract oils. Just be sure they're suitable for consumption.
 -
QuestionWhat can I do if I have added too much oil?
 Community AnswerIf you've accidentally added too much oil, simply add more of the other ingredients so that the ratio stays the same.
 -
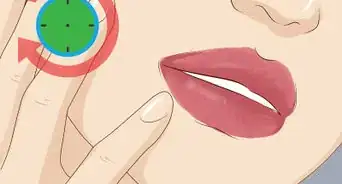
QuestionWhat It you lick your lips with your crayon lipstick on?Community AnswerIt's possibly worse licking your lips with lipstick on them, as you don't know what the substances are inside of it since few brands publish complete ingredients lists. The crayon lipstick will not do anything to you if you lick your lips when wearing it. Kids eat crayons and they are okay, that's why children's crayons are made to be non-toxic.
Warnings
- Crayon manufacturers do not endorse the use of crayons for makeup. Crayola has gone so far as to state that it discourages and does not recommend the use of crayons as makeup.[11] On the other hand, the "rigorous" testing makeup apparently undergoes is about as transparent as mud, so you be the judge.⧼thumbs_response⧽
- Be aware of reactions and irritations. Crayons have only been tested to be used artistically; they have not been tested to be used cosmetically. As such, the long-term effects of using crayons as lipstick are not known.[12]⧼thumbs_response⧽
- Do not pour melted lipstick down the sink. If you have any lipstick leftover, either pour it into another container or dump it into the trash. If you pour it into the sink, it will harden and create a clog.[13]⧼thumbs_response⧽
- Be aware that crayons have a higher lead content than regular lipstick. To prevent any complications, avoid using this lipstick on a daily basis; consider using it only once or twice a month, or for costumes and special events.[14]⧼thumbs_response⧽
Things You'll Need
Stove-top Method
- Pot
- Metal or heat-safe glass container
- Something to stir with
- Small containers (contact lens cases, empty chap stick tube or lip balm container, pill boxes)
Candle Method
- Large spoon
- Candle
- Toothpick
- Small containers (contact lens cases, empty chap stick tube or lip balm container, pill boxes)


References
- ↑ Beautylish, 7 DIY Crayon Lipsticks to Make Now
- ↑ Rookie Mag, DIY Crayon Lipstick
- ↑ Rookie Mag, DIY Crayon Lipstick
- ↑ DIY Ready, DIY|How to Make MAC Lipstick Colors With Crayons
- ↑ DIY Ready, DIY|How to Make MAC Lipstick Colors With Crayons
- ↑ She Knows, How to Make Lipstick Out of Crayons
- ↑ Beautylish, 7 DIY Crayon Lipsticks to Make Now
- ↑ She Knows, How to Make Lipstick Out of Crayons
- ↑ Beautylish, 7 DIY Crayon Lipsticks to Make Now
- ↑ Our Last Bites, Homemade Natural Lip Gloss
- ↑ http://www.crayola.com/faq/safetymsds/is-it-safe-to-use-crayola-crayons-to-make-lipstick/
- ↑ Crayola, FAQ
- ↑ Rookie Mag, DIY Crayon Lipstick
- ↑ Xo Vain, Make Your Own Lipstick Out of Crayons!
- Videos provided by SoCraftastic