This article was co-authored by Natasha Dikareva, MFA. Natasha Dikareva is a San Francisco, California based sculptor, and installation artist. With over 25 years of ceramics, sculpting, and installation experience, Natasha also teaches a ceramic sculpture workshop titled "Adventures in Clay" covering concept development, hand-building techniques, texture, and glazing techniques. Her work has been featured in solo and group exhibitions at the Beatrice Wood Center for the Arts, Abrams Claghorn Gallery, Bloomington Center for the Arts, Maria Kravetz Gallery, and the American Museum of Ceramic Art. She has taught at the University of Minnesota and the American Indian OIC School. She has been awarded the Excellence Award at the 1st World Teapot Competition, Best in Show at the 4th Clay & Glass Biennial Competition, and a Grand Prize at the American Museum of Ceramic Art. Natasha holds an MFA from the University of Minnesota and a BFA from Kiev Fine Arts College.
This article has been viewed 13,181 times.
Whether you’re honoring Remembrance Sunday or just looking for a new design to make out of clay, making poppies out of polymer clay is a fun DIY project you can easily do at home. Instead of sculpting one big piece of clay, you create several small pieces individually and then attach them to a base. The flower’s size and level of detail is entirely up to you, but by adding a hairpin, you can add smaller pieces to jewelry by twisting the pin into a loop once you’re done.
Steps
Shaping Your Flower’s Parts
-
1Create circles for your petals. First, press a lump of red clay flat. Then use your hands or even a rolling pin to roll the clay out until it’s very thin.[1] For each poppy that you want to make, punch out ten circles with a circular cookie cutter. Once you’re done, press your finger along the edges of each one to soften and thin them.[2]
- Pressing the edges down may cause the circles to stick to your worktable. Use any thin tool that you have handy to scrape them off as needed.
-
2Draw lines in your petals. For each circle, choose one edge to be your top and its opposite to be your bottom. Run the ball end of a medium-size stylus from the center of the bottom toward the top to create a slightly depressed line running straight up the middle. Repeat several times on both sides of the first line, with each line fanning outward from the bottom of the center line toward the circle’s edges.[3]
- You don’t need to start each line in the exact center of the circle’s bottom edge, but the bottoms of your lines should be grouped close together toward the center and then spread outward from there.
Advertisement -
3Create the flower’s base. Ball up the clay left over from punching out your petals and roll it out again, as thin as before. Your base should be thicker than your petals, however, so either fold the sheet in half to create a double layer or trim two squares from it and press them together. Punch out a circle for your base with a cookie cutter.[4]
- Of course, if your original sheet of rolled clay has enough left for two squares, don’t worry about balling it up and rolling it out again.
-
4Turn your base into a bowl. First, press the ball of a fatter stylus into the center of your base to create a bowl effect. Apply gentle pressure to avoid flattening the whole thing. Use your fingers to smooth and fix the edges afterward if they appear uneven.[5]
- Repeat if desired for an even deeper bowl. Just be sure not to break through the bottom of the bowl. You want to keep that intact.


Piecing Them Together
-
1Add a headpin to the base. Lay a headpin flat across one rim of your bowl. Line up the head of the pin with the center of the bowl. Once the pin’s head is centered, gently press the body of the pin through the rim. Work slowly so the pin remains perfectly horizontal as it goes down. Stop once the pin’s head comes to a rest at the bottom of your bowl, about halfway down the base, depending on how deep you made your bowl.[6]
- As before, be careful not to push the pin all the way through your base. You want to keep the bottom of your bowl intact for the next step.
-
2Secure the pin. Take a strip of clay from your flattened sheet. Lay it over the rim of your bowl where the body of the pin cut through it. Use your stylus to lightly press the strip into the clay and reshape the rim as needed.[7]
- Then, once the body of the pin has been secured in the rim, dab some clear liquid clay into the bowl to keep the head in place.
-
3Attach half of your petals. Set five of them aside for later. With the remaining five, place the bottom of one petal along the inner rim of your base’s bowl. Use your stylus to smooth the petal’s bottom into the rim itself until the two clays join. Then add a second petal in the same fashion. With this one, however, line the bottom up so half of it is covering where you just attached the first petal.[8]
- Repeat with each petal, using each one to cover about half of the previous petal.
- By the time you’re done layering all the petals over each other, the bowl and hairpin should be covered and hidden from view.
-
4Toy with the petals’ edges. Notice how your petals are still relatively flat. Give them some more life by reshaping them. Gently place the ball of one stylus on the upper side of a petal. Now do the same underneath the petal, a little farther along its edge. Gently manipulate your styluses to slightly twist the petal’s edge as you please.[9]
- Use the same technique with each petal. At the same time, try not to shape each one exactly the same. You want to suggest natural growth and movement, so try to avoid a uniform look.
- Go over all five petals as many times as it takes until you’re satisfied with your sculpted flower.
-
5Sculpt a peduncle. A flower’s “peduncle” is the base from which the petals grow. Use your fingers to shape a ball of green clay that’s small enough to fit in the very center of your flower where the bottoms of your petals overlap. Then flatten the peduncle’s bottom on your worktable so it’s dome-shaped. Press your thinnest stylus into the center of the dome’s top. Now use your stylus to draw lines from the center, down its sides, to the bottom, all the way around the dome, so it resembles a bundt cake.[10]
- Once you’ve drawn your lines, roughen the texture by lightly brushing a toothbrush over the surface.
- If your toothbrush smooths out one of your lines by accident, just go over it again with your stylus to correct it.
-
6Attach the peduncle. Dab some liquid clay in the center of your flower. Set the peduncle in place. Apply just the slightest pressure to help it set into the liquid.[11]
- Once it’s in place, use the same stylus as before to reshape any lines that might have smoothed out while being handled.
- If necessary, go over it again with your toothbrush as well.
-
7Add more liquid clay. First, trace a thin line around the edges of the peduncle. Secure it that much more to your flower. Then add lines of liquid clay from the peduncles’ edges straight up along the petals.[12]
- Remember: you’re trying to replicate nature, so try not to be too orderly about drawing lines.
- Avoid patterns (like one short, one long, one short, one long, etc.) or drawing two side-by-side lines that look exactly the same.
- When it’s finished, there shouldn’t be any open space between the lines radiating out from the peduncle.


Adding Finishing Touches
-
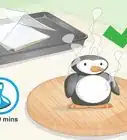
1Bake your clay. Harden what you have so you can move on to the flower’s back without wrecking its front. Heat your oven to 130 degrees Celsius (266 Fahrenheit). Once it’s ready, set your flower on a baking sheet and bake for ten minutes. However, always check the directions of your particular brand of clay first. If the manufacturer advises a lower temperature, follow their instructions.[13]
- Polymer clay is safe to bake in a home oven, as long as you don’t burn it. If it burns, it may start to release toxic fumes.[14]
- To be extra safe, use an oven thermometer to confirm that your oven doesn’t heat higher than the temperature you set it to.
- A baking sheet is probably very easy to clean, but to be extra safe, devote one exclusively for clay. Don’t reuse it for cooking.
-
2Add petals to the back. After your clay is done baking, let your flower cool off before handling it again. Once it’s cool enough to touch, brush liquid clay along the back of the base. Use fresh red clay to form a thin disk that’s a little smaller than the flower’s base. Press this into the liquid clay.[15]
- Once your disk is attached to the back of the base, add your remaining five petals to the fresh clay. Use the same technique as before. Smooth the bottom of each petal into the clay. Use each petal to cover half of the previous one. Then use your styluses to twist your petals’ edges for a more natural, random effect.
-
3Top the back with a sepal. A flower's sepal is a leaf-like growth that cups the back of the flower. Roll out a thin sheet of green clay. Use your stylus to trace outline for a sepal to add to the back of your flower (these resemble a bikini shape), and then cut it out with a sculpting knife. Run your stylus down the center of each one of its three offshoots. Then use your thinnest stylus to draw veins from the center line out to the edges of each side.[16]
- Once you’re done, place one sepal over the back’s center, using your fingers or stylus to gently press it into the new petals so their clays join.
- Go over your sepal’s lines with your thin stylus again to sharpen them if they smoothed out while you pressed.
-
4Bake, paint, and glaze, if desired. Return the clay to the oven to bake for another 15 to 20 minutes. Remove it and let it cool off again. To add even more detail in and around the peduncle, apply brown or black acrylic paint with a fine brush along its lines, as well as the surrounding lines of dried liquid clay.[17]
- Once the paint dries, brush the whole thing with sculptor’s glaze for a shiny finish, if you like.


Community Q&A
-
QuestionHow can I make flowers out of clay?
 Natasha Dikareva, MFANatasha Dikareva is a San Francisco, California based sculptor, and installation artist. With over 25 years of ceramics, sculpting, and installation experience, Natasha also teaches a ceramic sculpture workshop titled "Adventures in Clay" covering concept development, hand-building techniques, texture, and glazing techniques. Her work has been featured in solo and group exhibitions at the Beatrice Wood Center for the Arts, Abrams Claghorn Gallery, Bloomington Center for the Arts, Maria Kravetz Gallery, and the American Museum of Ceramic Art. She has taught at the University of Minnesota and the American Indian OIC School. She has been awarded the Excellence Award at the 1st World Teapot Competition, Best in Show at the 4th Clay & Glass Biennial Competition, and a Grand Prize at the American Museum of Ceramic Art. Natasha holds an MFA from the University of Minnesota and a BFA from Kiev Fine Arts College.
Ceramics & Sculpting InstructorThere are several ways of making flowers with clay. You can cut them out from the flower slab that you made. Make them as tiny pinch cuts and draw some texture on them. Or make them out of petals of porcelain. These petals can be made very thin. They look pretty when the light falls on them. -
QuestionHow can you distinguish between different clays?Natasha Dikareva, MFANatasha Dikareva is a San Francisco, California based sculptor, and installation artist. With over 25 years of ceramics, sculpting, and installation experience, Natasha also teaches a ceramic sculpture workshop titled "Adventures in Clay" covering concept development, hand-building techniques, texture, and glazing techniques. Her work has been featured in solo and group exhibitions at the Beatrice Wood Center for the Arts, Abrams Claghorn Gallery, Bloomington Center for the Arts, Maria Kravetz Gallery, and the American Museum of Ceramic Art. She has taught at the University of Minnesota and the American Indian OIC School. She has been awarded the Excellence Award at the 1st World Teapot Competition, Best in Show at the 4th Clay & Glass Biennial Competition, and a Grand Prize at the American Museum of Ceramic Art. Natasha holds an MFA from the University of Minnesota and a BFA from Kiev Fine Arts College.
Ceramics & Sculpting InstructorYou can distinguish between clays based on their firing temperature. Earthenware is a low-temperature clay, and stoneware is a mid-range clay. Porcelain is a high-temperature clay. -
QuestionHow can I choose the most suitable clay?Natasha Dikareva, MFANatasha Dikareva is a San Francisco, California based sculptor, and installation artist. With over 25 years of ceramics, sculpting, and installation experience, Natasha also teaches a ceramic sculpture workshop titled "Adventures in Clay" covering concept development, hand-building techniques, texture, and glazing techniques. Her work has been featured in solo and group exhibitions at the Beatrice Wood Center for the Arts, Abrams Claghorn Gallery, Bloomington Center for the Arts, Maria Kravetz Gallery, and the American Museum of Ceramic Art. She has taught at the University of Minnesota and the American Indian OIC School. She has been awarded the Excellence Award at the 1st World Teapot Competition, Best in Show at the 4th Clay & Glass Biennial Competition, and a Grand Prize at the American Museum of Ceramic Art. Natasha holds an MFA from the University of Minnesota and a BFA from Kiev Fine Arts College.
Ceramics & Sculpting InstructorThink about whether you want the clay for making pots or sculptures because you cannot use the same clay for throwing on the wheel and making sculptures. After that, you can look for a clay formula in the ceramics monthly magazine. Or buy commercial clay meant for that purpose.
Things You’ll Need
- Red polymer clay
- Green polymer clay
- Brown or black polymer clay
- Worktable
- Circular cookie cutter
- Ball styluses of various sizes
- Headpin (optional)
- Liquid clay
- Toothbrush (optional)
- Acrylic paints and fine brush (optional)
- Glaze (optional)
- Oven
- Baking sheet


References
- ↑ Natasha Dikareva, MFA. Ceramics & Sculpting Instructor. Expert Interview. 5 May 2020.
- ↑ https://www.youtube.com/watch?v=TdVYQNi_sNY
- ↑ https://www.youtube.com/watch?v=TdVYQNi_sNY
- ↑ https://www.youtube.com/watch?v=TdVYQNi_sNY
- ↑ https://www.youtube.com/watch?v=TdVYQNi_sNY
- ↑ https://www.youtube.com/watch?v=TdVYQNi_sNY
- ↑ https://www.youtube.com/watch?v=TdVYQNi_sNY
- ↑ https://www.youtube.com/watch?v=TdVYQNi_sNY
- ↑ https://www.youtube.com/watch?v=TdVYQNi_sNY
- ↑ https://www.youtube.com/watch?v=TdVYQNi_sNY
- ↑ https://www.youtube.com/watch?v=TdVYQNi_sNY
- ↑ https://www.youtube.com/watch?v=TdVYQNi_sNY
- ↑ https://www.youtube.com/watch?v=TdVYQNi_sNY
- ↑ http://www.polymerclayweb.com/aboutpolymerclay/thebasics/safetyissues.aspx
- ↑ http://www.polymerclayweb.com/aboutpolymerclay/thebasics/safetyissues.aspx
- ↑ https://www.youtube.com/watch?v=TdVYQNi_sNY
- ↑ https://www.youtube.com/watch?v=TdVYQNi_sNY
About This Article