wikiHow is a “wiki,” similar to Wikipedia, which means that many of our articles are co-written by multiple authors. To create this article, 257 people, some anonymous, worked to edit and improve it over time.
The wikiHow Video Team also followed the article's instructions and verified that they work.
This article has been viewed 8,303,514 times.
Learn more...
Three dimensional paper snowflakes look magnificent hanging in a window or on a wall. Fun for kids or adults, they are easy to make. Some like them for Christmas, but you may like them any time!
Steps
-
1Gather the materials. You'll need six (or eight for a fuller snowflake) pieces of paper. White copy paper will do, although you can use more elaborate types of paper like construction paper or origami paper. You'll also need scissors, clear tape, and a stapler or some double-sided tape.
-
2Fold each of the six pieces of paper in half diagonally, and then in half again diagonally. If the paper you are using does not make a perfect triangle, cut off the rectangular edge that sticks out to make the sides align perfectly. You should end up with a square folded into a triangle. Fold the triangle in half, noting where the folded "bottom" of the triangle is.Advertisement
-
3Cut three slits in the triangle. Position the scissors along the bottom fold, and parallel to one of the edges going up to the top. Cut almost all the way up to the double folded crease, but not quite. Keep about the same distance between each cut. (This might not be suitable for thicker paper, since the number of layers makes it difficult to cut through.)
-
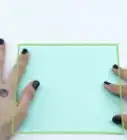
4Unfold the paper so that it is flat. Position it so that one of the points of the square faces you. It should look like the picture.
-
5Keeping your paper diamond side-up, roll the first two innermost paper lines together to form a tube. Tape these two pieces together. You should see triangle shapes on each side of the roll.
-
6Turn the diamond over to the other side of the paper. Take the next two paper lines and pull them together on the opposite side of the tube and tape together as before. This will be a more rounded shape and wider than the first tube.
-
7Keep turning the paper and joining the paper lines together on opposite side in the same fashion until all paper lines have been joined.
-
8Repeat Steps 2 to 7 with the remaining 5 pieces of paper.
-
9Join 3 of the completed rolled pieces together at one end and staple together using the other hand. Do the other 3 pieces the same way. Now you will have 2 pieces consisting of 3 strands or "arms" each. (For smaller snowflakes, it may be easier to use double-sided tape or white glue in place of staples.)
-
10Staple the two new pieces together in the middle.
-
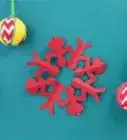
11Staple where each of the six arms meet. This ensures that the snowflake shape is pulled into place. See picture at top for the finished snowflake.
-
12Hang them up, use them to make a center piece or use them to decorate in your own way in places where they can be admired.


Community Q&A
-
QuestionDoes the paper have to be square?
 Community AnswerYes, but it's easy to turn a rectangular sheet of paper into a square. Fold one corner over to the opposite side, lining up the edges to form a triangle. Cut off the "leftover" rectangle below the triangle. Unfold the triangle, and you have a square.
 -
QuestionCan you use more than six pieces of paper? And can you use different types of paper?Community AnswerYou can use as many pieces of paper as you can fit together. Even numbers (6, 8, 10) look best because the snowflake is symmetric. You can mix and match different paper colors, but stick to the same type (printer, construction, origami) to avoid lopsided snowflakes.
-
QuestionHow big should I cut the squares of paper?
 Community AnswerThe larger they are, the easier it will be to work with them. Go for at least 6 inches (15 cm) on each side for best results.
Warnings
- Don't use any kind of hot glue if you are making this; it may burn or rip the paper.⧼thumbs_response⧽
- Be careful using scissors. You might cut yourself. Especially if you are nearby younger kids when crafting this snowflake. If so, make sure there are adult(s) present.⧼thumbs_response⧽
Things You'll Need
- Six pieces of paper, any kind should do. The size of your paper square can vary from 4" to 10" (10cm - 25cm). The paper should be of a good strength to hold up the snowflake structure.
- Scissors
- Tape
- Stapler (a mini stapler is great for smaller snowflakes).
About This Article
To make a 3D paper snowflake, you’ll need 6 square pieces of paper that are all the same size, scissors, and clear tape. To get started, fold one of the squares in half diagonally so it’s a triangle. Then, fold the triangle in half so you’re left with a smaller triangle. Use your scissors to cut 3 evenly-spaced vertical slits along one of the short sides of the triangle, stopping each slit before you reach the other side. Now, unfold the paper all the way so it’s a square again. Tape the tips of the 2 innermost flaps together. Then, flip the paper over, and tape the tips of the next 2 flaps together. Flip the paper over again and tape the third pair of flaps together, then do the same thing on the other side one more time with the last 2 flaps. Now you’re finished with the first arm of the snowflake. Set the first arm aside, and repeat with the other 5 squares. When you’re finished, tape the bottoms of 2 of the snowflake arms together. Then, tape the arms together where they touch in the middle. Tape on the rest of the snowflake arms one at a time. Once you’ve attached the final arm, your 3D paper snowflake is finished!