wikiHow is a “wiki,” similar to Wikipedia, which means that many of our articles are co-written by multiple authors. To create this article, 13 people, some anonymous, worked to edit and improve it over time.
This article has been viewed 37,811 times.
Learn more...
Piggy banks have been around for many years, but it started in the fifteenth century when the word "piggy" was referred to as an orange clay. This clay was used for jars and dishes to hold change. In the eighteenth century, the word "piggy" now sounded much like the word "pig". So a person had shaped a "piggy" jar, which looked like a pig.
These piggy banks are a great gift for children to save up their change. But wouldn't it be more fun to make one yourself? And who said it had to be a pig? What if you want an elephant bank? Or a turtle? If you would just love to have a handmade piggy bank, read this article to find out how to make one!
Steps
-
1Decide on what you would like to make. It's important to plan ahead so that you know what you are doing. And you don't have to make a pig, instead you could make a puppy bank! Be creative, although a piggy bank is certainly fine to make. Think about your interests or pets, such as cats or football. Anything that is fairly round or has a body can work. If you are stuck without ideas, here are some to name a few:
- Any animal: usually very simple structures, and cute, too! If you like animals, this is the way to go. Some more specific ideas for an animal are dogs, cats, turtles, elephants, horses, and rabbits.
- Sports: Make a ball if you're a sports lover! You can make a football, soccer ball, basketball, or bowling ball (with three round holes instead of one little slit).
- Food: A very creative idea, but can be tricky! If you want to make a food, try a hamburger, cupcake, apple, or even a stack of pancakes!
-
2Take a large piece of clay and roll it. Make sure that it is very round, or else it won't be a piggy bank! If, however, you are making a bank where the body isn't completely round, such as a football, shape the clay more into that shape. But with animals, you can add details like the head and tail later, this is just the body or base of the bank where the money will be held.Advertisement
-
3When it is round, take the clay knife and cut the clay right through the middle. Make sure that the halves are even, so try as best as you can to cut through the center. They should also be clean (without any tears). Now you will have two half-circles.
-
4Make two bowls. Take one clay piece and press your thumb through the center, but not all the way. Start to knead with your fingers outward, pushing the clay in the center to make a dent, like a bowl. Make sure that it is somewhat deep, but check the edges. They shouldn't be too thick, no thicker than 1 1⁄2 inches (3.8 cm), but no thinner than 1/4 an inch at the bottom. Do this with both halves.
-
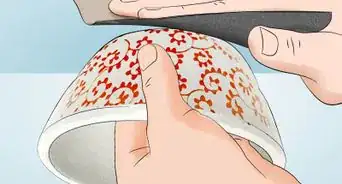
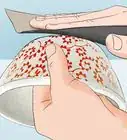
5Score the clay. Take the scoring tool and quickly flick it across the width of the edges of the bowl. Do this to both of the bowls. Make sure you go all the way around the bowls. You score clay so that the two bowls will soon connect and stick together.
-
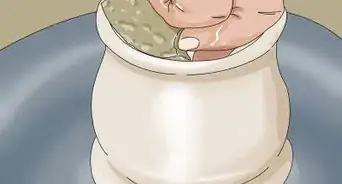
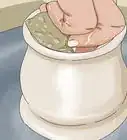
6Dip your finger in the water just a bit and apply it to both of the the bowls you scored. You may have to apply the water more than once. The, press the two halves together and apply more water on the crack where the bowls come together. You can also use your fingers the same way. After applying the water or smoothing the clay with your fingers, you shouldn't be able to see the crack. Now you have one piece of clay again.
-
7Cut slots with the clay knife. At the top of the piggy bank, stick the knife in until it goes all the way through. Work around that, cutting a rectangle shape. This is the coin slot. Don't make this slot too big, no wider than a centimeter.
- Also make a slot for the bottom of the bank. Do the same thing you did for the top coin slot, but make this one a circle. Make sure that it is big enough for a quarter to come out, but don't make it too big or else all of the coins will quickly come through.
-
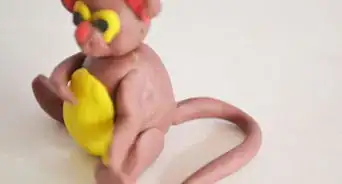
8Add details to the body of the bank. This is the fun part! If you are making an animal, roll extra pieces of clay for the head and stick them on the body of the bank by scoring, adding water and smoothing it with your fingers. Add a tail for certain animals.
- Legs: for legs, make oval shapes and gently flatten them on a surface. You can then add them to your animal. This works great with elephants and turtles! But, make sure that the legs are thick enough to support the rest of the body.
- Face: to add a face, use the clay knife to poke eyes and a mouth for your animal.
- You can use the clay knife for other details, too, like writing in letters, numbers, or anything that would add to your bank.
-
9Cook the clay. Put the bank in an oven for a few minutes. The temperature should be 50 degrees Celsius (122 degrees Fahrenheit).
-
10Paint the clay with glaze. Be creative! Paint over your bank the way you like it. You can add polka dots to your pig, or purple frosting to your cupcake. But, it is good to paint over your bank at least twice so the colors stay on. Let the glaze dry for an hour or two.
- Put the clay in the oven again (optional) on 93 degrees Celsius (200 degrees Fahrenheit) for 10 minutes.
- Enjoy your piggy bank!
-
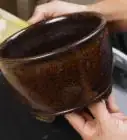
11Finished.


Community Q&A
-
QuestionDon't I have have to put a hole in it so that I can get the money out?
 Community AnswerIt is common to smash the clay bank after you have filled it to the brim with your money. This rarely damages the money, so you have nothing to worry about. But, if you want to save the clay piece, I suggest you carve a small circle for coins and dollar bills to slip through at the bottom, and poke two tiny holes on either side. Once you have finished the rest of the steps, find the circle and two small holes. Take leather, cloth, etc., and tie it with string strung through the tiny holes and connect them with your cover material.
Warnings
- If you are a child, have an adult cook the clay.⧼thumbs_response⧽
- Never coat the clay with glaze only once.⧼thumbs_response⧽
Things You'll Need
- Clay
- Glaze in different colors
- Clay knife
- Scoring tool
- water
- oven
- paintbrush