wikiHow is a “wiki,” similar to Wikipedia, which means that many of our articles are co-written by multiple authors. To create this article, 12 people, some anonymous, worked to edit and improve it over time.
This article has been viewed 251,922 times.
Learn more...
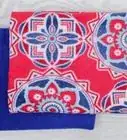
Fleece is soft, warm, easy to care for and easy to work with. It's machine-washable in cool water, and won't unravel when trimmed. You can make a fleece blanket by simply trimming a piece of fleece to the desired shape and size. But, if you're willing to put a bit more work into your blanket, you can create anything from a useful gift to an elegant work of art.
Steps
The Fabric
-
1Select your fleece fabric and measure it to size. If you're making a single-layer fleece blanket, which will have a right side and a wrong side; you need just enough fabric for one layer. If you'd like to make a reversible fleece blanket, which can be used with either side up, you need enough fleece for two complete blanket-sized layers.[1]
- The following size blankets will cover the top of a bed. Add a 1/2 (1.27 centimeters) - to - 1-inch (2.5 centimeters) seam allowance on all sides if you intend to stitch the edges, and don't count the selvage (machine-finished edge of the fabric) as part of the pattern:
- Crib: 27 inches (68.58 centimeters) by 52 inches (132.08 centimeters)
- Twin: 39 inches (99.06 centimeters) by 74 inches (187.96 centimeters)
- Full: 54 inches (137.16 centimeters) by 74 inches (187.96 centimeters)
- Queen: 60 inches (152.4 centimeters) by 80 inches (203.2 centimeters)
- King: 78 inches (198.12 centimeters) by 80 inches (203.2 centimeters)
-
2Mark your cutting line with a washable fabric marker. Trim along the line with scissors or lay the fleece flat on a cutting board and place a straight, solid cutting guide along the edge you intend to cut. Guide a rotary cutter down cutting guide, slicing through the fabric. You can also cut the fleece with pinking scissors, which automatically creates a somewhat finished-looking edge.
- Make sure the surface beneath you blanket is safe to possibly harm. You don't want to go leaving cuts on a nice table or countertop.
For a Reversible (Two-layer) Blanket
-
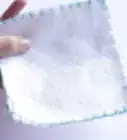
1Place the right sides of the fleece pieces together. The edges don't have to line up perfectly, but they should be reasonably close. Insert a straight pin every few inches to secure the pieces together.
- If you can't identify the right side of the fabric, ask the staff before you leave the fabric store. You can also wash the fleece several times, then select the most attractive (least pilled) side of the fabric as your "right" side.
-
2Stitch the two pieces of fleece together on three sides. Use a uniform 1/2" to 1" (1.25 - 2.5 cm) seam allowance. You have two options for how to finish the fourth edge:[3]
- Turn the blanket inside out through the open edge. Hand- or machine-stitch all the way along the final edge, securing the two pieces together.
- Stitch along the fourth edge, leaving a 4-inch (10.16 centimeter) opening. Turn the blanket inside out through this opening, so both right sides face out. Hand-finish the 4-inch opening with a blanket or whip stitch.
- Or skip the sewing entirely. Cut 1/2" to 3/4" (1.25 - 1.9 cm) wide fringe on all sides of the blanket. Tie the two pieces of fleece together, one paired set of fringe ties at a time. See below for directions.
For a Braided or Knotted Edge
-
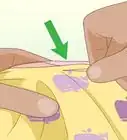
1Cut out a square in each corner. That is, after you have the pieces of fabric you want to work with. Cut them to size and then cut out the corners -- around 2" (5 cm) is a good size.[4]
- Corners are virtually impossible to knot or braid. This makes everything much easier and keeps you from wondering what the heck to do with those pesky edges.
-
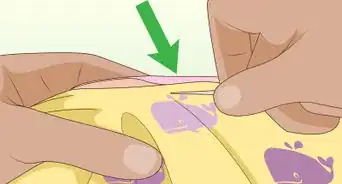
2Mark and cut the fringe. An easy way to do this is with painter's masking tape. Mark a line down all four sides of your blanket (on the top side). Keep it in line with the depth of your corner cuts.[5]
- Make your cuts. You'll want around 1 1/2" (1.9 cm) to 2" (2.5 cm) for your fringe depth. The width of each piece should be around 1" (2.5 cm). Grab your rotary cutter are start making slits down all four lengths of the blanket.
-
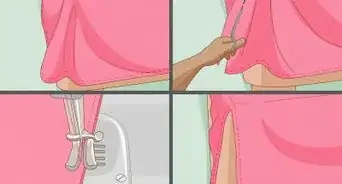
3Decide whether you are braiding or knotting your edges. If you're knotting, congratulations! All you have to do is double knot the top and bottom layers of fringe together. Start at one edge and grab two pieces of fringe that are laying on top of each other. Double knot and work your way around. If you're braiding, continue reading:
- Make slits in each piece of fringe. That's right: there will be little teeny holes in all your fringes -- that's how they'll stay braided together.
-
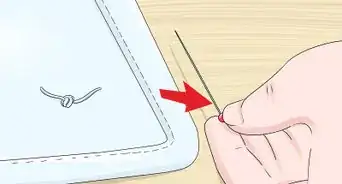
4Choose a piece of fringe to start with. Any will do. Use a bent paperclip (a crochet hook will work great too) and stick it through the slit of your first fringe.
- Then stick the paperclip through the slit of the fringe underneath. It will "hook" the second fringe and you can pull it through the first fringe.
-
5Continue pulling through and "braiding." Once you've pulled it all the way through on your first move, your paperclip (or crochet hook) should already be through the slit of the second fringe, and you can move on to the next fringe on the top. Put the paperclip through the next slit to hook the next fringe. If you're right handed, it'll be easiest to work right to left and vice versa.[6]
- The most important thing is to always alternate between using a fringe on the top and a fringe from the bottom. When you get to the corners, just keep doing the same thing. It will naturally curve around the corner.
-
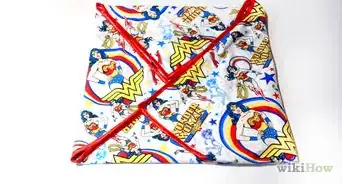
6Cut the very last piece of fringe in half. Use them to tie a knot around the first fringe. Make sure to do at least a double knot and triple if the fringe is long enough. That will be the only knot on your entire blanket.[7]
- You're done! And no, the edge will not unravel. As long as you've knotted the last piece, you're good to go.
Community Q&A
-
QuestionWill chenille fabric work for a tie blanket?
 Community AnswerChenille is rather thin, but if using two layers it should be okay. Anything with a knit backing (as opposed to woven) works just great for the snip and tie blankets as they do not shed or unravel, hence don't need to be hemmed to prevent their coming apart.
 -
QuestionWhat if you are using two different pieces of fleece? How do you braid/alternate the fabric to get the same outcome?Community AnswerWhen working with two pieces of fleece, it is very valuable to pin them together across both diagonals and at intervals along the edges to keep them from "crawling" apart from each other. Safety pins will work fine, so they aren't removed until you are done and ready to take them out. Then when you cut them together at evenly spaced intervals, if a cut is off a bit, it will be off the same on both pieces and not be noticeable in the finished product, whereas if cut separately, it can leave an awkward pucker.
-
QuestionHow can I put two pieces together to make a large fleece blanket with proper edges?
 Community AnswerPlace two pieces face-to-face, with the best pattern inside. Sew around the edges, leaving 1 foot open for turning inside out. When you turn it inside out, you will find fleece is thick and makes rounded puffy edges. Pin these down, along with the opening, and sew all the way around again. You can use thick satin seam binding for a more finished look. If it is still raised, sew around it again. Fleece does not fray, so some people do not sew it, or they cut fringe along the edges. Consider sewing the pieces together flat, without turning it inside out. Check out Spoonflower for lots of cool fleece choices.
Things You'll Need
- Fleece fabric
- Measuring tape or ruler
- Non-permanent marker
- Scissors, pinking shears, or cutting mat, rotary cutter and cutting board (if sewing)
- Painter's masking tape
- Needle and thread, Serger, sewing machine or crochet hook and yarn (if sewing)


References
- ↑ https://www.youtube.com/watch?v=KjHU7r37pB8
- ↑ https://www.youtube.com/watch?v=JeTfekcNhhk
- ↑ https://www.youtube.com/watch?v=OVuK-2xzO3c
- ↑ https://www.youtube.com/watch?v=Ebyzd_5flkM
- ↑ https://www.youtube.com/watch?v=Ebyzd_5flkM
- ↑ https://www.youtube.com/watch?v=6vNIL0jjRZM
- ↑ https://www.youtube.com/watch?v=6vNIL0jjRZM
- http://www.youtube.com/watch?v=SO3Jye7HIr8&feature=related
About This Article
To make a fleece blanket, start by cutting a piece of fleece fabric that's the size you want your blanket to be. For a blanket that covers a twin-size bed, make your fabric 39 inches by 74 inches. Then, simply finish the edge of the fabric using a serger or by hand stitching a blanket or whip stitch. If you want to make a no-sew fleece blanket, start by cutting out a square from each corner of the fabric and cutting fringe along the sides. Then, braid or knot the fringe to finish the edges of your blanket. To learn how to make a reversible fleece blanket, scroll down!