X
This article was co-authored by wikiHow Staff. Our trained team of editors and researchers validate articles for accuracy and comprehensiveness. wikiHow's Content Management Team carefully monitors the work from our editorial staff to ensure that each article is backed by trusted research and meets our high quality standards.
This article has been viewed 24,401 times.
Learn more...
A paper frisbee is a cool toy that you can put together in just a few minutes. It flies almost as well as the real deal but is safe to use indoors. Best of all, you can make it in any size or color you want.
Steps
Method 1
Method 1 of 2:
Using Folded Pieces of Paper
-
1Gather your supplies. To use this method, you will need at least eight pieces of 3” x 3” paper (6 cm x 6 cm). You can use printer paper or origami paper, which will be thin and easy to fold. You will also need a ruler and glue.[1] [2]
- You can use thicker paper like cardstock but make sure they are 3” x 3” as this will make it easier to fold and fit the pieces of paper together.
-
2Fold the paper in half on a diagonal. Make sure the top right corner folds to meet the bottom left corner on a diagonal line. You can use the ruler to ensure you get a nice even fold on a diagonal.[3]
- If you’re using double-sided paper, make sure to fold it so you can see the colors. Otherwise, they’ll just be hidden in the frisbee.
Advertisement -
3Fold the tip of the paper down. Take the left top corner (or the tip of the triangle shape of the paper) and fold it so it touches the bottom left corner of the paper. Use your fingers or the ruler to make a nice, even crease.[4]
- Repeat these steps for the remaining seven pieces of paper. Make sure the folds are on the same side. For example, if the first piece is folded so the left top corner touches the bottom left corner of the paper, you should do this for the remaining pieces of paper. This will make it easy to put the pieces of folded paper together and form the frisbee.
-
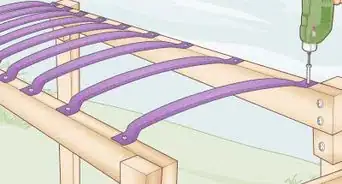
4Use glue to put the pieces together. Once you have eight pieces of folded paper, you can use glue to put them together in the shape of a frisbee. You will glue and slide each piece of paper together to form the frisbee. You can use other adhesives like tape or staples, but glue will work the best.[5]
- Turn one of the folded pieces so the point of the smaller triangle faces to the left and the right point of the larger triangle faces to the right. Place a small dot of glue on the top corner of the folded piece where the smaller triangle and the larger triangle form a straight line.
- Slide the section with the glue into the pocket of the second folded piece of paper. The pocket will be formed by the smaller triangle section of the folded piece of paper. Press down on the paper so the glue sets properly. The pieces of paper should make two 45° angles on the inner and outer edge when you’re done.
-
5Repeat the process for every piece. Add glue to the piece of paper you just glued inside the other. The pieces will naturally make an octagon as you put them together. Make sure you don’t accidentally glue the paper to your work surface and risk tearing it. [6]
-
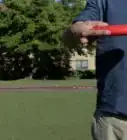
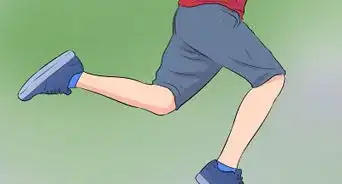
6Test out your creation. It’s better to throw paper frisbees with more of a backhand flick than a full frisbee toss. The motion should be almost entirely in your wrist. Paper frisbees aren’t sturdy enough to stand up to a throw with all your strength behind it.[7]
- Don’t worry if it doesn’t work the first time. Try to figure out what went wrong and fix it the next time you make one. Is it too floppy to throw? You probably made it too large or added too much glue. Did one of the connections come apart? Add a little more glue and try again.


Advertisement
Method 2
Method 2 of 2:
Using Paper Plates
-
1Gather your supplies. To make a frisbee out of paper plates, you will need the following supplies:[8]
- Two regular sized paper plates
- Scissors
- Tape or a stapler
- Colorful markers or crayons for decorating your frisbee.
-
2Place both plates right side up. Position the plates as if you were going to put food on them, with the right side facing towards you.[9]
-
3Decorate the plates. Turn the plates upside down and decorate them as you wish with markers or crayons. You can put animals, shapes, or flowers on the plates. Make sure the decorations remain on the upside down area of the plates so they are visible when the frisbee is thrown in the air.[10]
- You may also want to put circular shapes on the plates to mimic the movement of the frisbee when it flies in the air or create an interesting design on the plate that appears when the frisbee is flying in the air.
-
4Cut a circle out of the center of each plate. You can do this by placing the plates together so the decorated sides are facing outward and cutting the circle out of the center of both plates. You can also do this one at a time by cutting the circle out of the center of each plate.[11]
- Start by cutting a diagonal line from one end of the center of the circle to the other end. Then, cut another diagonal line so you have an "X" shape in the center of the circle. You can then cut out the center using the "X" cut.[12]
- Try to cut only the center of the plate out and leave the rest of the plate intact.
-
5Put the two plates together with the decorative side facing outward. Use tape or staples to seal the edges of the plates together so the plates stay together. You should now have a frisbee with a hole in the center.[13]


Advertisement
Things You’ll Need
Using Folded Pieces of Paper
- Eight pieces of 3” x 3” paper (6 cm x 6 cm)
- A ruler
- Glue
Using Paper Plates
- Two regular sized paper plates
- Scissors
- Tape or a stapler
- Colorful markers or crayons for decorating your frisbee.


References
- ↑ http://www.paperairplanes.co.uk/frisbee.php
- ↑ http://makezine.com/projects/origami-flying-disk/
- ↑ http://www.paperairplanes.co.uk/frisbee.php
- ↑ http://www.paperairplanes.co.uk/frisbee.php
- ↑ http://www.paperairplanes.co.uk/frisbee.php
- ↑ http://www.paperairplanes.co.uk/frisbee.php
- ↑ http://www.paperairplanes.co.uk/frisbee.php
- ↑ http://www.makeandtakes.com/summer-camp-for-kids-paper-plate-frisbees
- ↑ http://www.makeandtakes.com/summer-camp-for-kids-paper-plate-frisbees
About This Article

wikiHow Staff
wikiHow Staff Writer
This article was co-authored by wikiHow Staff. Our trained team of editors and researchers validate articles for accuracy and comprehensiveness. wikiHow's Content Management Team carefully monitors the work from our editorial staff to ensure that each article is backed by trusted research and meets our high quality standards. This article has been viewed 24,401 times.
Co-authors: 8
Updated: September 16, 2021
Views: 24,401
Categories: Backyard Games
Advertisement