wikiHow is a “wiki,” similar to Wikipedia, which means that many of our articles are co-written by multiple authors. To create this article, volunteer authors worked to edit and improve it over time.
This article has been viewed 17,551 times.
Learn more...
Reasons to make a picture skinnier are numerous. Perhaps you are uploading a picture and are faced with stringent sizing guidelines. Maybe you are working in a word processor and wish to have space to wrap text around a picture. Or, it could be that a picture is simply too large to easily view. Depending on your use of the picture, there are several methods you can use to make an image thinner. You can change the HTML coding, edit the picture in an Image Editor or resize it directly in your word processor. This guide outlines how to go about resizing an image in each of these 3 scenarios.
Steps

Make a Picture Skinnier Using an Image Editor
-
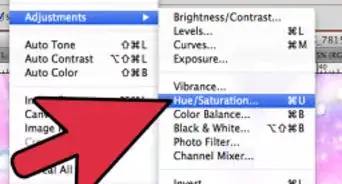
1Select Image Size or Resize from the Image menu of your Image Editor. The actual tool may have a slightly different name depending on the program you are using, but it should be similar to those listed here and recognized for its purpose of allowing you to resize your image.
-
2Change the pixel size for width and height, if necessary. Similar to editing an image's size using HTML code, you will use the Image Resize Dialog Box to enter in selected values for your image height and width.
- Decrease the width. You can usually do this with pixels, percentage or inches (centimeters). By decreasing the width and leaving the height at default, you will make a picture skinnier. Conversely, you can allow the width to remain the same and increase the height.


Make a Picture Skinnier Using a Word Processor
-
1Select the image you wish to alter. In some word processing programs, it may be necessary to double click. The image is ready to resize when handles, which are small circles or squares, appear at the corners, along each side and in the middle of the picture.
-
2Click on any of the corner handles or those on the sides of the picture, and drag to the appropriate size. With your mouse, holding down the left button (or main button on a Mac), you can move these handles closer to or further away from the image center. This allows you to make a picture skinnier until it fits your specifications.


Things You'll Need
- Image editing software
- Word processing software