This article was co-authored by wikiHow Staff. Our trained team of editors and researchers validate articles for accuracy and comprehensiveness. wikiHow's Content Management Team carefully monitors the work from our editorial staff to ensure that each article is backed by trusted research and meets our high quality standards.
There are 8 references cited in this article, which can be found at the bottom of the page.
This article has been viewed 227,170 times.
Learn more...
Paper rings are an affordable, artistic, and attractive way to show someone you care or to wear yourself. The most intricate paper rings are called “Origami finger rings.” However, you can make paper rings out of paper money and regular notebook paper too!
Steps
Creating a Finger Ring from Paper
-
1Choose a single piece of paper. You can use creative paper materials, or you can use a plain piece of notebook paper. Make sure that you start with the paper's back side facing up.
- Try gold or silver foil paper to make the ring look even more like it’s made out of metal. You can find such foil online or in many craft and even some department stores.[1]
- A standard piece of paper at 8 by 11.5 inches will work, although people have made paper rings out of smaller squares, even post-it-notes!
- Use colored paper if you want to make your ring colorful. Really, though, any piece of paper would work. You could even make a paper ring out of a regular piece of lined notebook paper.[2]
- You could also try using special Origami paper, which is the Japanese art of paper folding. Try washi or chiyogami, which comes in different colors and designs.[3] This paper, which can be purchased online, is used to make Origami paper designs.
-
2Fold the paper in half horizontally. This is the first in what will be a series of folds needed to make the ring.Advertisement
-
3Fold the remaining rectangle. Once you’ve cut the piece of paper in half, you should fold the rectangular piece of paper you’re left with in half again.
- It should now be a smaller rectangular shape.
-
4Unfold the paper again. The process of making a paper ring involves a series of folds and unfolds.
- After you've unfolded the paper, fold both sides of the paper once again to meet the central line of the paper.
- Basically, the horizontal end of each folded over side should now meet in the middle. #*Note that the paper is getting smaller and smaller each time you fold it!
-
5Keep folding the paper. Now, fold the already folded paper once again, this time completely in half by folding the paper to the right.
- It will have a square like shape. You are creating the ring through a series of folds.
-
6Fold both of the paper’s edges in. They should meet at the center line.
- Think of these folds as creating the tip of a paper airplane. That's how it should look.
- The end of the paper should now form a triangular point.
-
7Tuck in the corners. You’ve got a few more folding steps to go before you have a true paper ring. Be patient!
-
8Fold both lines to the center. Pull the sides of the paper out, and pop up the top of the folded paper so that it forms the center of the ring.
-
9Glue the ring together. You may want to use a piece of tape or glue at the bottom of the ring to make sure that the ring holds together.
-
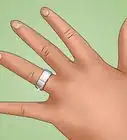
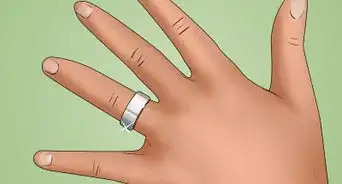
10You’re done! Wear the ring or give it to someone you care about! They will most likely appreciate the thought and care you put into it.


Making a Paper Ring with a Bottle or Dollar
-
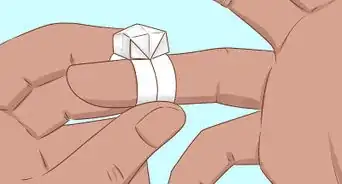
1Take a long strip of paper. This is an alternative method you can use to make a simple paper ring. It doesn't take long, and it doesn't require a lot of folding!
- Wrap the strip of paper around the small plastic top of a bottle, say from hair spray (about the size of your finger).[5]
-
2Use glue to fasten the end of one narrow strip. You will fasten this onto the rest of the paper strip as you wrap it around and around the plastic bottle top.
- Wrap it around until you reach the other end.
- Glue that end down onto the piece of paper.
-
3Remove the ring from the plastic bottle top. If you want to weave other colors into the ring for a fancier version, take a second strip of paper in another color.
- Put glue on the end of it.
- Fasten the end to the ring in a vertical direction.
-
4Wrap the second piece of paper around the ring. To do this, weave it in and out of the ring.
-
5You're done!
- Weave it much as you would by creating a braid.
- When you reach the end, glue it to the ring. It’s ready to wear!
-
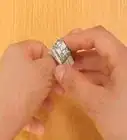
6Make a dollar bill ring. This can be a fun way to give someone a gift in cash or to leave a tip for someone! Maybe the tooth fairy could give a child such a ring.
- Start with the bill facing with the back side up.
-
7Fold back the top white edge of the bill . This should be folded back to the place where it meets the green part of the bill.[6]
-
8Turn the bill over. Fold the bottom edge of the bill until it meets the top. Tuck it under the little flap you created by folding over the white edge.[7]
-
9Fold it in half again, but don’t tuck it under the flap this time.
- Now turn the bill over so the side that says “The United States of America” is along the top.
-
10Fold back the white edge. It should be folded to the left of the “1” or other dollar amount to the point where it meets the bill’s green part.
- Fold the bill back on the right of the “1.”
- The “1” should appear to be in a square box.
-
11Bend the rest of the bill. Fold the right hand part of the bill so that the left edge goes right between the O and the F of the word “OF” in the “United States of America.”
- Curve the bill around. Keep going until the “1 square” is lined up on top of the vertical bit that is poking up underneath.
- Open up the “1 square” to the right, and then fold down the vertical bit.
- Finally, fold back the “1 square” back on top.
-
12Tuck the little flap. You should tuck the flap under the vertical bit you just folded down.[8]
- Turn the ring over. Fold the poking up bit down and through the center of the ring.
- Turn the ring over again. Fold down the little flap.
- Tuck it under the “1 square.” Using your fingernails or a pencil might help with this part. Finally fold over the edge of the ring band so it’s narrower.
-
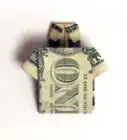
13You're done!


Making More Elaborate Origami Rings
-
1Try more elaborate designs. In Origami you can make many different ring designs, such as an origami butterfly ring.[9]
- To make a butterfly ring, cut a strip of paper out of a paper sheet. The strip you cut out should be about 1/8th of the paper’s width.[10]
- Fold the paper in half lengthwise, and then unfold it.
- Pay attention to the center crease you’ve created, as it will be important.
-
2Fold the paper in half from top to bottom. Fold in the corners toward the crease as if you are making a paper airplane.
- The ends should form a triangular point.
- Unfold the corner, and start to fold in the triangular area by pushing the triangular area in. #*Do the same fold to the other corner.
-
3Fold the bottom edge of one side up. Stop at the edge of the triangle you created with the pocket folds.
- Fold the other side of the paper the same way, and then fold the corners in one more time.
- Now fold in the corners on the other side.
-
4Fold the bottom edge up and over the triangle you have formed. Fold the other side the same way.
- Now, start folding about 1/3 the way up the triangle inside.
- Fold the other side the same way.
- Fold in the corners so that they are flush with the triangle’s outer edge.
-
5Open up and pocket fold in. Do the same to the other three corners. Fold lengthwise, starting with a corner.
- Fold the other side the same way. Flip over, and do the same to the other side.
- Using your index finger and thumb, lightly squeeze and pull the ring part so the loop is better formed.
- Cut the ring parts so they fit, and slide one end into the other. You should now have a butterfly ring!
-
6You're done!
-
7Find Origami diagrams online. If you want to try more elaborate versions of a paper ring, you can easily find Origami diagrams online.
- Step-by-step diagrams exist to create rings including a heart ring, a peace ring, gem star ring, diamond ring, basic wedding band.[11]
- Origami is a Japanese word that literally means paper folding. It is an art form that involves using paper folds to create everything from animals to puppets.[12]
- Once you’ve mastered a simple ring, you can move on to trying more advanced Origami! Origami can be a fun craft exercise for young children too, although the diagrams can get quite complex.


Community Q&A
-
QuestionCan you only make a money ring out of a dollar bill?
 Community AnswerNo, of course not! Any country's paper currency will work! You can also use American dollars in other denominations.
 -
QuestionCan I use white plain paper?
 Community AnswerYes, you can use any paper that you would like.
 -
QuestionCan you use construction paper?Community AnswerNo, because it won't fold as easily. Paper rings require a lot of folding.
Things You'll Need
- Pair of scissors
- Paper
- Glue


References
- ↑ http://www.origami-resource-center.com/rings.html
- ↑ https://www.youtube.com/watch?v=S_veCYAKFGk
- ↑ http://www.origami-resource-center.com/rings.html
- ↑ http://www.origami-make.org/howto-origami-ring.php
- ↑ https://www.youtube.com/watch?v=Gdqvasi1qKY
- ↑ http://www.homemade-gifts-made-easy.com/dollar-bill-ring.html
- ↑ http://www.origami-instructions.com/money-origami-ring.html
- ↑ https://www.youtube.com/watch?time_continue=4&v=gyx6kmu4pOw
- ↑ https://www.youtube.com/watch?v=wZvwDdsPris
About This Article