This article was co-authored by wikiHow Staff. Our trained team of editors and researchers validate articles for accuracy and comprehensiveness. wikiHow's Content Management Team carefully monitors the work from our editorial staff to ensure that each article is backed by trusted research and meets our high quality standards.
This article has been viewed 1,427,935 times.
Learn more...
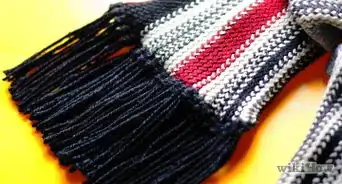
Slip knots are used in knitting and crochet to attach your yarn to the needle. It's the first step in casting on and crocheting a chain, counting as the first stitch.
Steps
Looping, Pinching, and Pulling Up
-
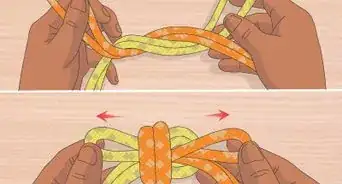
1Pinching with two fingers, pick up the yarn roughly 6-8" from the end. It should drop down into a U-shape as it falls under your fingers. You don't need to measure the yarn precisely; just give yourself enough extra yarn to work with.[1]
- This U-shape is called a "bight" in knot tying.
-
2Twist your fingers clockwise to make the yarn cross over, forming a loop. All it requires is a half turn or so, and the yarn should naturally cross over itself.Advertisement
-
3Put your two fingers inside the loop, expanding it out. Make sure your other hand is holding onto the strands of yarn below your loop, keeping the shape intact.
-
4Using the fingers in the loop, grab the standing yarn and pull it partially through. The standing yarn is the line that leads back to your ball of yarn. The shorter side, leading to the end, is called the tail. Pulling the standing line through will form another bight (U-shaped bend in the yarn).
- You only need to pull a few inches of yarn through.
-
5Pull the tail of the yarn to tighten the knot about halfway. You don't want to cinch the whole thing down yet. You can, however, pull on the tail to bring the knot closer together and "clean it up."
- It should look a bit like a noose, with a knot on the bottom of a yarn loop.
-
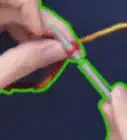
6Slide your knitting needle or crochet hook into the loop and pull both ends of yarn tight. A slip knot almost always goes around something, as the beauty of the know is how easily it tightens and loosens around an object. Pull both the tail and standing line simultaneously to tighten your slip knot.[2]

Feeding a Loop into a Loop
-
1Pick up the yarn approximately 12 centimeter (4.7 in) (5in) from the end. This will create a U-shaped "bight" in the yarn.
-
2Create a loop by taking the long end of the yarn (standing line) and winding it over the top of the shorter end (tail). Hold the point where the yarns cross tightly between your left thumb and forefinger.
-
3Using your right hand, pick up the standing line of yarn to form another bight. Remember, the standing line is the part leading back to your yarn ball. Form another half-loop here, like you did in step one of this method.
-
4Feed this second bite through the back of the loop. This will create a loop in a loop.
-
5Pull on the tail of the knot to tighten the first loop around the second. This will make the knot much cleaner and easier to manage.
-
6Feed your knitting needles or crochet hook into the remaining loop and pull the long end of the yarn to close the loop over the needle. This is all you need for your slipknot.

Looping and Pushing Through
-
1Pull out about ten inches of yarn from your yarn ball. The exact amount doesn't matter -- you just need enough to work with comfortably.
-
2Make a 1" loop in the yarn by tucking the end of the yarn under the rest of the yarn. Simply double the yarn back on itself, then slide the end underneath the rest of the yarn to make a circle.
-
3Flip the loop back down so it lays on top of the rest of the yarn. Make sure you flip it towards the side with the rest of the yarn, not the side with the end of the yarn.
-
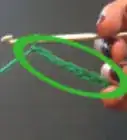
4Pick up the yarn inside the loop and pull it through. Simply pinch the straight line of yarn underneath your loop and pull it through 1-2". It should naturally form another loop.
-
5Pull the end of the yarn to get the knot tight, keeping the loop at the top open. You only want to tighten it enough to close the first loop you made, leaving the other loop open on top. It looks a bit like a noose.
-
6Slip the knot onto a knitting needle or crochet hook and pull both ends to tighten the knot. Put the knitting needle in through the remaining loop and pull both ends of yarn to make it snug.


Community Q&A
-
QuestionHow do I join different color yarns neatly and securely?
 Community AnswerThere has to be a hundred different ways to do this. I tend to use knots, though a lot of people don't do this because it either might show or you can feel the knot. Personally, I never have this issue. If you don't know where the knot is, you are not likely to find it unless you are looking for it. YouTube has hundreds of videos showing these different methods.
 -
QuestionHow do I tie a knot in yarn projects?
 MicheleTop AnswererYarn should rarely have a knot. It's easier to knit in new yarn than to join it with a knot. However, there are several ways to join yarn that has broken. The weaver's knot and the magic knot are two.
 -
QuestionIs it durable for usage on the neck?
 Community AnswerThat is a very bad idea. Tying a slip or any other kind of knot around anyone's neck is a severe choking/strangling risk.
Things You'll Need
- A ball of yarn or string
- A knitting needle
- If no knitting needle you can use your hands
References
About This Article

To make a slip knot for knitting or crocheting, pinch the yarn 6-8 inches from the end. Then, twist your fingers clockwise to make the yarn cross over itself and form a loop. Put 2 fingers inside the loop and spread them apart to expand the loop. Next, grab the standing yarn and pull it through the loop. Pull the tail of the yarn to tighten the knot halfway. Finally, slide your needle or hook into the loop and pull both ends of the yarn to tighten the knot. To learn how to make a slip knot using other methods, scroll down!