X
wikiHow is a “wiki,” similar to Wikipedia, which means that many of our articles are co-written by multiple authors. To create this article, 98 people, some anonymous, worked to edit and improve it over time.
This article has been viewed 607,774 times.
Learn more...
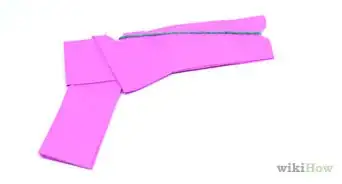
Right now, you can probably build your very own mini crossbow without getting up from your desk: no knives, wood, electric appliances or any other expensive equipment are needed. To make a small crossbow out of household items, follow these instructions.
Steps
-
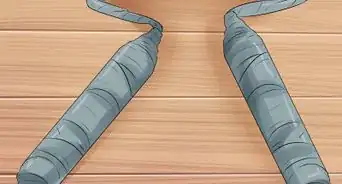
1Tape two pencils together, leaving at least a centimeter untaped at either end. Repeat with two more pencils.
-
2Tape the two pencil pairs together to form a lowercase “T.” Duct tape works best, but you can use other kinds of tape (or even rubber bands or glue). Again, leave the last centimeter of each end uncovered. Tape the pen pairs into a “t,” still leaving the ends uncovered.Advertisement
-
3Take apart a cheap or useless pen. Unscrew if necessary and remove all mechanisms including the ink cartridge, springs, and/or tips. (Save the ink cartridge because that will be used as the ammo later.) When you’re done, you should end up with a hollow tube. Dissemble the pen. Save the tub and ink cartridge.
-
4Tape the tube to the main bar of the “t.”Be sure to line the top of the tube up with the top of the “t,” which will be the shooting end of the crossbow. Line the tube up with the top of the “t” and tape into place.
-
5Stretch a rubber band horizontally over the tube. Anchor the rubber band by sliding it into the gap between the pencils on either side of the crossbar of the “t.” Stretch a rubber band over the crossbar of the “t,” wedging it between the pencils on either side.
-
6Wrap tape around the center of the rubber band several times. This will be the cradle from which you launch the ink cartridge. Be sure not to tape the rubber band to the crossbow itself. Use tape to make a cradle in the center of the rubber bands.
-
7Wrap a rubber band around the pencils beneath the loading end of the tube. (The loading end is the one where the tube doesn’t line up with the end of the crossbow.) This adds elevation, which will come in handy later. Wrap a rubber band around the pencils beneath the loading end of the tube.
-
8Put the ink cartridge back into the tube so that it's sticking out slightly. If it goes in too far, simply tilt the crossbow to slide it back out. Load the ink cartridge.
-
9Stretch the rubber-band to the end of the tube. Be sure to stretch it to the loading end, not the shooting end. Stretch the rubber ban back towards the loading end.
-
10Grab the ink cartridge, pull it back with the rubber band, and let go. Note that if the ink cartridge is still full, you might actually draw on whatever you shoot at.
-
11Use the top and bottom of the pen for a cap. Hope you have fun shooting.
-
12Finished.
Advertisement
Community Q&A
-
QuestionWhat is the main purpose of the mini crossbow?
 Community AnswerIt's portable and easy to hide so you can probably use it at school without getting caught.
 -
QuestionHow far does a small homemade crossbow shoot?
 Community AnswerIt depends on the amount of force that you put into it, but at maximum force probably about 9-10 feet.
 -
QuestionHow big should the toothpick be?Community AnswerYou should opt for the longest toothpicks you can find.
Advertisement
Warnings
- Do not look into the end of the crossbow while loaded. Use common sense.⧼thumbs_response⧽
- If made poorly, the crossbow won't work well and will be hard to handle.⧼thumbs_response⧽
- Do not take this to school (unless you want to get expelled)⧼thumbs_response⧽
- Do not aim this at people or animals, even as a joke. Accidentally letting go of the rubber band from something as simple as someone bumping into you might cause a serious injury.⧼thumbs_response⧽
- Do not intimidate someone with this. That person could take the crossbow and fire something dangerous at you.⧼thumbs_response⧽
Advertisement
Things You'll Need
- 1 pen
- 4 pencils
- 2 to 4 rubber bands
- Silly bands instead of rubber bands (optional, but very useful)
-
Tape (preferably duct tape)
-
- If you want put a close pin at the end or a binder clipso you can put the bolt back and fire with a trigger
-


About This Article
Advertisement