This article was co-authored by wikiHow Staff. Our trained team of editors and researchers validate articles for accuracy and comprehensiveness. wikiHow's Content Management Team carefully monitors the work from our editorial staff to ensure that each article is backed by trusted research and meets our high quality standards.
This article has been viewed 53,255 times.
Learn more...
Whether it if for a Harry Potter costume or a fairy outfit, one of the most important props you'll need is a magic wand. You can always buy a wand from the store, but they can get very expensive. They also aren't very unique, especially if you want a wand for an original character. While you can always make a wand out of wood, a paper wand is much cheaper and easier to make! Once you know the basics of making them, you can make all sorts of wands!
Steps
Making a Harry Potter Wand
-
1Lay a strip of double-sided tape diagonally across a sheet of paper. The tape needs to go from the bottom left corner to the top right corner. If you need to, cut the tape into smaller pieces first so that it is easier to work with.[1]
- Regular 8½ by 11-inch (21.59 by 27.94-centimeter) paper will work the best for this.
-
2Roll the paper into a tight, tapering tube. Begin rolling the paper from the bottom right corner, and finish rolling at the top left corner. When you reach the taped part, simply roll right over it. Try to roll the paper so that one end is slightly wider than the other. The wider end will be the bottom of your wand.[2]
- Plan on having one end come to a sharp point and the other end to a ¼ to ½-inch (0.64 to 1.27-centimeter) opening.[3]
Advertisement -
3Glue the end of the paper down. Coat the inside of top left corner with liquid glue. Smooth it back down onto the wand. Secure it with a piece of tape or a clip until the glue dries. Once the glue dries, remove the tape or clip.[4]
- You can also secure the corner with a piece of double-sided tape instead of gluing it.
-
4Trim both ends of the wand to make them straight. You can do this with a sharp pair of scissors.[5] If the ends get crushed, you can fill them back out with a skinny skewer or knitting needle.
-
5Fill the holes in with hot glue. Squeeze some hot glue into the tip of your wand. Wait for it to set, then repeat for the bottom. If you need to, stuff the inside of the wand with some rolled up tissue. This way, you won't have to use as much glue. Try to make the glue as smooth as possible.[6]
- For a fancier wand, stick a fancy button or gem into the hot glue before it sets. Do this for the bottom/wider end of the wand only.[7]
-
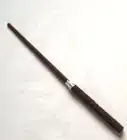
6Create a handle with hot glue, if desired. Coat the bottom 3 to 4 inches (7.62 to 10.16 centimeters) of your wand with hot glue. You can coat the handle with a thick, even layer of hot glue for a neat wand, or you can use messy, vertical lines to make a more rustic wand, like Harry's. You can even create dots, specks, or swirls.[8]
- For a fancier wand, stick fancy buttons or charms into the glue before it sets.
- Not all wands have a handle. The most notable is Hermione Granger's wand.
- Look at pictures of wands from the movies to get ideas.
-
7Decorate the body of the wand, if desired. Squeeze some hot glue around the rest of the wand in a spiral. Start at the top of the handle and finish at the tip. You can even go back down the other way to make a lattice or crisscross pattern.[9]
- You can also glue other items to the body to create texture, such as charms or sequins. Keep in mind that you will be painting over this.
-
8Paint the wand with primer. This is not absolutely necessary, but it will help give you a smoother base for the actual paint. Coat the wand with paint primer. Let it dry, then paint the other side.[10]
- If you added a fancy charm to the bottom of the wand, you can leave it as it is or coat it with primer.
-
9Paint the wand a solid color. To get a wood grain effect, go over the wand with a lighter shade while the paint is still wet. Do this using a stiffer bristle brush, starting from the bottom of the wand and finishing at the tip. Let the wand dry before moving on.
- Most of the wands in the films were brown, but you can use another color as well, such as: black, tan, white, grey, or green.
- If you added an embellishment to the bottom of your wand, you can leave it blank, or your can paint over it.
-
10Add some weathering with watered down black acrylic paint. Use a brush to apply the paint to the handle of your want, then quickly wipe it off with a damp paper towel. You can weather the rest of the wand in a similar fashion, but only work a few inches at a time.[11]
- Don't paint the entire wand, or the paint will dry too fast.
- Use a thin brush or a q-tip and watered down black paint to fill in any gaps, creases, or corners.
-
11Add some highlights with watered down acrylic paint. Mix up a lighter shade of the base color you used for your wand. Dilute it with some water, then use a thin brush to apply it to some of the raised areas on your design. Don't get too carried away, however; you only need a little dab here and there.
-
12Consider adding some shimmer with a rub-on wax finish. Use your finger, a q-tip, or a paper towel to apply gold or silver rubbing wax (ie: Rub n' Buff) to the raised areas of your wand.[12] Gold will work the best for brownish wands, while silver will work better for white or grey wands.
- You don't have to do this, but it can give your wand a nice, magical touch.
-
13Seal the wand. You can use the spray-on kind or the brush on kind. Do one side first, let it dry, then spray the other side. Depending on the type of sealer you are using, you may need one to two more coats. You can use a matter, glossy, or satin finish for your wand.


Making a Fairy Wand
-
1Roll a piece of paper diagonally into a tight tube. Start rolling the paper from the bottom left corner towards the upper right corner. When you are halfway across the sheet of paper, pause, and coat the edges of the paper with glue. You don't have to do this, but it will make the wand sturdier.[13]
- Liquid glue will work the best, but a glue stick or double-sided tape may also work.
- If you don't have time to roll paper into a wand, you can use a paper straw for the wand base instead.[14]
-
2Secure the corner of the paper with glue, then let it dry. Coat the upper right corner of the paper with more glue, then smooth the corner down onto the wand. Secure the corner with tape or a clip until the glue dries. Once the glue dries, remove the tape/clip.[15]
- You can also secure the corner with a strip of double-sided tape instead.
-
3Trim the ends of the wand to make them flat. Use a sharp pair of scissors to do this. If the scissors crush the wand, you can push it back into shape by poking a skewer or knitting needle into it.
-
4Paint the wand, then let it dry. You don't have to do this, but it will make your wand look more interesting. You can paint it with acrylic paint or with spray paint. Paint one side first, let it dry, then paint the other side.[16]
- To make the paint last longer, consider coating the want with sealer. You can use the spray-on or the brush-on kind.
-
5Wrap a ribbon around the wand. Place a drop of glue at the end of the ribbon, then press the ribbon against the tip of the wand. Wrap the ribbon tightly around the wand in a spiral, like on a candy cane. When you reach the end of the wand, cut off the excess ribbon, then glue the end down.[17] You can make the stripes as far apart or as close together as you want.
- Your ribbon can be as thick or as thin as you want it to be. Something between ¼ and ½ inch (6 and 13 millimeters) wide would work the best.[18]
- You can also use colored or patterned washi tape instead of ribbon.[19]
- For something different, decorate the handle with glitter glue inside. Let the glue dry before moving on.
-
6Hot glue a rhinestone to the bottom of the wand, if desired. You don't have to do this, but it will give your wand a nice touch. It will also help cover the hole at the bottom of the wand. If you don't have any rhinestones, you can use a pretty button, charm, or glass gem instead. Choose a small one that is the same width as the bottom of the wand.
-
7Tape several strips of thin ribbon to the top of your wand. Cut several strips of thin ribbon that are at least half the length of your wand. Something between ⅛ and ¼ inch (3.5 and 6 millimeters) wide would work the best. Line the ribbons up along a strip of tape, then wrap the tape around the tip of your wand. Make sure that the ribbons are hanging down the length of the wand and not sticking out of the top.
- Try sheer and/or metallic ribbon for a magical touch.
- Avoid making the ribbons longer than your wand, or they may get tangled.
- You can use curling ribbon. Be sure to curl them with scissors first.
-
8Cut two identical shapes out of cardstock. Use a cookie cutter or a stencil to trace two identical shapes onto a sheet of cardstock. Cut the shapes out with a sharp pair of scissors when you are done. Hearts and stars are great choices, but you can use another shape too.
- If you can't find any cardstock, you can use poster paper, a folder, or even thin cardboard.
- If you are using thin cardboard, use a craft blade to cut the shapes out instead.
-
9Paint the shapes, then let them dry. Unless you already like the color of your cardstock, you will need to paint it. You can use acrylic paint, poster paint, or even spray paint. You only need to paint one side of each shape. The other side will eventually be on the inside of the wand.
- To make the wand last longer, seal the shapes with a clear sealer.
-
10Decorate the shapes, if desired. Here is where you can let your imagination run wild. Outline the shapes with glitter glue. Hot glue a pretty rhinestone in the middle of the shape. Add some sequins in the corners. The possibilities are endless! You can decorate your shapes as much or as little as possible.
- You can make them match or you can make them different.
- Go with a theme. For a mermaid wand, add some seashells!
-
11Glue the first shape to the tip of the wand. Turn the first shape so that the back, plain side is facing you. Draw a vertical line of glue down the center, starting from the middle and finishing at the bottom. Press the tip of the wand into the glue. The wand needs to be halfway inside the shape.[20]
-
12Glue the second shape on top. Coat the tip of the dowel with more glue. Next, draw a thin line of glue around the edges of the first shape. Quickly press the second shape on top. Make sure that the decorated part is sticking out, and the edges line up with the first shape.[21]
-
13Secure edges of the shapes while the glue dries. Use paper clips, clothespins, or binder clips to hold the edges of the shapes together. If any glue leaks out from under the shapes, quickly wipe it away with a damp cloth. Once the glue dries, you can pull the clips off.[22]
- You don't need to secure the shapes in the middle where the dowel is. Doing so may create an unsightly bump.
-
14Finished.


Community Q&A
-
QuestionCan I use school glue?
 Cha0032Community AnswerYou won’t be able to fill in the sides with hot glue, but you can still use your school glue to paste something crafty to block the hole inside the roll of paper.
 -
QuestionDoes the wand really work?
 Community AnswerNo, this is a pretend wand. You can try to perform a spell, but it likely will not work.
 -
QuestionCan I use a glue stick?
 SunPuppyCommunity AnswerIf you use a glue stick, the wand may not stick as well, but if you're sure you can keep the wand still, then you can use it. Otherwise, you'll need stronger glue.
Warnings
- Even if you sealed the wands with sealer, do not get them wet. The paper will get soft and the paint will run.⧼thumbs_response⧽
- Be gentle with these wands. They are made out of paper and can get bent easily.⧼thumbs_response⧽
- These wands are for pretend only. You will not be able to cast any magical spells with these.⧼thumbs_response⧽
Things You'll Need
Making a Harry Potter Wand
- Paper
- Double-sided tape or liquid glue
- Hot glue gun and hot glue sticks
- Brown, grey, white, or black acrylic paint
- Black acrylic paint
- Paintbrushes
- Gold or silver rub-on wax finish (ie: Rub n' Buff)
- Clear sealer
- Embellishments (optional)
Making a Fairy Wand
- Paper
- Glue
- Thick paper
- Paint
- Ribbons
- Tape
- Embellishments (optional)


References
- ↑ http://www.the-leaky-cauldron.org/features/crafts/othercrafts/paperwand/
- ↑ http://www.the-leaky-cauldron.org/features/crafts/othercrafts/paperwand/
- ↑ http://www.nymetroparents.com/article/how-to-make-a-magic-wand-out-of-paper-and-hot-glue
- ↑ http://www.the-leaky-cauldron.org/features/crafts/othercrafts/paperwand/
- ↑ http://www.the-leaky-cauldron.org/features/crafts/othercrafts/paperwand/
- ↑ http://www.the-leaky-cauldron.org/features/crafts/othercrafts/paperwand/
- ↑ http://www.nymetroparents.com/article/how-to-make-a-magic-wand-out-of-paper-and-hot-glue
- ↑ http://www.nymetroparents.com/article/how-to-make-a-magic-wand-out-of-paper-and-hot-glue
- ↑ http://www.the-leaky-cauldron.org/features/crafts/othercrafts/paperwand/
- ↑ http://www.the-leaky-cauldron.org/features/crafts/othercrafts/paperwand/
- ↑ http://www.the-leaky-cauldron.org/features/crafts/othercrafts/paperwand/
- ↑ http://www.the-leaky-cauldron.org/features/crafts/othercrafts/paperwand/
- ↑ https://www.youtube.com/watch?v=37QviTTSQhE
- ↑ http://thepapermama.com/2013/07/4th-of-july-kid-friendly-sparkler-wand/
- ↑ https://www.youtube.com/watch?v=37QviTTSQhE
- ↑ http://www.firstpalette.com/Craft_themes/Wearables/fairywand/fairywand.html
- ↑ https://www.youtube.com/watch?v=37QviTTSQhE
- ↑ http://thepapermama.com/2013/07/4th-of-july-kid-friendly-sparkler-wand/
- ↑ http://thepapermama.com/2013/07/4th-of-july-kid-friendly-sparkler-wand/
- ↑ http://www.firstpalette.com/Craft_themes/Wearables/fairywand/fairywand.html
- ↑ http://www.firstpalette.com/Craft_themes/Wearables/fairywand/fairywand.html
- ↑ http://www.firstpalette.com/Craft_themes/Wearables/fairywand/fairywand.html
- ↑ http://www.nymetroparents.com/article/how-to-make-a-magic-wand-out-of-paper-and-hot-glue
About This Article