X
This article was co-authored by wikiHow Staff. Our trained team of editors and researchers validate articles for accuracy and comprehensiveness. wikiHow's Content Management Team carefully monitors the work from our editorial staff to ensure that each article is backed by trusted research and meets our high quality standards.
The wikiHow Tech Team also followed the article's instructions and verified that they work.
This article has been viewed 26,797 times.
Learn more...
This wikiHow teaches you how to disable your computer's microphone on Windows.
Steps
-
1Find the sound icon on your desktop taskbar. This button looks like a speaker icon in the lower-right corner of your desktop next to the Wi-Fi and battery icons.
-
2Right-click the sound icon. Your options will pop up.Advertisement
-
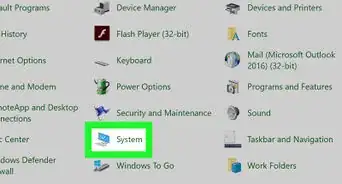
3Click Recording Devices on the right-click menu. This will open your Sound settings in a new window, and switch you to the Recording tab. You can see a list of all your audio input devices here.
-
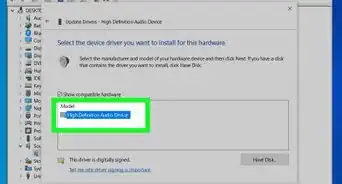
4Right-click your microphone on the list. Your options will pop up on a new menu.
-
5Select Disable on the right-click menu. This option will turn off your microphone, and remove it from the Recording list.
-
6Right-click on the empty space on the Recording list. This will show your list options on a new pop-up menu.
-
7Click and check Show Disabled Devices. When this option is checked, you will be able to see your microphone on the Recording list even though it's disabled.
- You can right-click your disabled microphone here, and select Enable to turn it back on.


Advertisement


About This Article

wikiHow Staff
wikiHow Staff Writer
This article was co-authored by wikiHow Staff. Our trained team of editors and researchers validate articles for accuracy and comprehensiveness. wikiHow's Content Management Team carefully monitors the work from our editorial staff to ensure that each article is backed by trusted research and meets our high quality standards. This article has been viewed 26,797 times.
How helpful is this?
Co-authors: 1
Updated: February 26, 2018
Views: 26,797
Categories: Windows
Advertisement