X
wikiHow is a “wiki,” similar to Wikipedia, which means that many of our articles are co-written by multiple authors. To create this article, volunteer authors worked to edit and improve it over time.
This article has been viewed 64,311 times.
Learn more...
Have a lot of pictures on your computer that you want to put on your iPod? As long as your iPod has a color screen (or you have an iPod Touch), you can copy your photo library over to view your pictures on the go. There are several ways you can do this, from using iTunes, to emailing the images to yourself.
Steps
Method 1
Method 1 of 4:
Using iTunes
-
1Ensure iTunes is up to date. While you shouldn't have any problem performing these steps with most versions of iTunes, updating will typically solve most issues you may encounter. Updating is especially important if you are running a very old version that may not have access to the same features.
- Windows - Click Help → Check for Updates
- OS X - Click iTunes → Check for Updates
-
2Connect your iPod to your computer. Use the USB cable to attach the iPod. Plug it into a port directly on your computer; plugging into a USB hub will generally not provide enough power. If iTunes hasn't been opened yet, it may open automatically.Advertisement
-
3Select your iPod in the Devices menu. If you can't see the sidebar, click View → Hide Sidebar.
- You cannot sync photos with iPods that do not have a color screen.
- If your device does not appear, you may need to put it in Recovery Mode.
-
4Select the Photos tab. This will open the photo sync manager.
-
5Check the "Sync Photos from" box. This will enable you to select pictures from various sources to sync with your iPod.
-
6Select the source. Use the drop-down menu to choose where you want to sync photos from. You can choose from the various photo manager programs installed on your computer, or you can select a specific folder.
- You can sync photos from multiple sources.
-
7Choose which photos to sync. You can have all of the photos from your source synced, or you can manually select photos and albums. Check the box next to each item you want to sync.
-
8Start the Sync. Click Apply to copy the photos to your iPod. You monitor the sync process in the display at the top of the window.


Advertisement
Method 2
Method 2 of 4:
Using a Third-Party File Manager
-
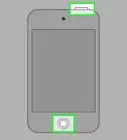
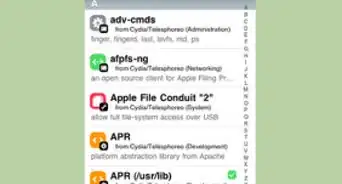
1Download an iOS file manager on your computer. The most popular iOS file manager is iFunBox. This program allows you to import photos directly to your iPod. You will need to have iTunes installed as well, but you don't need to set up any syncing relationships with it. iTunes just allows iFunBox to recognize your iPod.
-
2Connect your iPod to your computer. You should see it appear in the iFunBox window. If it does not appear, ensure that you have iTunes properly installed on your computer.
-
3Select the "Quick Toolbox". In the "Import Files and Data" section, click "Photo Library".
-
4Add files to be sent over. You can add photos by browsing your computer for folders and files, or you can drag and drop them into the iFunBox window. Pictures will be added to your iPod automatically as soon as you add them to iFunBox.
-
5Find your photos on your iPod. Open the Photos app on your iPod. Your photos will appear in the Photo Library album.


Advertisement
Method 3
Method 3 of 4:
Using Email (iPod Touch)
-
1Create an email message to yourself. Use your preferred email program or website and compose an email to your own email address. Make sure it's an email address that you have configured on your iPod Touch. Create the message on your computer so that you attach the images you want.
- If you only want to transfer a few pictures, email may be the easiest method.
-
2Attach the photos you want to copy. Your email service may limit you to 20-25 MB, which means you may only be able to send a few pictures. You can attach files by clicking the "Attachments" button in your email program.
-
3Send the message. Depending on how many pictures you're sending, the message may take a few moments to send.
-
4Open the message on your iPod. Open your Mail app on your iPod Touch. You should see your message in your inbox. Tap it to open it.
-
5Download the images. Tap one of the images from the email message to open it. Press and hold the image, and then select the "Save Image" option that appears. The image will be saved to your Camera Roll, which can be accessed from the Photos app.


Advertisement
Method 4
Method 4 of 4:
Using Disk Mode (Original iPod)
-
1Put your iPod into Disk Mode. This is only possible with iPods with a click-wheel. You can put your iPod into Disk Mode through iTunes or manually.
- iTunes - Plug your iPod into your computer. Select the iPod from the Devices menu. in the Summary tab, click "Enable disk use".
- Manually - Press and hold the Menu and Select buttons for at least 6 seconds. Wait until the Apple logo appears. As soon as the logo appears, release the buttons and then press and hold Select and Play. Hold these buttons until the Disk Mode screen appears.
-
2Connect your iPod to your computer. If you put your iPod into Disk Mode manually, connect it to your computer after Disk Mode has been enabled.
-
3Open the iPod on your computer. If you are using Windows, the iPod will appear as a drive in the Computer/My Computer/This PC window (⊞ Win+E). If you are using a Mac, the iPod will appear as a drive as a desktop.
-
4Copy the photos onto the iPod. Open the "Photos" folder on the iPod. Drag and drop or copy the photos you want into the folder.
-
5Eject the iPod. Once the photos are finished transferring, eject the iPod so that you can disconnect it safely. In Windows, right-click on the iPod drive and select Eject. If you are using OS X, drag the drive to the Trash.


Advertisement
Warnings
- Adding too many photos will lower your capacity for apps and music.⧼thumbs_response⧽
Advertisement


About This Article
Advertisement