This article was co-authored by wikiHow staff writer, Nicole Levine, MFA. Nicole Levine is a Technology Writer and Editor for wikiHow. She has more than 20 years of experience creating technical documentation and leading support teams at major web hosting and software companies. Nicole also holds an MFA in Creative Writing from Portland State University and teaches composition, fiction-writing, and zine-making at various institutions.
This article has been viewed 20,583 times.
Learn more...
This wikiHow teaches you how to delete an Apple device that you no longer want to track from Find My iPhone. If you no longer have access to the device you want to remove, you will have to erase it remotely.
Steps
Disabling Find My iPhone on an iPhone or iPad
-
1
-
2Tap your name. It's at the top of the screen.Advertisement
-
3Tap iCloud. It's the blue cloud icon near the center of the screen.
-
4Scroll down and tap Find My iPhone. It's near the middle of the menu.
-
5
-
6Enter your Apple ID password and tap Turn Off. This disables Find My iPhone for this iPhone or iPad.[1]


Removing a Device you No Longer Own (Using a Computer)
-
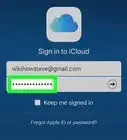
1Sign into https://www.icloud.com. If you've given away or sold an iPhone, iPad, Mac, or Apple Watch, without removing it from Find My iPhone, you remove them now from now using iCloud on the web.
-
2Click Find iPhone. The icon looks like a green radar map. A map will appear displaying the location of all devices tracked by Find My iPhone/Find My Mac.
-
3Click All Devices. It's at the top-center part of the screen.[2]
-
4Click the device you want to remove. The password pop-up will appear.
-
5Sign in with your Apple ID if prompted. Use the username and password associated with the Apple ID you were using with that device.
- Don't enter a phone number or message if prompted to do so. This is only necessary if your iPhone or iPad is actually missing.[3]
-
6Select Remove from Account. Follow the on-screen instructions to complete the removal.
- If you don't see this option, you'll have to click Erase (iPhone/iPad/Mac) first, and then follow the on-screen instructions to delete the data remotely. Once the device is erased, click Remove from Account.
- If you have to erase the device remotely but it's not turned on (or it's offline), the erase will begin the next time the device connects to the internet.[4]


Removing a Device you No Longer Own (Using an iPhone/iPad)
-
1Open Find iPhone on your iPhone or iPad. It's the white icon with a round green radar icon inside. You'll usually find it on the home screen.
- You will need to be signed into Find My iPhone using the same Apple ID you used to sign into the device you're removing. If you're signed in with a different account, tap Sign Out at the top-right corner, select Sign Out, and then sign in with the right account.
-
2Tap the device you want to remove. The list of devices appears below the map at the bottom of the screen.
-
3Tap the device on the map. If the previous action zoomed into the device on the map, tap the device now. If not, skip to the net step.
-
4Tap Remove from Account. It's below the icons at the bottom of the screen. Follow the on-screen instructions to remove the device.
- If you don't see this option, you'll have to tap Erase (iPhone/iPad/Mac) first (the trash icon at the bottom-right corner), and then follow the on-screen instructions to delete the data remotely. Once the device is erased, tap Remove from Account.
- If you have to erase the device remotely but it's not turned on (or it's offline), the erase will begin the next time the device connects to the internet.[5]


Disabling Find My Mac
-
1Click the menu. It's at the top-left corner of your Mac's home screen.[6]
-
2Click System Preferences.
-
3Click iCloud. You may be asked to sign in to iCloud using your Apple ID and password here.
-
4De-select "Find My Mac." A pop-up password will appear.
-
5Enter your Apple ID password and click Continue. Your Mac's location will no longer be tracked.


References
About This Article

1. Open Settings.
2. Tap your name.
3. Tap iCloud.
4. Tap Find My iPhone.
5. Toggle off the switch.