This article was co-authored by wikiHow Staff. Our trained team of editors and researchers validate articles for accuracy and comprehensiveness. wikiHow's Content Management Team carefully monitors the work from our editorial staff to ensure that each article is backed by trusted research and meets our high quality standards.
There are 18 references cited in this article, which can be found at the bottom of the page.
This article has been viewed 4,914 times.
Learn more...
It may seem cheesy, but getting a new stove is actually really exciting! Just think about all the new things you’ll be able to cook. Plus the brand new appliance will make your kitchen look clean and sharp. The best part is, it’s actually not even that difficult to install. With just a wrench, you can do all of the work yourself. Just make sure you hook it up correctly so your new oven is installed safely.
Steps
Choosing a New Stove
-
1Measure the stove space with a ruler or tape measure. Take a ruler or tape measure and stretch it across the width of the gap in the counter space where your stove sits. Then, measure the length from the wall to the front edge of your counter. Finally, measure the height of your current stove. Write down your measurements to make sure you choose a stove that fits neatly into place.[1]
- If you have your old stove’s owner’s manual, flip through it to see if you can find its measurements. You can also try looking up the make and model online to use the exact measurements.
-
2Replace your stove with the same size and type for a simple option. Stoves actually tend to come in standard sizes, so if you choose a new stove that’s the same size as your old one, it should fit into place without any problems. Just make sure the measurements match exactly.[2]
- For example, the most common size for a stove is 30 inches (76 cm) wide, 36 inches (91 cm) high, and 25 inches (64 cm) deep. If your old one matches these specs, all you need to do is choose a new one that matches.
- Make sure you choose the same type as well! If your old stove is electric, don’t choose a new gas one, for example.
Advertisement -
3Choose an appropriate power cord if your stove is electric. New electric stoves don’t come with a power cord, so you’ll need to purchase one that fits your new stove. Look at the receptacle in your kitchen to see if you have a 3 or 4-prong plug. Then, check the product description of your new stove and choose a cord that will fit into it.[3]
- You may not be able to simply re-use your old stove’s power cord, so double check to make sure.
-
4Avoid trying to switch from electric to gas without a professional. If you’re planning to switch from an electric stove to a gas one, hire a plumber to install the gas line and an electrician to modify the electrical circuit. Don’t try to do these jobs on your own so you can be sure they’re done right and up to code.[4]
- An improperly installed gas line could have explosive consequences. Leave it to the pros to be safe.


Removing the Old Stove
-
1Slide the oven out from against the wall. Open up the oven door of your stove and get a good grip on the upper lip. Carefully pull the oven away from the wall far enough so you can get behind it and access the wiring and lines in the back.[5]
- Try not to yank or jerk the stove. Instead, gently slide it out of place.
- It can help to wiggle the stove from side to side to move it out of place.
-
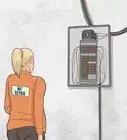
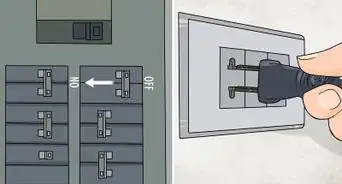
2Unplug the stove and shut off the gas valve if it has one. Reach behind the stove and pull the plug out from the wall outlet. If you have a gas stove, locate the gas line on the wall. Turn the valve on the gas line to the right to shut off the gas supply.[6]
- Turn the gas supply valve as far as it goes to make sure it’s fully shut off. You don’t want to have a gas leak while you’re working.
- If you have an electric stove, there won’t be any gas lines to shut off or disconnect, so you can just skip that part.
-
3Use a wrench to disconnect the gas line from the stove if you have one. Locate where the gas line connects to the back of your stove. Clamp the connector with a wrench and turn it counterclockwise to loosen and disconnect it.[7]
- Leave the gas line nearby so you can reconnect it to your new stove.
- Once your stove is disconnected, you can pull it out completely and dispose of it.
-
4Recycle or contact a junk removal company to get rid of your old stove. Appliances like stoves need to be properly disposed of. Search for recycling centers near you that accept stoves or contact a junk removal company that will come to your home to pick it up.[8]
- Some junk removal companies may come pick up your old stove for free because they can salvage or resell it.
- If you’re in the US, you can look for recycling centers near you by visiting: https://www.recyclingcenternear.me/recycle-appliance-near-me/.


Installing a Gas Stove
-
1Unpackage your new stove but leave the material attached. Remove the outer boxing of your new stove as well the exterior plastic wrapping so you can connect it. Leave the interior wrapping and packaging so the racks don’t slide around while you install the stove.[9]
- Don’t worry, you can easily remove the rest of the packaging once you’re all set up.
-
2Connect the gas line to the stove and turn the gas on. Locate the gas connector valve on the back of your new stove. Screw on the end of the gas supply line to the gas connector and use a wrench to tighten it. Then, turn on the gas supply by turning the control valve to the left.[10]
-
3Brush soapy water on the gas line connections to check for leaks. Fill a small cup with warm water and add a few drops of dish soap to it. Use a paintbrush to mix the water so it’s nice and soapy. Spread a thin layer of the soapy water onto the connectors of both ends of the gas line. If there are any bubbles, it means there’s a leak and you need to tighten the connectors some more.[11]
-
4Plug the stove into the wall outlet and slide it into place. Take the stove’s plug and connect it firmly to the wall outlet to supply power to it. Then, gently slide the stove into place so it fits nice and neat.[12]
- If you want, you can attach felt furniture pads to the corners on the bottom of the stove so it slides more easily and won’t scratch your floor.
-
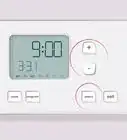
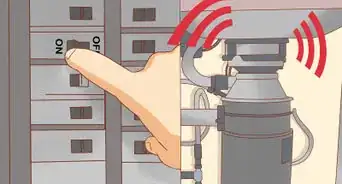
5Turn on the stove to make sure it’s working. Check the clock and electronics to make sure the stove has power. Turn on a burner and wait to heat up if you have an electric stove. If you have a gas stove, test 1 of the burners, but keep in mind it may take a few moments for the gas lines to flush and provide gas to the burner. If the stove is working, you’re all set![13]
- You should also hear a clicking sound when you activate the starter for the burner. If you don’t, it means the stove may not have power. Check to make sure it’s plugged in.


Connecting an Electric Stove
-
1Use a screwdriver to open the access panel on the back of the stove. Find your stove’s access panel on the backside. It’s usually located on the bottom corner or in the center. Use a screwdriver to remove the screw holding the panel in place so you can access it.[14]
- Some stoves may have 1 or 2 screws that need to be removed. Make sure you don’t lose the screws!
- Do not plug in the wire into your wall outlet until you’re done connecting it to your stove.
-
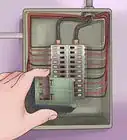
2Remove the lower screws from the terminal block. In the access panel, look for the 3 terminal blocks. Find the lower screws and use your screwdriver to remove them so you can connect your leads (the ends of your wires).[15]
- These tiny screws are super important. Place them somewhere you won’t lose them so you can reconnect them later.
-
3Slide the wires beneath the stove into the access panel. Snake your stove wire beneath the stove and up into the access panel. Position the leads so they’re in line with the terminal block. Make sure your wire isn’t bunched up or stretched too tight.[16]
-
4Screw the wires to the terminal block. Attach the center wire to the center terminal so your neutral is connected.[17] Then, place the remaining leads to the remaining terminal blocks. Replace and tighten the screws to hold the wires in place.[18]
- The left and right leads are actually interchangeable.
- It’s very important that you connect the center wire to the neutral terminal block. Otherwise, it could be a fire hazard.
-
5Replace the access panel, plug in the stove, and turn it on to test it. Place the access panel back into position and install the screws to hold it securely. Plug in the other end of your stove’s wire into the wall outlet. Then, turn on the range to test it and make sure it’s heating up and functioning.[19]


Warnings
- Gas leaks can cause fires, so use caution whenever you’re disconnecting or reconnecting the gas line.⧼thumbs_response⧽
- Do not plug in your electric stove until you’ve finished connecting the power cord.⧼thumbs_response⧽


References
- ↑ https://www.remodelista.com/posts/what-to-know-when-replacing-range-stove-oven-remodeling-101/
- ↑ https://www.remodelista.com/posts/what-to-know-when-replacing-range-stove-oven-remodeling-101/
- ↑ https://youtu.be/zzk7QUKqfEs?t=14
- ↑ https://www.bobvila.com/slideshow/13-home-improvements-that-are-illegal-to-diy-49321
- ↑ https://youtu.be/O-hJJL5TtuY?t=45
- ↑ https://youtu.be/b8F9fFjWDI4?t=113
- ↑ https://youtu.be/b8F9fFjWDI4?t=134
- ↑ https://www.recyclingcenternear.me/recycle-appliance-near-me/
- ↑ https://youtu.be/b8F9fFjWDI4?t=35
- ↑ https://youtu.be/TwPuMr-DVWQ?t=431
- ↑ https://youtu.be/TwPuMr-DVWQ?t=447
- ↑ https://www.ahs.com/home-matters/repair-maintenance/how-to-replace-gas-stove/
- ↑ https://youtu.be/b8F9fFjWDI4?t=303
- ↑ https://youtu.be/zzk7QUKqfEs?t=82
- ↑ https://youtu.be/zzk7QUKqfEs?t=155
- ↑ https://youtu.be/zzk7QUKqfEs?t=285
- ↑ https://youtu.be/zzk7QUKqfEs?t=248
- ↑ https://youtu.be/KgPt9AmFDPM?t=141
- ↑ https://youtu.be/KgPt9AmFDPM?t=204
About This Article