This article was co-authored by James Hornof. James Hornof is a Master Electrician and the Owner and President of B & W Electric based in Denver, Colorado. With over two decades of experience in the electrical construction industry, James specializes in field installation, management, estimating, and design. He graduated top of his class in electrical trade school and studied Business Management at The Community College of Denver. James holds a Master Electrician license in Colorado, Wyoming, and Texas.
This article has been viewed 1,058,115 times.
All fluorescent light fixtures consist of at least lamp(s), lamp holders, ballast and internal wiring. Some older types have "starters", too. The ballast is used to create the voltage and current necessary to start and illuminate the fluorescent lamp. In time, the ballast may need to be replaced. Read on to learn how to swap out the old with an approved replacement ballast of the same technology. Please read the entire article and warnings before attempting.
Steps
-
1Before you go to the trouble of replacing the ballast, you should determine if a bad ballast is indeed the likely cause of the problem. First, replace the tubes with new tubes or with tubes that you know are good. Usually, if the lamps have turned black at one or both ends, they are bad, but the only way to know for sure is to replace them with good ones. Note, however, that fluorescent lamps generally burn out gradually over time, not suddenly. If all of the tubes in a fixture stop working abruptly at the same time, it's likely that the problem is not the tubes.
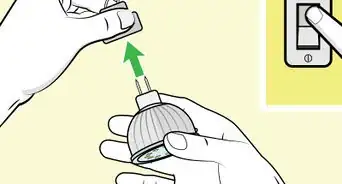
If replacing the tubes does not fix the problem and if the light fixture has one or more "starters" (found only in older fixtures), replace the starters. There will be one starter per lamp (tube). The starter is a small cylindrical part (3/4-inch (20 mm) diameter x 1 1/4-inch (30 mm) long) that is twisted into a separate socket, usually located near the end of the fixture or behind a lamp. Starters are very inexpensive (about $2 each) and easy to replace. It is difficult to determine if starters are functional merely by inspecting them visually. Swap with a new or known "good" starter to check. If changing the tubes and starters does not correct the problem, the most likely culprit is the ballast.
-
1
-
2Remove the lamps and place them in a safe location.
-
3Turn the light off at the switch, as well as at the circuit breaker. (If you are not sure which breaker operates the light, shut off the whole house breaker to be safe.) Turn the metal tabs near the center of the fixture perpendicular to its length. It will fall away from the fixture. Pull it toward you and store it in a convenient place. Do the same with the other side.[2]
-
4Before you cut any wires, it is recommended that you check both the hot and neutral feed wires for voltage with respect to ground. (And see the alternative to cutting in step 11 before doing any cutting.) The voltage can be checked with a simple voltmeter or voltage sensor. Locate the ballast and follow the wires until you find the wire nuts (caps) that connect wires of the same color (red to red, etc.). If there are no wire nuts, you will have to cut the wires about 12 inches (30 cm) (300 mm) from the center of the fixture on each side. Complete this until all wires are cut or all wire nuts are removed.[3]
-
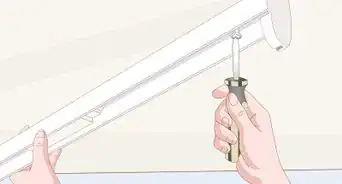
5Unscrew the nut holding the ballast to the fixture while holding it in place with your other hand. This is best done with a nut driver or socket wrench. Remove the ballast by lowering the side held by the nut, and sliding it in that direction.[4]
-
6Take the ballast with you to your local home center or hardware store and purchase a like replacement. Note the number of tubes in your fixture and their wattage, length, type (T8, T12, T5, etc.). Note also there may be two ballasts in a four-tube fixture, each ballast running two of the tubes.
-
7Install the replacement ballast by reversing the instructions in step 5. Be sure the red and blue wire face the end with red and blue wires, and the black and white wires face the other end.
-
8If you opt for the cutting method, cut the wires so they overlap the fixture wires by about 6 inches (15 cm) (150 mm).
-
9Strip about 1/2" (12 mm) of insulation from the ends of all 8 of the wires.[5]
-
10Use a wire nut to connect the blue wire to the blue wire, the red to the red, the white to the white, and the black to the black. As a quick and easy alternative to cutting and wiring, simply rotate and pull the wires out of the lamp connectors. A little back and forth rotation (in the manner of a screwdriver) suffices, but is necessary otherwise the wires won't come out. Make a note of the wire colors when you pull them out. To connect the new ballast, simply push the wire into the hole from which you pulled the old wire out and give the wire a tug to make sure it's seated firmly, the same method as used at the factory.
-
11Reverse step 3. Make sure the tabs are in the holes at the end of the fixture.
-
12Replace the new lamps.
-
13Turn on the light.


Community Q&A
-
QuestionThe old ballast has three wires, red, black, and white. The new ballast has 5 wires, red, black, white, and two blue. How do I wire in the new ballast?
 Community AnswerMost likely that is a different generation of ballast. Cap the two blue wires and install the red, black, and white as usual. It should work fine.
 -
QuestionMy fluorescent light fixture sometimes turns on and then sometimes won't. How do I fix that?Community AnswerIf it has a starter (a small aluminum-looking cylinder that screws in below the bulb), replace that. If not, replace the ballast.
-
QuestionIf only one light works in a fixture, is the ballast bad?
 Community AnswerProbably not. If the fixture is a 2 tube fixture, it is probably a single bad tube. If both the tubes are old, you might consider replacing both of them with newer, slightly lower wattage ones to save electricity. For example, if they are 40 watt, try some 32 watt tubes..
Warnings
- Select a ballast that has either the exact same part number or is a direct replacement based on type (electronic or electromagnetic technology) input voltage, number and type of lamps, wattage and if desired, sound rating. Additionally, both magnetic and electronic ballasts often come in either "Rapid Start" (a/k/a Programmed Start or "PS") or "Instant Start" ("IS") versions. Your choice should be determined by how the fixture is primarily used, i.e., if most always left on for 10+ hours at a time choose "IS" which is slightly more energy efficient of the two starter types, but if frequently turned off and on, use a "Rapid Start" for longer bulb and ballast life.⧼thumbs_response⧽
- When working on any electrical components it is recommended that you wear non-conductive shoes, stand on a piece of plywood, or use a wooden ladder. Do not lean or touch conductive surfaces while working on the circuit. If you are unsure if the circuit is hot or you must work on a hot circuit, use one hand only, stick the other in your back pocket. Use a voltmeter or preferably a voltage sensor to ascertain the voltage on all colors of wire in the box or circuit with respect to ground.⧼thumbs_response⧽
- If retro-fitting a new electronic ballast for a failed magnetic ballast, the new ballast may require new energy efficient lamps - and new holders sized to fit pins of the lamp. The old lamp holders may not support the new lamps, and the new ballast may not light the old lamps. Given the amount of time and money to be spent on this retro fit, it may be advisable to either replace the failed ballast with the same electromechanical technology or replace the entire fixture altogether.⧼thumbs_response⧽
- If pursuing a retrofit, schematic reading skills will be required. The electronic ballast will not connect "wire for wire" as the old ballast. It is most imperative that the schematic on the new ballast be followed exactly. Check for lamp type supported by the ballast (likely T-8 type), and purchase lamp holders to fit lamps. If additional wire is needed between ballast and lamp holders, be sure the added wire is the same size and type insulation as the wire at the ballast. This will prevent overloading and fire hazard. Wire nuts (if needed) must be selected based on the size and number of wires being connected to one another.⧼thumbs_response⧽
- Properly recycle spent fluorescent lamps. All fluorescent lamps contain mercury (even the supposed "environmentally friendly" types with the green end caps), and care should be taken to prevent breakage.⧼thumbs_response⧽
- A fluorescent fixture should never be in contact with combustible materials, due to the heat created by the ballast. Provide 1 inch (2.5 cm) (25 mm) of air space between the fixture and any combustible materials to reduce fire hazards.⧼thumbs_response⧽


References
- ↑ https://www.youtube.com/watch?v=3TLbr7CUpC4
- ↑ https://www.youtube.com/watch?v=E456CwPq1sI
- ↑ https://www.youtube.com/watch?v=3TLbr7CUpC4
- ↑ https://www.familyhandyman.com/electrical/fluorescent-light/how-to-replace-a-fluorescent-light-ballast/
- ↑ https://www.familyhandyman.com/electrical/fluorescent-light/how-to-replace-a-fluorescent-light-ballast/
About This Article

To safely replace the ballast in your fluorescent light, turn off the lamp, remove it, and check the voltage of the feed wires with a voltmeter. Then, use a nut driver to unscrew the nut holding the ballast in place and install the replacement ballast. Insert the red, blue, black and white wires in their corresponding holes, screw the nut back in place and replace the lamp. For advice on additional safety tips, as well as a method using wire cutting, read on!