This article was co-authored by wikiHow staff writer, Jessica Gibson. Jessica Gibson is a Writer and Editor who's been with wikiHow since 2014. After completing a year of art studies at the Emily Carr University in Vancouver, she graduated from Columbia College with a BA in History. Jessica also completed an MA in History from The University of Oregon in 2013.
There are 11 references cited in this article, which can be found at the bottom of the page.
The wikiHow Video Team also followed the article's instructions and verified that they work.
This article has been viewed 9,012 times.
Learn more...
If you need a costume quick, make bat wings! For durable wings, cut fabric pieces and use your sewing machine to attach them to a long-sleeved black shirt. If you're looking for an even faster, no-sew option, cut a large piece of fabric into a bat wing shape and make slits near the top. All you have to do is slide the wearer's arms through the slits and flap away.
Steps
Sewing Bat Wings to a Shirt
-
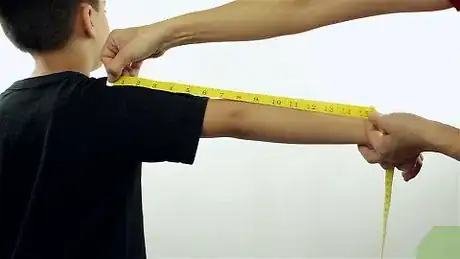
1Measure the length from your shoulder to wrist. To determine how much fabric you'll need for the wings, hold the end of a measuring tape at your shoulder. Pull out the tape while you stretch your arm out and away from your body. Then, measure the distance from the shoulder to your wrist.
- Double this measurement to determine how much black fabric to buy.
-
2Cut the fabric in half and stack the pieces under the sleeve of a shirt. Take a piece of black fabric that's twice as long as your shoulder-to-wrist measurement and cut the fabric in half crosswise. Stack the 2 pieces on top of each other and lay a long-sleeved black shirt on 1 side of the fabric so the shirt overlaps by about 12 inches (30 cm). Spread out the sleeve to create a 90-degree angle with the side of the shirt.[1]
- Use felt or spandex fabric since it won't fray and you won't need to hem the edges of your bat wings.
Advertisement -
3Draw a line on the fabric to mark the side and sleeve of the shirt. Take a piece of chalk and mark a straight line on the fabric from the armpit of the shirt down the side. Place the chalk back at the armpit and continue the line along the bottom seam of the sleeve. Then, mark where the sleeve and bottom of the shirt end.[2]
- If your lines are uneven, go back over them with a ruler.
-
4Mark a 1⁄2 inch (1.3 cm) seam allowance. Remove the shirt and line up a ruler with 1 of the chalk lines. Move it 1⁄2 inch (1.3 cm) towards the inside edge of the fabric. Then, draw another chalk line to create the seam allowance. Repeat this for the other line on the fabric.[3]
-
5Draw a scalloped line from the endpoints of your bat wings. Place your chalk at the endpoint you marked for the side seam. Make a scalloped line up towards the opposite endpoint so the points point away from the center of the bat wing. Stop drawing the scalloped line when you reach the seam allowance.[4]
- To make lots of points on the wings, make about 5 or 6 scallops. For larger scallops with fewer points, draw 3 scallops.
- If you need help making the scalloped shapes, lay a round plate on the fabric and trace around half of the plate to make a scallop. Use a small dessert plate if you're making small wings for a kid.
-
6Cut out the stacked fabric along the seam allowance line and scalloped line. Use scissors to carefully cut the straight seam allowance lines. Then, cut along the scalloped line. Remember to cut through both layers of fabric so you end up with 2 bat wing pieces.[5]
- If you prefer, cut just 1 fabric piece. Then, place it on the second piece of fabric and trace around it before cutting it out.
-
7Pin the straight edges of the bat wing to the side and sleeve of the shirt. Lay your long-sleeved black shirt flat and position 1 of the bat wings so the straight edges line up with the side seam of the shirt and the seam at the bottom of the sleeve. Match the original lines with the shirt seams instead of the very edge. Use sewing pins to secure the bat wing in place and repeat this with the opposite bat wing.[6]
-
8Straight stitch each wing to the side and sleeve of your long-sleeved shirt. Adjust your sewing machine to make a straight stitch and sew along the straight side of the shirt. Lift the presser foot up and turn the shirt so you can sew the straight line across the bottom of the sleeve. Remember to leave a 1⁄2 inch (1.3 cm) seam allowance.[7]
- If you don't have a sewing machine, you can stitch the wings to the shirt by hand.
Variation: If you don't want the seam to be visible on the back of your wings, you can rip out the seams along the side and sleeve of the shirt. Turn your shirt inside out and slide the wings into the shirt so the edges of the wings line up with your shirt. Then, zig zag stitch along the seams you ripped before turning the shirt right side out.
Making No-Sew Bat Wings
-
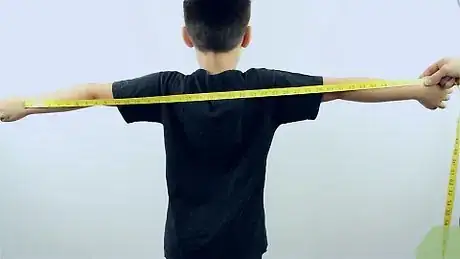
1Measure how long to make the wingspan. Ask the wearer to spread their arms out from their sides and pull a measuring tape from 1 wrist to the other to determine the wingspan. If you're making the wings for yourself, spread your arms out and ask a friend to measure from wrist to wrist.[8]
-
2Get out 1⁄2 to 2 yards (0.46 to 1.83 m) of black fabric and fold it in half widthwise. If you're making child-sized bat wings, get out around 1⁄2 yard (0.46 m) of fabric. Most adult measurements take closer to 2 yards (1.8 m). Lay the fabric out on a flat surface and fold it in half widthwise.[9]
- Keep in mind that you can use any black fabric that you like, but the edges may fray if you use woven material. If you don't want the wings to fray, choose felt or spandex.
-
3Use chalk to draw scallops from the folded corner towards the diagonal corner. Keep your fabric folded and make a scalloped line that starts at the bottom of the folded line. Draw the scallops so the points point away from the folded line. Make the scalloped line curve out and then taper as you get close to the diagonal corner. Stop drawing the scallops about 4 inches (10 cm) from the top corner.[10]
- You can skip this step if you'd like to cut the scallops without a guide or you could trace around the edge of a round place if you'd like extra guidance. Use a small dessert plate if you're making small wings for a child.
Tip: Make the scallops as deep or shallow as you like. Keep in mind that deep scallops create more noticeable points. To make lots of points, draw 5 or 6 scallops. For larger scallops, make 3 scallops.
-
4Cut the scalloped line with sharp scissors. Carefully cut along the scalloped line so your scissors cut through both layers of fabric. Discard the excess fabric or save it to make accessories for your bat costume.[11]
- Don't worry if the scallops aren't exactly the same size. Cutting slightly irregular scallops gives your bat wings a unique look.
-
5Unfold the fabric and cut 2 vertical slits near the end of each wing. Lay the wings so they're flat and outstretched. Take your scissors and cut a vertical slit about 3 inches (7.6 cm) from the end of a wing. Make the slit long enough so you can slide your arm or the wearer's arm through it. Then, make an identical slit 5 inches (13 cm) towards the center. Repeat this for the other end of the wings.[12]
- If you're unsure how long to make the slits, start with a short slit and try on the wings. You can keep cutting the slit until it's long enough to easily slide the wearer's arm through.
-
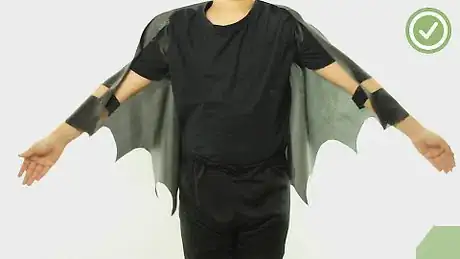
6Slip the wearer's arms through the slits to wear the bat wings. Put on a black shirt and slide 1 arm through the slits at 1 end of the wings. Grab the other end of the wings and slide the opposite arm through the slits at the other end so the wings drape across your back. Keep slipping the wearer's arm through until the end of the wings are positioned at your wrists.[13]
- You can wear your wings with a black dress, a bat mask, or a headband with bat ears.
- If the center of the bat wings slips down on your back, use a safety pin to secure it to the neckline of your shirt.
Things You'll Need
Sewing Bat Wings to a Shirt
- Measuring tape
- Long-sleeve black shirt
- Scissors
- Sewing machine
- Black thread
- Ruler
- Sewing pins
Making No-Sew Bat Wings
- Measuring tape
- 1⁄2 to 2 yards (0.46 to 1.83 m) of black felt or fabric
- Chalk
- Scissors
- Black shirt
References
- ↑ https://youtu.be/AyyApUgZQEs?t=284
- ↑ https://youtu.be/AyyApUgZQEs?t=305
- ↑ https://youtu.be/AyyApUgZQEs?t=334
- ↑ https://youtu.be/AyyApUgZQEs?t=359
- ↑ https://youtu.be/AyyApUgZQEs?t=394
- ↑ https://youtu.be/AyyApUgZQEs?t=463
- ↑ https://youtu.be/M7c8ey73rYY?t=185
- ↑ https://youtu.be/Ymo-62E22wc?t=20
- ↑ https://www.pbs.org/parents/crafts-and-experiments/no-sew-wild-kratts-costume
- ↑ https://youtu.be/Ymo-62E22wc?t=52
- ↑ https://mediaplayer.whro.org/program/crafts-kids/e/crafts-kids-no-sew-wild-kratts-bat-costume
- ↑ https://mediaplayer.whro.org/program/crafts-kids/e/crafts-kids-no-sew-wild-kratts-bat-costume
- ↑ https://www.pbs.org/parents/crafts-and-experiments/no-sew-wild-kratts-costume
